G
Guest
Guest
Mark .And half of us need glasses so probably can't see bugger all properly anyway :tongue-out3:
Along with those with one good eye and the other covered up ! Doesn't look good for me then .:nerd:

Mark .And half of us need glasses so probably can't see bugger all properly anyway :tongue-out3:
So on the basis of this discussion we can come to the conclusion that most modellers are verging on adding a white stick to the toolkit :smiling5:Mark .
Along with those with one good eye and the other covered up ! Doesn't look good for me then .:nerd:

Well, it comes in handy when mixing the paint :thumb2:So on the basis of this discussion we can come to the conclusion that most modellers are verging on adding a white stick to the toolkit :smiling5:
I'd like to say you've got be kidding....Some of them even tried to compensate for the thickness of the paint film when building a model…..utter lunacy :money-face:
Mate, some of them even calculated the bend angle required for etched brass so they could over bend then file the corner back to a right angle…..mind you, we did work to a track gauge of 18.83mm, but that was set by width gauges not measured….I’ve still got mine LOL….I'd like to say you've got be kidding....
You should know by now - if you know the answer, then do not ask the question, it unlocks the loony side of the forum.Oh God What Have I Unleashed .....?
Best way tio unscrew a universal joint.Love it
What was this topic about ? :angry:
Its confused and trying to find its way here....WHERE'S MY DAMN "CONFUSED" REACTION EMOJI ?
Where's the tool kit????So on the basis of this discussion we can come to the conclusion that most modellers are verging on adding a white stick to the toolkit :smiling5:
Correct, it is not quantifiable , it is art and art cannot be judged by purely quantifiable measures. It is all about what looks right to you.No more flippant comments from me.
It really does seem to come down to the individuals perception of 'perception'. Personally, my modelling skills are nowhere near the point that I need to consider such things. I'm just glad if everything gets painted and there's not too much glue splodging out.
My over all opinion is this though. Yes, models are smaller than the real thing, but the way that they are presented to observers is either in close up photographs or first-hand where one can get up close to have a look using whatever eyesight enhancing equipment we need, if necessary. For the most part the model will fill our view. If that's the case, surely the scale thing becomes less relevant.
Or not.
I'm really not sure & don't see how one can actually quantify any shading/colour change that might needed. If it's un-quantifiable, then it comes down to personal opinion.
/ And for that reason, I'm out.
I'll have one of those, and raise you two 'do it how you feel'.Doe's it really matter does anybody honestly care , I don't lose sleep over it ,no one gets hurt ,I dont need to put my face of concern on , I've got better things to do than worry that there's a rivet missing or thoes are the wrong wheel nuts , let alone some saddo trying to tell me (us) that green doesn't look Iike that in what ever scale let's bash on with what we like doing best and flip them the bird.
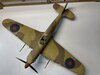
From the point where an aircraft leaves the factory in a pristine state to the eventual disposal/destruction, the external paint colours go through all kinds of tonal change due to usage, weather, oil, etc., and maybe even a respray (or two) on the way. Some aircraft are even restored after their initial lifespan to be used again as flying machines or static museum displays. You won't see any aircraft at the Shuttleworth Collection in a heavily weathered condition.
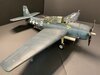
So my point is that as a modeller you decide what sort of condition you are going to portray your efforts. As I display all of my models in a glass shelved cabinet, heavily weathered models look odd to me. So I opt for cart down, cockpit open (if kit allows), no pilot, and 'museum' type finish. If I were to build a diorama, my models would look quite ridiculous in one done that way (unless portrayed at the factory hanger door). Diorama realism requires appropriate weathering, some engine exposure perhaps and paint finishes that match the setting. For models depicted as flying then it's cart up, no prop blades, a well painted pilot and optional paint/weathering conditions.
It all gets back to one simple criteria. If you're happy with your work then it's been done well. For what it's worth I've built well over a 100 models and I'm yet to build one that I was 100% happy with. That's what keeps me trying ...

scalemodelling.co.uk is a privately operated online discussion forum. All content posted by members reflects their own views and opinions and does not necessarily represent those of the forum owners or administrators. While reasonable efforts are made to moderate content, no responsibility is accepted for user-generated material. By using this site, you agree to comply with UK law and the forum rules.