Theme editor

Scale Model Shop

Italeri 1:48 Hawker Hurricane

Status
Not open for further replies.

colin m

Moderator
Staff member
Moderator
Joined
Dec 26, 2008
Messages
9,113
Reaction score
381
Points
83
Location
Stafford, UK
1/3
Thread owner
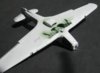
I've been quiet on the forum, but not idle. I've made a start on te Italeri Hurricane. I haven't bothered with a proper WIP, as it's been built at least twice on the forum already. And just like other builds, I've come accross a few problems. More of them later.

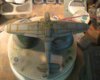
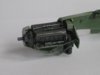
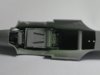
First, the engine. It's not too bad, and I'll probably leave the 'lower quarter engine panel' off.

View attachment 47115

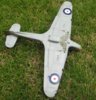
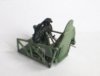
The cockpit is alright. Italeri provide a PE harness.

View attachment 47116

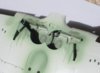
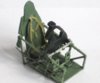
The instrument panel is made up of a decal (which needs to be chopped up to help alignment) and kit provided PE

View attachment 47117

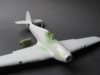
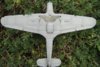
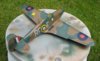
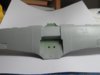
So, onto the problems.When trying to get the fuselage and wing assemblies to align, it became obvious that the fuselage was sitting on, and making contact with, the wheel well. No problem, I'll just sand it down a bit, and more and more until it got so thin I didn't dare go any further.

View attachment 47118

View attachment 47120

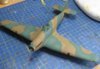
So the only option open to me now was to reduce the cockpit floor, by lots ! At the same time the fuselage sides were spread a touch (the sprue bar) to fill the wing roots, which worked well.

View attachment 47119

Now the fuselage and wings are together (no pic) it's not looking too bad. The next known problem to tackle is the gun ports on the wing leading edge, a trial fit shows, well, that they don't fit.

Remember folks, this is a new mould kit !

View attachment 50093

View attachment 50094

View attachment 50095

View attachment 50096

View attachment 50097

View attachment 50098

View attachment 163119

View attachment 163120

View attachment 163121

View attachment 163122

View attachment 163123

View attachment 163124
 

Attachments

  • Engine.jpg
    Engine.jpg
    1.5 KB · Views: 0
  • Wheel well.jpg
    Wheel well.jpg
    2.2 KB · Views: 0
  • Cockpit floor and bar.jpg
    Cockpit floor and bar.jpg
    1.6 KB · Views: 0
  • Wheel well upper side.jpg
    Wheel well upper side.jpg
    2 KB · Views: 0
  • IP.jpg
    IP.jpg
    1.6 KB · Views: 0
  • PE harness.jpg
    PE harness.jpg
    2.2 KB · Views: 0
Looks like you have your work cut out, but I have every confidence you will overcome them, good start anyway. Cheers Derek
 
Good stuff.There's nothing like a kit that fights back to keep you on your toes.

Cheers

Steve
 
Glad it wasn't just me with those problems Colin. Restored my faith now lol
 
Dave. It is a lovely detailed kit but for such a new mould kit, it shouldn't have the problems it does (imho)
 
On second thoughts i probably will get one.Even with the problems mentioned its still got to be better than the old Airfix kit.
 
Looking good Colin, despite all the difficulties. Keep at it that man!

Be interesting to see how my 1/48 Hasegawa kit fares (not good enough to build it yet maybe in another year)

Regards

Chris
 
Thread owner
So the Hurricane is finally ready for a bit of paint. Despite the well known problems, it's now all together, with just a bit of filler in places to tighten some gaps up. And the important thing is, it looks quite good. It seems to be in the correct proportions, the surface detail looks very pleasing now all the bits are stuck together.

The engine cover wasn't a great fit, but that was totally my fault. Whilst playing around trying to get it in place, I realised why it wouldn't fit, my engine was slightly twisted out of place. This is a bit strange as I know I checked all the alignment many times, but somehow, there it was twisted. It only became obvious when I test fitted the manifolds, one was up and one was down !

I don't know how this kit compares to the Hasegawa or Airfix. It's probably better than the Airfix which is a bit older. But better than the Hase' ? I don't know. One thing for sure, if anyone buys the Tamiya boxing of this kit, they will be dissapointed, this kit is not Tamiya standard and does need work.

View attachment 47440

The quarter panel pops in quite nicely, after a bit of sanding, so that will be sprayed in place.

View attachment 47441

View attachment 47442

And I thought I was ready for paint. Where did that crack come from ? Look directly under the air intake where the wing meets the fuselage. I'm just waiting for the CA repair to harden.

View attachment 50362

View attachment 50363

View attachment 50364

View attachment 163388

View attachment 163389

View attachment 163390
 

Attachments

  • Ready for paint 3.jpg
    Ready for paint 3.jpg
    2.2 KB · Views: 0
  • Ready for paint 2.jpg
    Ready for paint 2.jpg
    1.6 KB · Views: 0
  • Ready for paint 1.jpg
    Ready for paint 1.jpg
    2 KB · Views: 0
That's looking very good. I've always had a bit of a soft spot for the unfairly maligned Hurricane. We'd have been in a right pickle without it in 1940 :)

It's amazing how photographs can show up little flaws that the Mk1 eyeball misses. At least you've spotted it now and not after paint which is a right pain...believe me,I know.

Cheers

Steve
 
Been watching from the side lines, happy with the fact that the one I built a while back was relatively problem free.

It looks like you have beaten it into fair shape. Good you spotted the crack when you did. As Steve said better than finding it after you have committed to paint !

Regarding the old Airfix kit, that to is actually a good little build. The detail, especially inside, is a bit sparse but overall a nice result can be had from it. I will be getting at least one more from Italeri, and yet one more when they put out the Sea Hurricane version...

Colin, Pay close attention to the paint guide. In the kit I had, they had transposed the colours on the camouflage. This resulted in mine being green where there should be brown and visa-versa!!

Ian M
 
Thread owner
I have to agree Steve, the Hurricane, 'always the birde's maid never the bride' One striking feature of this plane, now I've actually built one is how thick the wing is. It's huge. I believe it provides good lift, but lots of drag.

@Ian, I think it was you who spotted this painting problem a long time ago. On your advice back then I had a look in the box and while the colour pics are spot on, the black and white instructions are indeed back to front ! So thanks for that, I probably would have fallen straight for that one.

So, a day off work and it's raining outside, well that's what I will tell ma'am when she gets home, which means a bit more work carried out.

View attachment 47497

An old trick but probably useful in this scale with a fair bit of glass around, is to paint the canopy interior green before applying primer and top coats. So when viewed from inside the cockpit, the interior green bars should still be visible. I don't normally do this in 1:72 but in this scale, let's see what it looks like.

View attachment 47498

Now then, pre-shading. One of those subjects that causes much discussion, to do, or not to do ? Well right now I have a foot firmly in both camps. I'm pre-shading the underside, but not the top - radical or what ! With so much dark green above, most of the pre-shading would be lost, well I'd loose it anyway. So, the upperside will have post shading and some of that funny 'white' matt varnish.

I'm also trying something new for me, that is instead of just using black for pre-shading, I'm looking around for complimentary colours to use. So to go with my 'Sky' underside I've used a brown pre-shade. I don't know if it will work, it might be too light, but we'll see.

View attachment 50416

View attachment 50417

View attachment 163442

View attachment 163443
 

Attachments

  • underside pre shade.jpg
    underside pre shade.jpg
    2.7 KB · Views: 0
  • Canopy.jpg
    Canopy.jpg
    1.7 KB · Views: 0
Colin I don't know how I missed this one all's looking good and some great work arounds with the cockpit and wings. I'm sure the underside pre-shading will work out fine using brown will give it a subtle effect. With dark camo I found is all too easy to loose the pre-shading post shading is a safer bet.

Vaughan
 
Hi Colin looks like the brown pre-shading has paid off it's looking good nice and subtle.

Vaughan
 
That has worked rather well. I often use Grey as well.

T'was I that called the paint problem a while ago, Italeri have even admitted their mistake and "will look into it..." I believe they said.

The underside is looking pucker by the way.

Ian M
 
Thread owner
Thanks all for having a look. Well Ian, I must have an old kit as my instructions are still back to front.

So, it's painted.

I've had a bit of fun finding Vallejo equivalents. The green was the real problem, even Airfix (Humbrol) quote two colours for Dark green, H30 and H163. Anyway, I went for Vallejo 895 'Gunship Green' which I'm still not sure about, but it's a bit late now. I've painted it ! With lots of matt varnish, decals and weathering it'll probably be ok - I hope.

At least the attached pic shows the nice surface detail Italeri has reproduced on the wing.

View attachment 47693

View attachment 50600

View attachment 163626
 

Attachments

  • Time for Klear.jpg
    Time for Klear.jpg
    2.6 KB · Views: 0
I would imagine that it will take a while before (or if) they change it Colin, I guess they would of had a good stock pile to get through first!

Agree with the vallejo equivalents. I gave up and bought Xtracrylix.

You have made a good job of it and it looks right. Sort of faded and sun bleached but looks great if you know what I mean...

Ian M
 
Thread owner
So after many coats of Klear, the decals are on. A strange thing occured. The underside, painted in enamel, just kept drinking the Klear. Whilst the upperside, painted in acrylic, just needed a couple of coats.

I'm trying something a bit new for me, I'm going to try and make the decals a bit more worn. I've noticed with my builds, I can weather the plane but then the decals look like they have just been painted on. So this time I have sanded them down a bit and will also spray a bit of paint over them later. It might work, it might not.

View attachment 47861View attachment 47862

View attachment 50742

View attachment 50743

View attachment 163768

View attachment 163769
 

Attachments

  • Decals upperside.jpg
    Decals upperside.jpg
    2.4 KB · Views: 0
  • Decals underside.jpg
    Decals underside.jpg
    3.6 KB · Views: 0
Status
Not open for further replies.
Back
Top