Theme editor

Scale Model Shop

Italeri 1/48 Lysander

Status
Not open for further replies.

Dave W

New member
Joined
Jan 8, 2011
Messages
4,713
Reaction score
0
Points
0
1/3
Thread owner
View attachment 32226View attachment 32227View attachment 32228

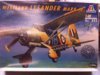
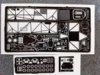
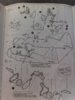
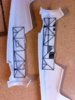
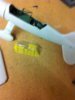
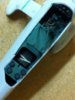
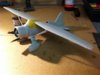
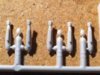
I thought i would build this next and take advantage of all the info generated by Vaughans excellent build of the 1/32 version.This ones an ancient Testors kit reboxed by Italeri.There's hardly any interior detail so i bought a superb Eduard etched set for it.It only cost around 6 quid so is a cheap way of tarting up an old kit.I love the bit in the instructions that tells you to use a rather lethal looking pair of scissors to open up holes in the fuselage for the crew ladder!.

View attachment 37136

View attachment 37137

View attachment 37138

View attachment 150162

View attachment 150163

View attachment 150164
 

Attachments

  • IMG_0708.jpg
    IMG_0708.jpg
    3.1 KB · Views: 0
  • IMG_0711.jpg
    IMG_0711.jpg
    3.5 KB · Views: 0
  • IMG_0712.jpg
    IMG_0712.jpg
    2.2 KB · Views: 0
Thread owner
There are no lights in the kit for the wheel spats.And as can be seen in the first photo there isnt any provision for fitting them either.So i thought i would have a go at making some. What i did was make some holes in a piece of plasticine and fill them with two part 10 minute epoxy glue that dries clear.I them cut out holes in the wheel spats and fitted the lights.Finished it off with retaining rings included on the Eduard etched fret.I know they are not mega detailed but they look better than just painting them on as suggested by Italeri.

View attachment 32229View attachment 32230View attachment 32231View attachment 32232View attachment 32233View attachment 32234View attachment 32235
 
Hi Dave

Sounds very ingenious creating the landing lights. Unfortunately the attachments you have posted aren't working so I can't see how it's coming on. I hope you can sort the images out.

Vaughan
 
Thread owner
Sorry,I will post them again tomorrow night when I can get back on the family computer.I still find posting on the forum a hit and miss affair.Works every time on my iPhone.Unfortunately my phone won't let me post pictures.
 
Nice looking project dave, the etched set will improve things no end. Just be careful with those scissors-no running! cheers tony
 
Thread owner
These are the photo's i tried to post last night . They are of my attempt at scratch building the landing lights.Something that is not included in the kit.I came up with the idea of casting some from clear two part epoxy glue.Unlike most of my ideas i think this ones worked.They are not super detailed but i think they look better than just painting a silver dot on the wheel spats. View attachment 32271View attachment 32272View attachment 32273View attachment 32274View attachment 32275

View attachment 37166

View attachment 37167

View attachment 37168

View attachment 37169

View attachment 37170

View attachment 37171

View attachment 150192

View attachment 150193

View attachment 150194

View attachment 150195

View attachment 150196

View attachment 150197
 

Attachments

  • IMG_0732.jpg
    IMG_0732.jpg
    2.6 KB · Views: 0
  • IMG_0733.jpg
    IMG_0733.jpg
    2.9 KB · Views: 0
  • IMG_0717.jpg
    IMG_0717.jpg
    2 KB · Views: 0
  • IMG_0718.jpg
    IMG_0718.jpg
    1.3 KB · Views: 0
  • IMG_0730.jpg
    IMG_0730.jpg
    2.1 KB · Views: 0
  • IMG_0737.jpg
    IMG_0737.jpg
    2.7 KB · Views: 0
Thread owner
Dont know whats gone wrong with my post.The thumbnail is the kit part before modification.
 
Hi Dave

I'm impressed they've come out really well!. looking forward to the next stages.

Vaughan
 
Great subject, between Vaughan, you and me, we'll have all three scales covered.

Colin M......
 
Thread owner
View attachment 32551View attachment 32550View attachment 32549Made some progress with the Lysander.Fitted the PE framework to the fuselage halves .Also folded up the PE part that makes up the framework behind the pilots position.To this i've attached the PE seats,harnesses and kit fuel tank.The engine is only half an engine on a flat plate.But after a bit of painting its come out ok.I've painted and attached the the rear gunners ammo drums to the rear shelf as well .I found the rear gunners seat difficult to build.It looks straight forward but i had to cut two pins to length then fold a piece of PE and attach everything together.I managed to stick my fingers together with superglue,but would the parts stick together?!.Eventually i used two part epoxy (as Trey once suggested to me) and that did the jobView attachment 32552View attachment 32553

View attachment 37393

View attachment 37394

View attachment 37395

View attachment 37396

View attachment 37397

View attachment 150419

View attachment 150420

View attachment 150421

View attachment 150422

View attachment 150423
 

Attachments

  • IMG_0754.jpg
    IMG_0754.jpg
    2.5 KB · Views: 0
  • IMG_0753.jpg
    IMG_0753.jpg
    2.6 KB · Views: 0
  • IMG_0752.jpg
    IMG_0752.jpg
    2.8 KB · Views: 0
  • IMG_0751.jpg
    IMG_0751.jpg
    3 KB · Views: 0
  • IMG_0713.jpg
    IMG_0713.jpg
    2.8 KB · Views: 0
Hi Dave

It's looking good coming along nicely PE parts certainly finish it off gives it that extra detail that the kit would have been missing. The engine despite only being as you say "half an engine" still looks authentic. Keep the good work up. I'm looking forward to the next stages.

Vaughan
 
Thread owner
Made a bit more progress with the Lysander.I've fitted the PE and kit parts to the cockpit.After an hour or so of masking i've glued the front canopy section to the model.I was going to leave the wings off to make painting easier.But like a little boy i couldnt wait to see it with the wings fitted!.So they are now glued on.Im going to paint this one as a Free French machine used in Tunisia in 1942.Apparentely 25 Lysanders were transfered from the RAF to the Free French airforce.They were used mainly for reconnaisance,but sometimes for bombing.So i shall be fitting the bomg racks to the undercarriage legs.Italeri give the colour scheme as green and brown upper surfaces with light grey undersides.I cant find much info on the internet so will probably go with dark green,dark earth and sky.Im guessing they would still be in RAF colours .Unless anyone else knows different?.This model should have fairings over the cylinder heads on the engine cowling.The instructions show them as seperate items to be fitted .But there are none in the kit. tView attachment 32717View attachment 32718 View attachment 32719

View attachment 37545

View attachment 37546

View attachment 37547

View attachment 150571

View attachment 150572

View attachment 150573
 

Attachments

  • IMG_0759.jpg
    IMG_0759.jpg
    2.3 KB · Views: 0
  • IMG_0761.jpg
    IMG_0761.jpg
    2.9 KB · Views: 0
  • IMG_0794.jpg
    IMG_0794.jpg
    2.6 KB · Views: 0
Dave this is looking real good getting me motivated to crack open mine!
 
Looking great Dave, I think I have a bit of a soft spot for 'ugly ducklings' !

Colin M........
 
Top stuff dave, its coming on great. I would imagine that the aircraft would be in standard RAF dark earth /dark green/ sky, although i have seen a profile of a free french one in a strange sand/brown/green/ with azure blue undersides! As for the bumps on the cowling they are only very slight, i imagine carefully placed drops of pva glue would give the effect , im sure with your skills it wouldnt be any problem. cheers tony
 
Neat trick for the landing lights. I recently did the wing tip lights on a Harrier with clear sprue, Cut it to length and glue in place and leave it to set. Ordinary poly glue and fogging the clear part is not an issue.

Once set I cut the sprue down to the rough shape, then sanding sticks did the rest. First a coarse one the a fine and a final go with a polishing stick. Worked out quite well.

Loving all these Lysander builds, I to did one as a lad, the old airfix one. What with all these super builds being shown here, I am soarly tempted to get another one and see what I can do to it.....:-/

Ian M
 
Thread owner

Attachments

  • IMG_0798.jpg
    IMG_0798.jpg
    3.1 KB · Views: 0
  • IMG_0800.jpg
    IMG_0800.jpg
    2.2 KB · Views: 0
  • IMG_0804.jpg
    IMG_0804.jpg
    2.1 KB · Views: 0
Thread owner
Just had an accident with the Lysander.Knocked it onto the shed floor and of course one of the wings has broken off.And the canopy came unstuck along one edge.So i've reglued that and gently clamped it in the hope it will glue back together.The wing joins to the brittle clear plastic of the canopy which was always going to be a weak point.So i've drilled and pinned the wing root.When the canopy has (hopefully)set i will attempt to re-attach the wing.

View attachment 32870View attachment 32871View attachment 32872

View attachment 37679

View attachment 37680

View attachment 37681

View attachment 150705

View attachment 150706

View attachment 150707
 

Attachments

  • IMG_0802.jpg
    IMG_0802.jpg
    2.7 KB · Views: 0
  • IMG_0807.jpg
    IMG_0807.jpg
    3.1 KB · Views: 0
  • IMG_0806.jpg
    IMG_0806.jpg
    2.2 KB · Views: 0
Wow Dave that is a bummer hope that fixes it for ya. Crazy seeing that big ole clamp on that bird !
 
Thread owner
Thats a lightweight aluminium clamp Trey.So its not as over the top as it looks!.Left it to dry overnight.Removed the clamp this morning and its fine.Will attach the wing this evening.
 
Status
Not open for further replies.
Back
Top