Theme editor

Scale Model Shop

Italeri Kfz 305 Opel Blitz with Tamiya 20mm Flak 38 MIT Sd.Ah.51

Thread owner
Hi Everyone

Mr T - I wrote a feature on captured vehicles during WWII and it was amazing how many spare parts were scrounged and swapped around especially by the end of the campaign.
Wouter - :smiling2: There is always someone worse off than yourself:tongue-out3:
Si - :smiling5::smiling3::smiling: Your killing me mate:smiling3:
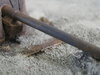
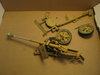
JR - Not as bad as the language when I realised the barrel was the wrong length:angry: (See below)
Scottie - I have had enough of detailing so have taken a bit of a break (See below)

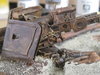
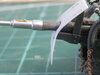
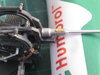
The Lord of the Dark Side was kind enough to watch my back as always and pointed out that the barrel looked a little long

View attachment 303994

I consulted the PMMS site and indeed I had not cut the kit part back far enough. Here is the link for those who are interested

https://www.perthmilitarymodelling.com/reviews/vehicles/flak38/flak38barrels.htm

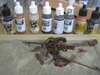
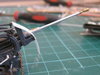
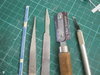
The next section has a Government Health Warning!! Pictures of surgical procedures and grotesque amputation to follow. If you are of a nervous disposition then turn away now.

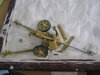
So I scrubbed up for surgery and got my surgical instruments ready

View attachment 303995

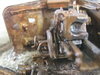
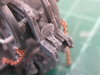
Firstly the shield was taken off and then the barrel was taken away for prep for it's transplant. Then the kit barrel was cut away leaving a solid base for the transplant

View attachment 303996

The area was sanded down and after a few dry fits. the transplant was completed with copious amounts of CA. The barrel was left in the recovery position overnight for the CA to set fully

View attachment 303997

In the morning the barrel had recovered fully enough so that the shield could be refitted

View attachment 304008

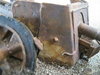
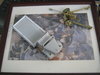
I have decided to give my eyes a rest from all this detailing and make a start on the base. For those of you who follow my builds, you will know I am not a great one for bases. However last year I built a PAK 40 but during the painting process my lamp toppled over and scythed through the model

View attachment 303998

So I decided this would be an ideal opportunity to use the bits as a wreck in the base. I brought a frame from the car boot for 50p and set out the models the way I wanted them

View attachment 303999

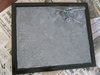
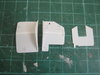
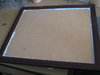
I took out the picture and glass and sealed the gap with UPVA

View attachment 304000

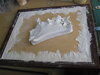
Then using a new packet of DAS clay I started to add the clay to the base

View attachment 304001View attachment 304002

Once the edges had been done I filled in the rest of the base. Clay is very porous and liable to crack when it dry's so I applied a liquid coat of UPVA all over the clay


View attachment 304003

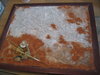
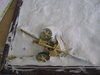
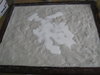
While still wet the PAK 40 was added and covered with further clay to represent sand drift

View attachment 304004View attachment 304005

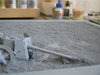
Then various sands and gravels were added along with several wheel tracks. This was all left to dry overnight

View attachment 304006

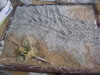
Today the excess was taken off and touch ups on the bare patches were done. This will be left again to dry before an undercoat is applied tomorrow

View attachment 304007

I have no idea how this is going to turn out. This is primarily an opportunity for me to paint my first ever "wreck". So if nothing else I will learn a lot during the process.

Thanks for watching

Steve
 

Attachments

  • IMG_0032.JPG
    IMG_0032.JPG
    2.7 KB · Views: 0
  • IMG_0049.JPG
    IMG_0049.JPG
    3.1 KB · Views: 0
  • IMG_0047.JPG
    IMG_0047.JPG
    2.9 KB · Views: 0
  • IMG_0046.JPG
    IMG_0046.JPG
    3.2 KB · Views: 0
  • IMG_0045.JPG
    IMG_0045.JPG
    2.6 KB · Views: 0
  • IMG_0033.JPG
    IMG_0033.JPG
    3.3 KB · Views: 0
  • IMG_0034.JPG
    IMG_0034.JPG
    2.9 KB · Views: 0
  • IMG_0035.JPG
    IMG_0035.JPG
    3.2 KB · Views: 0
  • IMG_0038.JPG
    IMG_0038.JPG
    2.4 KB · Views: 0
  • IMG_0039.JPG
    IMG_0039.JPG
    3 KB · Views: 0
  • IMG_0040.JPG
    IMG_0040.JPG
    2.1 KB · Views: 0
  • IMG_0041.JPG
    IMG_0041.JPG
    2.8 KB · Views: 0
  • IMG_0042.JPG
    IMG_0042.JPG
    2.8 KB · Views: 0
  • IMG_0043.JPG
    IMG_0043.JPG
    2.3 KB · Views: 0
  • IMG_0044.JPG
    IMG_0044.JPG
    2.8 KB · Views: 0
Exultant work Steve.
Thought the surgical kit looked like the one they had when they did my eye :flushed:
Nothing amiss with the base , infact the drifting sand looks very realistic.
Have you see the message , just for you !
JR
 
More fine work Cpl Jones. I have a pack of DAS in the cupboard that I keep forgetting about, but you've inspired me to did it out.
 
Steve,

Nice solve to the barrel issue...glad you could sort it without damage to the whole thing.
These guns can be such fiddly delicate items.
If you remember, I added a shell catch thing to the flak gun on my 38t build.....I lost count on how often I knocked stuff off:confounded:

Interested to see how you tackle the base now. I might knock up a wee one for my Marder:thinking:

Keep it coming
Si
 
Thread owner
Hi Everyone

John - Ouch! I hope they didnt use such primitive tools:sick:. Got the message. Just need to translate it:tired:
Peter- Its great stuff so long as you can stop it from cracking. The watered down UPVA seems to work
Si - I had terrible trouble with the Flak 30 on the CMP. I am tempted to paint it in parts rather than the whole thing as I was forever knocking bits off. Base update below:thumb2:
Mr T - Many thanks again

The base has turned out really well. It was tidied up and sprayed in grey artists primer. Then the frame was given a coat of black gloss. This will be left overnight and then a base colour will be done tomorrow. I fear I am getting into the painting rather than the building at the moment. Just go with the flow I suppose. I am looking at doing a very rusty effect as the Pak 40 was blown up in 1941 and has sat in all the desert weather's for two years.

View attachment 304216View attachment 304217View attachment 304218

Thanks for watching

Steve
 

Attachments

  • IMG_0056.JPG
    IMG_0056.JPG
    2.3 KB · Views: 0
  • IMG_0057.JPG
    IMG_0057.JPG
    2.6 KB · Views: 0
  • IMG_0058.JPG
    IMG_0058.JPG
    2.8 KB · Views: 0
Hi Steve

That is a seriously good base.

The part buried Pak is superb and well thought out and delivered.

If the paint gives you time to recover before more detailing, then go with the flow

Its flows well at the moment

Very nice work

regards

Steve H
 
Like it Steve.
Agree with the guys.
Will interesting how you proceed.
JR
 
Hi Steve have just caught up on this one, yes I managed to log in first time since Friday,excellent scratch work as always and the detailing superb. Keep up the great work.
Pete :thumb2:
 
Thread owner
Steve - That's wonderful feedback. Many thanks
Peter - Cheers my friend
Scottie - Base coat has been done on the sand and the PAK 40. Also finishing off the shields. Hopefully I will post some photos over the weekend
Guy - I hope it lives up to all its expectations
JR - Me too!:smiling5:
Lee - I think we are all mad. Some more than others:tongue-out3:
Mark - Thanks for the support
Peter - Great to see you back online. Glad you like the build
 
Dr. Jones

After your successful operation and implant noted above I see that all is going well. The Base is another example (sand drifts...etc etc..) of the superb work that you put into every build that we've seen from you. Your level of detailing, construction, painting and thought process is one to follow for sure. Keep up the FANTASTIC work !!!!
 
Thread owner
Hi Everyone

Joe - I was hoping you would pop along and have a look. I hope all is well across the pond and I look forward to seeing your return to your bench sooner rather than later.

I painted the base US Sand and then started work on the PAK 40. Using Cam Brown, Panzergrau, Smoke and all my rust colours I coloured the PAK 40 using the wet on wet method. Or as I like to call it " slap it on and see what happens" method.:smiling5:
In the end it turned out really well. This will now be left until I weather it with oils and pigments. As I make my own this will not be done until the main build reaches this stage also

View attachment 304381

View attachment 304377View attachment 304378View attachment 304379View attachment 304380
View attachment 304382

In the meantime I have gone back to the Flak and made the shields. I will endeavour to get these detailed over the weekend

View attachment 304383

Steve
 

Attachments

  • IMG_0060.JPG
    IMG_0060.JPG
    3.1 KB · Views: 0
  • IMG_0061.JPG
    IMG_0061.JPG
    3.4 KB · Views: 0
  • IMG_0062.JPG
    IMG_0062.JPG
    2.9 KB · Views: 0
  • IMG_0063.JPG
    IMG_0063.JPG
    3.6 KB · Views: 0
  • IMG_0064.JPG
    IMG_0064.JPG
    3.5 KB · Views: 0
  • IMG_0067.JPG
    IMG_0067.JPG
    3.7 KB · Views: 0
  • IMG_0068.JPG
    IMG_0068.JPG
    2.6 KB · Views: 0
Back
Top