Theme editor

Scale Model Shop

Joe's 1/72 Academy B-17F Memphis Belle

Status
Not open for further replies.

flyjoe180

SMF Supporters
Joined
Jan 18, 2012
Messages
13,306
Reaction score
1,097
Points
113
Location
Earth
1/3
Thread owner
Late starter, but I have already done much research for this kit and build so will get into it and report back with updates.


So far I know that:


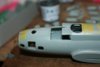
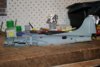
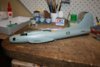
1. The kit represents a later B-17F version than that of either Memphis Belle, or Miss Ouachita, the second kit option.


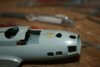
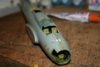
2. The nose-mounted astrodome mount must be removed and a new window installed ahead of the windshield. The astrodome replaced two small windows above the navigator/bomb aimer positions in later versions of the B-17F and on all versions of the B-17G. Memphis Belle had the earlier window configuration.


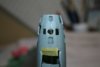
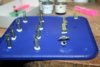
3. I'll have to add more armament to the nose section. I think the drill may get a work out.


4. There are a few discrepancies (as you get often with Academy kits) with colours. I have sorted them out already. Luckily the Belle was an often-photographed aeroplane.


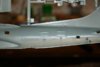
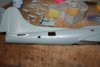
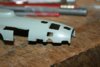
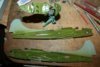
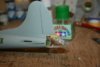
5. Academy's B-17s suffer from excessive dihedral. Should be easily fixed with some spacers from plastic card.


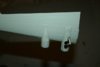
6. The starboard tail fin panel came from another B-17 and is a slightly different shade of OD.


7. The control surfaces were faded and appear lighter in photos of the aircraft than the rest of the upper surfaces.


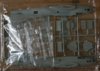
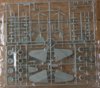
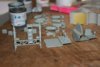
Sprue/box shots to come soon. Looking forward to this :)
 
When I built the Revell 1/48 Memphis Belle I painted the control surfaces with Humbrol 86 light olive.The control surfaces were fabric covered and the paint faded differently to the rest of the airframe apparently.
 
A Kiwi is on the move and soon to take flight. Looking in on the flight plan Joe.


Laurie
 
Look forward to seeing this Joe. The B17 is one of the nicest looking bombers of WW2 - well I think so.
 
Thread owner
I've cut plastic, Humbrol paint was everywhere and bombs are being loaded. Photos and updates to come.
 
Thread owner
Okay, time for a break from the build so far and to get some pictures for you.

\ said:
Hell's Bells
No, Memphis Belle!


Box shot, very nice art work even if it isn't accurate (note the missing astrodome and lack of glazing over the nose area):


View attachment 108993


The sprues all wrapped still. Academy provide parts for various versions of the B-17 in their boxes, handy if you want spares. This B-17F kit comes with the earlier tailplanes, engine cowls and propellers and some spare glazing. Instructions are nice and simple. The schemes require researching as Academy have a habit of being incorrect in so many ways:


View attachment 108994


View attachment 108995


View attachment 108996


View attachment 108997


View attachment 222016

View attachment 222017

View attachment 222018

View attachment 222019

View attachment 222020
 

Attachments

  • IMG_3243.JPG
    IMG_3243.JPG
    2.5 KB · Views: 0
  • IMG_3250.JPG
    IMG_3250.JPG
    1.9 KB · Views: 0
  • IMG_3253.JPG
    IMG_3253.JPG
    2.3 KB · Views: 0
  • IMG_3254.JPG
    IMG_3254.JPG
    2.5 KB · Views: 0
  • IMG_3256.JPG
    IMG_3256.JPG
    3.1 KB · Views: 0
Thread owner
As I said I have cut plastic and painted various parts.


The interior is made up of three main sections, the bomb bay and framing, the cockpit, and the forward nose area for the navigator and bomb aimer:


View attachment 108998


The rear opening on the starboard side must be opened up for the side glazing. The other opening is for an earlier version. On the B-17F the waist gunners stood opposite each other, in the later B-17G the positions were staggered:


View attachment 108999


View attachment 109000


The nose area requires work. The astrodome mount is removed and will be filled. The new window overhead the navigator position is cut out using a spare piece from the clear sprues as a replacement. This took a few hours:


View attachment 109001


View attachment 109002


View attachment 109003


View attachment 109004


View attachment 222021

View attachment 222022

View attachment 222023

View attachment 222024

View attachment 222025

View attachment 222026

View attachment 222027
 

Attachments

  • IMG_3264.JPG
    IMG_3264.JPG
    2.1 KB · Views: 0
  • IMG_3257.JPG
    IMG_3257.JPG
    2.5 KB · Views: 0
  • IMG_3258.JPG
    IMG_3258.JPG
    2 KB · Views: 0
  • IMG_3259.JPG
    IMG_3259.JPG
    2.3 KB · Views: 0
  • IMG_3261.JPG
    IMG_3261.JPG
    2.2 KB · Views: 0
  • IMG_3266.JPG
    IMG_3266.JPG
    2.5 KB · Views: 0
  • IMG_3268.JPG
    IMG_3268.JPG
    1.7 KB · Views: 0
Thread owner

Attachments

  • IMG_3273.JPG
    IMG_3273.JPG
    2.5 KB · Views: 0
  • IMG_3274.JPG
    IMG_3274.JPG
    2.7 KB · Views: 0
  • IMG_3270.JPG
    IMG_3270.JPG
    2.6 KB · Views: 0
  • IMG_3271.JPG
    IMG_3271.JPG
    2.6 KB · Views: 0
Thread owner
This morning I have assembled the wings with the landing gear struts inserted:


View attachment 109009


I also have four Pratt & Whitney radials waiting:


View attachment 109010


And I have masked the tail section for the rear gunner and drilled some holes into the clear parts to accommodate weapons:


View attachment 109011


View attachment 109012


View attachment 109013


Time for lunch. Should have the interior fitted later today and going well the fuselage zipped up.

View attachment 222032

View attachment 222033

View attachment 222034

View attachment 222035

View attachment 222036
 

Attachments

  • IMG_3278.JPG
    IMG_3278.JPG
    1.4 KB · Views: 0
  • IMG_3280.JPG
    IMG_3280.JPG
    2.2 KB · Views: 0
  • IMG_3281.JPG
    IMG_3281.JPG
    2.1 KB · Views: 0
  • IMG_3282.JPG
    IMG_3282.JPG
    2.4 KB · Views: 0
  • IMG_3283.JPG
    IMG_3283.JPG
    3 KB · Views: 0
Looking very good so far!!


Build a significative plane like this must be an interesting and funny job ;)
 
Thread owner
Interior Assembled and fitted to the starboard side of the fuselage. Windows are already in place and masked.


View attachment 109122


I've decided the best way to tackle the upper and ball turrets and their detail are to install the mounts permanently (I'm not going to play 'war' with it so who cares), and mask them off once interior green has been applied as seen above. Once the aircraft is varnished the turrets can be assembled in full. The guns are quite plain, not much I can do with them as they are very small in diameter and flimsy. Certainly won't be attempting to make cooling holes in the barrels!


Then the two fuselage sides were fixed together. The turret mounts and other items lined up perfectly. A nicely engineered kit from Academy so far.


View attachment 109123


The only complaint is this step in the fuselage roof over the cockpit/flight deck. Should be easy to fix, but not really acceptable.


View attachment 109124


The tail cone fitted along with it's twin fifties:


View attachment 109125


View attachment 222145

View attachment 222146

View attachment 222147

View attachment 222148
 

Attachments

  • IMG_3288.JPG
    IMG_3288.JPG
    2.7 KB · Views: 0
  • IMG_3291.JPG
    IMG_3291.JPG
    2.6 KB · Views: 0
  • IMG_3293.JPG
    IMG_3293.JPG
    2.3 KB · Views: 0
  • IMG_3294.JPG
    IMG_3294.JPG
    2.2 KB · Views: 0
Status
Not open for further replies.
Back
Top