Theme editor

Scale Model Shop

Joe's 1/72 F-4C Phantom II

Status
Not open for further replies.

flyjoe180

SMF Supporters
Joined
Jan 18, 2012
Messages
13,295
Reaction score
1,089
Points
113
1/3
Thread owner
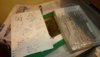
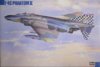
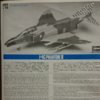
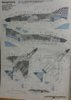
My entry is this kit. Unsure which scheme I'll use yet, but most probably the box top one with the William tell and Bicentennial markings.


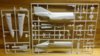
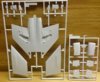
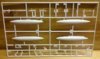
I'll post sprue shots etc later, just getting life back in order after returning from the US.


View attachment 264215


View attachment 264216
 

Attachments

  • Hasegawa F4C boxtop.jpg
    Hasegawa F4C boxtop.jpg
    2.1 KB · Views: 0
  • 57th FISb.jpg
    57th FISb.jpg
    2 KB · Views: 0
Thread owner

Attachments

  • DSC_0025.JPG
    DSC_0025.JPG
    2.6 KB · Views: 0
  • DSC_0026.JPG
    DSC_0026.JPG
    2.1 KB · Views: 0
  • DSC_0027.JPG
    DSC_0027.JPG
    3.5 KB · Views: 0
  • DSC_0028.JPG
    DSC_0028.JPG
    2.6 KB · Views: 0
  • DSC_0029.JPG
    DSC_0029.JPG
    2.8 KB · Views: 0
  • DSC_0030.JPG
    DSC_0030.JPG
    2.2 KB · Views: 0
  • DSC_0031.JPG
    DSC_0031.JPG
    1.9 KB · Views: 0
  • DSC_0032.JPG
    DSC_0032.JPG
    2.5 KB · Views: 0
Nice one. Hope that every think is ok with you and that earth quake. 
 
Thread owner
Thanks Ian. Just about everyone in NZ felt it on Monday night, but all is well where I am. It was upgraded to a 7.8 magnitude yesterday. The place isn't known as the Shaky Isles for no reason :)
 
Thread owner
I pulled the Phantom out of the stash for the GB, and I'm nearly ready to start. Got to try and get this one finished well before the deadline, work life just got a whole lot busier...
 
Another 'one true scale' Phantom. We'll be finished in a week or two.
 
Thread owner
Work commenced a few days ago on the Phantom.

View attachment 273321

Starting, with of course, the cockpit and nose section. I assembled most of the components and sprayed them cockpit grey.
View attachment 273322

The ejection seats come with a basic seat and two halves for the seat surround. A nice touch is Hasegawa provides pull handles for the top of the seat and has moulded nice seat handles on the side. I obtained colour and parts references from this site http://www.ejectionsite.com/f4seat.htm. Recommend it for all of your Phantom builds, there are differences between the various versions. I glued a section of styrene to the tops of the seat to provide a better look to the top, and also to cover the horrible seam the two halves leave.
View attachment 273323

The seats were painted accordingly, and I added some crude straps furnished from metal foil and painted. Not precise or a true replica, but under the closed canopy they will at least offer something.
View attachment 273324

The cockpit was glossed and decals applied. I quite like these decals, they were easy to apply.
View attachment 273325

The next stage was to build up the tub and nose section and insert the seats.
 

Attachments

  • DSC_0030.JPG
    DSC_0030.JPG
    2.1 KB · Views: 0
  • DSC_0033.JPG
    DSC_0033.JPG
    2.1 KB · Views: 0
  • DSC_0044.JPG
    DSC_0044.JPG
    2 KB · Views: 0
  • DSC_0046.JPG
    DSC_0046.JPG
    1.8 KB · Views: 0
  • DSC_0048.JPG
    DSC_0048.JPG
    2.8 KB · Views: 0
Thread owner
The nose halves join up nicely. You can insert the completed tub for the cockpit from underneath, provided you don't cement the seats in first. The bottom of the tub assembly acts as the nose wheel cavity and the forward section of the fuselage undersides.
View attachment 273326

View attachment 273327

View attachment 273328

As a piece of advice for Hasegawa builders of the Phantom, the rear bulge area immediately behind the cockpit: I added it because I thought it would be easier to paint the section facing the cockpit once it was blended in. However, the joining of the rear section to the front causes a nasty but small step, no matter how much dry fitting and scraping you do, and it simply gets in the way.
View attachment 273329

View attachment 273330
 

Attachments

  • DSC_0057.JPG
    DSC_0057.JPG
    1.8 KB · Views: 0
  • DSC_0054.JPG
    DSC_0054.JPG
    2.2 KB · Views: 0
  • DSC_0050.JPG
    DSC_0050.JPG
    2.1 KB · Views: 0
  • DSC_0052.JPG
    DSC_0052.JPG
    1.8 KB · Views: 0
  • DSC_0053.JPG
    DSC_0053.JPG
    2.7 KB · Views: 0
Thread owner
That step was then dealt to with various grades of sand paper, some filler, and small files.I also re-etched the recessed panels lost in the process, and reapplied the recessed rivet detail using the top of a fine drill bit.
View attachment 273331

View attachment 273332

Then the main wing sections were assembled (the wing tips come later), and that part mated to the fuselage. This requires careful attachment, as not all areas around the exhausts line up. I glued it in sections. A ball point pen acted as a nice way of pushing the offending exhaust holes outward for a nice fit.
View attachment 273333

Wing tips attached and HUD glued in with PVA
View attachment 273334

The bulge under the nose (no idea what it is) was fitted. Before doing this a rather chunky aerial has to be removed and smoothed over. The attachment itself required a fair amount of smoothing too, but it conformed nicely to the shape of the nose with little fuss.
View attachment 273335
 

Attachments

  • DSC_0059.JPG
    DSC_0059.JPG
    2.3 KB · Views: 0
  • DSC_0061.JPG
    DSC_0061.JPG
    1.8 KB · Views: 0
  • DSC_0062.JPG
    DSC_0062.JPG
    2.1 KB · Views: 0
  • DSC_0063.JPG
    DSC_0063.JPG
    3 KB · Views: 0
  • DSC_0068.JPG
    DSC_0068.JPG
    2 KB · Views: 0
Thread owner
The exhausts are nicely moulded, but bare inside, meaning you are left with a blank looking tube which leads to a nicely moulded engine outlet at the base. So I added some home made petals to the interior to at least add some interest to the interior of the afterburning exhausts.
View attachment 273336

View attachment 273337

I did this recently on another build and the effect was good once painted and weathered. A shame though that the kit manfucaturer didn't take the time to mould the exhaust interiors. It seems, looking at other Hasegawa kits I have, that this is common.

Sorry for the long update!
 

Attachments

  • DSC_0065.JPG
    DSC_0065.JPG
    2.5 KB · Views: 0
  • DSC_0066.JPG
    DSC_0066.JPG
    2.2 KB · Views: 0
Thread owner
Not much to add I'm afraid, been busy learning about a new aircraft type for work.

Cockpit canopy masked and glued on. I've primed some parts of the airframe for spraying white (intake areas, landing gear bits and bobs, wheel hubs etc).

View attachment 274715

The external stores are limited on this kit to fuel tanks. They all have vertical seams and needed tidying up. Had to rescribe some of the lost detail after sanding.
View attachment 274716

View attachment 274717

The exhausts received a polished steel coat (Humbrol). Next step for these will be to add a gun metal colour, then a dark wash inside to provide the signature F-4 extensive exhaust staining. The exterior will receive, along with the bare metal underside of the fuselage around the exhaust area, a mixture of colours and chalk rubs to simulate the varying shades of metal and stains.

View attachment 274718

View attachment 274719

That's about it for now. Progress is slow, and I'll be offline quite a bit until I finish training at work. A good thing there is six months to get this done!
 

Attachments

  • DSC_0069.JPG
    DSC_0069.JPG
    2.4 KB · Views: 0
  • DSC_0070.JPG
    DSC_0070.JPG
    2 KB · Views: 0
  • DSC_0072.JPG
    DSC_0072.JPG
    1.7 KB · Views: 0
  • DSC_0071.JPG
    DSC_0071.JPG
    2.2 KB · Views: 0
  • DSC_0073.JPG
    DSC_0073.JPG
    1.9 KB · Views: 0
Thread owner
Should be able to update this soon, no progress since last post but now my course is nearly complete I should have a few more hours to proceed with this Phantom. I'm checking in regularly for a peek, the other builds are providing inspiration, good work everyone.
 
Thread owner
Just to prove I've been doing a little bit when time permits!

I've sprayed white on the tail, horizontal stabs where the checker markings will go, and I've also started preparing the landing gear and wheels. Next step is to tidy up the intakes (that common problem we all seem to have had), connect all the various little aerials etc, and then prime for the main colours.

View attachment 280188

View attachment 280189
 

Attachments

  • DSC_0074.JPG
    DSC_0074.JPG
    1.6 KB · Views: 0
  • DSC_0075.JPG
    DSC_0075.JPG
    2 KB · Views: 0
Thread owner
Some pretty rough shading to give the paint scheme a patchy look
View attachment 280505

Nose masked off, and camouflage grey applied to the undersides and stores (Humbrol 28). The black patches worked to a degree, there is definitely variation in the paint finish, but it's hard to see in the photo. The (empty) missile rails will get touched up with the appropriate metallic finish later on.
View attachment 280506

View attachment 280507

Today's mission, colour number one of three for the South East Asia scheme, the tan Humbrol 118... Again, hard to see but there is a slight variation in the finish due to the random black undercoat.
View attachment 280508

I'll leave this for at least 24 hours and then look at masking and applying the lighter olive green colour. I'll use the Blu-tac rolls I've used before on other builds to mask the various colours. The rolls give a very slight feathered edge which will be appropriate for this scale.
 

Attachments

  • DSC_0076.JPG
    DSC_0076.JPG
    1.8 KB · Views: 0
  • DSC_0078.JPG
    DSC_0078.JPG
    1.7 KB · Views: 0
  • DSC_0079.JPG
    DSC_0079.JPG
    2.1 KB · Views: 0
  • DSC_0080.JPG
    DSC_0080.JPG
    1.3 KB · Views: 0
Status
Not open for further replies.
Back
Top