Theme editor

Scale Model Shop

Joe's 1/72 Italeri Bell UH-1H Iroquois

Status
Not open for further replies.

flyjoe180

SMF Supporters
Joined
Jan 18, 2012
Messages
13,275
Reaction score
1,076
Points
113
1/3
Thread owner

Attachments

  • _20171229_152628.JPG
    _20171229_152628.JPG
    2.7 KB · Views: 0
  • _20171229_152221.JPG
    _20171229_152221.JPG
    2.3 KB · Views: 0
  • _20171229_152313.JPG
    _20171229_152313.JPG
    2.6 KB · Views: 0
  • _20171229_152244.JPG
    _20171229_152244.JPG
    2.5 KB · Views: 0
Thread owner

Attachments

  • DSC_0009.JPG
    DSC_0009.JPG
    1.9 KB · Views: 0
  • DSC_0010.JPG
    DSC_0010.JPG
    1.9 KB · Views: 0
  • DSC_0011.JPG
    DSC_0011.JPG
    3 KB · Views: 0
  • DSC_0012.JPG
    DSC_0012.JPG
    3.1 KB · Views: 0
Great to see you have had a chance to get this one off and running. Look forward to seeing this one progress
 
Thread owner
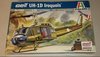
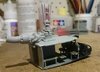
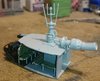
I have got the main fuselage and interior parts together.
View attachment 312121
View attachment 312122


To make this a late NZ Huey I've so far added to the basic kit:
1. Replacement side doors and windows - from an Italeri AB412
2. Wire cutters - from an Italeri AB412
3. Scratch built the small air vents at the front of the cabin (these are prominent and shown on the box and instructions but Italeri provides no such parts) - from the noses of spare 'missiles'
4. The retractable landing light under the nose beside the lower cutter (masked off for painting) - a clear lens from the spares box
5. The roof-mounted square panel (I think this black panel might have something to do with a GPS aerial?) - made from scrap plastic card
6. The maintenance bar across the forward fuselage ahead of the engine cowl area - made from brass wire
7. The VHF blade aerial atop the engine cowl - spares box
8. Small blade aerial ahead of anti-collision light - spares box
9. The steps on each side of the fuselage (these seem to be unique to the Iroquois in NZ service) - from brass wire
10. A lower rear aerial - from the spares box, trimmed from a missile tail fin
11. HF aerial prongs on the port side (the original zig-zag HF aerial was replaced in the 90's by a straight wire on these prongs. I'll add the wire later) - brass wire inserts
12. Port fuselage strake (a later modification) - plastic card attached using CA glue
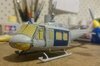
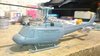
Primed up:
View attachment 312123

View attachment 312124

View attachment 312125
 

Attachments

  • DSC_0017.JPG
    DSC_0017.JPG
    1.5 KB · Views: 0
  • DSC_0019.JPG
    DSC_0019.JPG
    2 KB · Views: 0
  • DSC_0025.JPG
    DSC_0025.JPG
    1.5 KB · Views: 0
  • DSC_0016.JPG
    DSC_0016.JPG
    2.6 KB · Views: 0
  • DSC_0013.JPG
    DSC_0013.JPG
    1.7 KB · Views: 0
Thread owner
Finally got time to paint this sucker
View attachment 315961
View attachment 315962

Glossed up:
View attachment 315963

And this morning decals on:
View attachment 315964View attachment 315965View attachment 315966

Decals are okay, but not great. I will see how the tail boom black band settles down, if not good I'll strip it and paint the band. The Kiwi roundel is a little on the small side but not much I can do about that. Also missing one or two stencils. Just minor touch ups to go and the tail handles to go on. Nearly there!
 

Attachments

  • DSC_0027.JPG
    DSC_0027.JPG
    2.5 KB · Views: 0
  • DSC_0028.JPG
    DSC_0028.JPG
    1.9 KB · Views: 0
  • DSC_0029.JPG
    DSC_0029.JPG
    1.7 KB · Views: 0
  • DSC_0032.JPG
    DSC_0032.JPG
    1.9 KB · Views: 0
  • DSC_0033.JPG
    DSC_0033.JPG
    3.5 KB · Views: 0
  • DSC_0034.JPG
    DSC_0034.JPG
    2 KB · Views: 0
That's a nice Huey, Joe with lots of add ons. The limitations of plastic mold manufacturing gives us that little bit of work to get it looking the way we want it to. Just the washes for panelling to go. :thumb2:

Cheers,
Richard
 
Thread owner
Pretty much complete now, but somehow some paint spray has made its way inside... :angry: Attempting to clean up the mess, but either way I'll post pics in the completed section soon.
 
Status
Not open for further replies.
Back
Top