Theme editor

Scale Model Shop

Joe's 1/72 Matchbox English Electric Canberra PR.9

Status
Not open for further replies.

flyjoe180

SMF Supporters
Joined
Jan 18, 2012
Messages
13,306
Reaction score
1,097
Points
113
Location
Earth
1/3
Thread owner
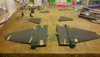
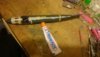
Okay, so I'm having a frenzy at the bench and I dug this ancient and rather sad-looking box. Should be a good contender for a spy in the sky theme, so I'm in. I'm going to build this wheels-up on the provided stand. I acquired this for a few dollars! The decals are old but in reasonable condition, I'll coat them with a varnish just in case. The canopy has an ejection mark on it, so I'll need to sand and buff/polish that out. Apart from that it's vintage Matchbox (now re-boxed by Revell I think).


View attachment 256111


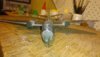
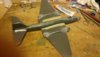
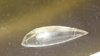
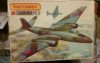
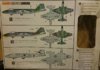
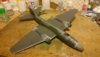
I absolutely love the art work on these old kits. Matchbox of this vintage provided lots of images around their boxings:


View attachment 256112


View attachment 256113


View attachment 256114
 

Attachments

  • DSC_0319.JPG
    DSC_0319.JPG
    2.5 KB · Views: 0
  • DSC_0318.JPG
    DSC_0318.JPG
    2.5 KB · Views: 0
  • DSC_0317.JPG
    DSC_0317.JPG
    1.5 KB · Views: 0
  • DSC_0316.JPG
    DSC_0316.JPG
    1.2 KB · Views: 0
Thread owner
No point in hanging around yet again. I've made a start on the cockpit, not sure how much of the navigator one will actually be able to see once the fuselage is zipped up, but I'll stick him in anyway to stay true to the kit. The age of this particular mould:


View attachment 256115


The cockpit bits and pieces are drying, so while that was occu rring it was off to the wings and engines, a very basic affair. I have also sanded the stand parts smooth.


View attachment 256116


Got to love those Matchbox coloured parts :)
 

Attachments

  • DSC_0322.JPG
    DSC_0322.JPG
    2.4 KB · Views: 0
  • DSC_0321.JPG
    DSC_0321.JPG
    2.1 KB · Views: 0
Going to be a difficult one to put together judging by it's age, but a nice subject to tackle
 
Thread owner
Going to be a difficult one to put together judging by it's age, but a nice subject to tackle

It goes together like ABC, the trick is the finesse at the end. I've plenty of experience with putty and sandpaper, I enjoy the construction of these old kits. Might treat myself to a nice Tamiya, Academy, or Hasegawa build after the current three oldies are finished :)
 
Looking forward to this one, I remember these old matchbox kits from my childhood in the 70's.
 
Now that is an old kit Joe, I like the colour scheme your going for and a great start.
 
It's nice to see these old kits being built Joe. :)


Looking forward to it.
 
Thread owner
Thanks for the comments. The fuselage required a fair amount of work on the seams, care being taken to preserve the delicate raised detail. The beige thing at the top right of the photo is the lower fuselage panel, opened up and reinforced with thick plastic card for the stand on which this will sit. Experimenting with the stand top showed the lug that would hold it was not stable, so I reinforced it.


View attachment 256263


And then the tail planes and main wing components were mated to the sanded fuselage. This presents hours of sanding and filling work.


View attachment 256264


This picture gives you some idea of the amount of filling and sanding that went on:


View attachment 256265
 

Attachments

  • DSC_0329.JPG
    DSC_0329.JPG
    2.1 KB · Views: 0
  • DSC_0328.JPG
    DSC_0328.JPG
    2.3 KB · Views: 0
  • DSC_0324 (2).JPG
    DSC_0324 (2).JPG
    2.1 KB · Views: 0
Thread owner
And then it was time to fill in the large gaps left by the tail planes and wings, I will sand these tomorrow.


View attachment 256266


The canopy had an injection mark on the inside of the main bubble area. Sanded this with progressively smoother grades of paper and cloth, and used a plastic polish to restore the shine. It still needs a bit more rubbing, and the ejector mark is still there, but nothing like what it was. I should have taken a before picture.


View attachment 256267
 

Attachments

  • DSC_0330.JPG
    DSC_0330.JPG
    2.2 KB · Views: 0
  • DSC_0331.JPG
    DSC_0331.JPG
    1.4 KB · Views: 0
some real nice work mate, I would never bear a raised panel line kit. 


The preservation of those lines must be a real pain.
 
Aah, REAL modelling!. Loads of filler on that one Joe. I built this one in my youth. I remember it needed a few fishing weights in the nose so it wouldn't tail sit. Look forward to seeing more.
 
Great work joe , its a real challenge sanding raised seams without destroying the panel lines but it is possible. There are some great kits out there that sometimes get overlooked simply because theyve got raised detail.i remember when this kit was released - it was one of the first matchbox kits that had raised detail and the reviewers loved it. Up to then they all had the trademark recessed trenches that all the reviewers used to moan about!! How things have come full circle and recessed is now the way to go .cant wait to see the canberra in its silver paint and on its "Multipose" stand!!, cheers your fellow Boomer ( Builder Of Old Mouldings Especially Raised). tony
 
Quite fun to watch someone else do all the work! I do hate the odd ejection mark, especially in glass. Looks great!
 
Thread owner
Progress looking good on this.

Cheers Dave.

some real nice work mate, I would never bear a raised panel line kit. 


The preservation of those lines must be a real pain.

Ta John. Raised lines aren't too difficult to preserve if you're careful with masking them prior to sanding. Lost lines can be rebuilt :)

Wow was that a full tube of filler when you started Joe ? Great work though.

Surprisingly, no Ian B| A new tube of filler is on standby!

Aah, REAL modelling!. Loads of filler on that one Joe. I built this one in my youth. I remember it needed a few fishing weights in the nose so it wouldn't tail sit. Look forward to seeing more.

Thanks Dave. Just had a look at your Matchbox Spitfire, similar predicaments, it's the age of the moulds. Having said that I've built 'modern' kits that require just as much work. No nose weight in this baby, it's living on a stand with wheels up, already worked out the CG etc and it sits fine.

Dang, that is a whole lot of filler!! O.o


Keep up the great work!! :D

Cheers Gavin, glad you're enjoying the show. :)

Great work joe , its a real challenge sanding raised seams without destroying the panel lines but it is possible. There are some great kits out there that sometimes get overlooked simply because theyve got raised detail.i remember when this kit was released - it was one of the first matchbox kits that had raised detail and the reviewers loved it. Up to then they all had the trademark recessed trenches that all the reviewers used to moan about!! How things have come full circle and recessed is now the way to go .cant wait to see the canberra in its silver paint and on its "Multipose" stand!!, cheers your fellow Boomer ( Builder Of Old Mouldings Especially Raised). tony

Agree entirely Tony, an age old argument the raised panel lines one. I've flown aircraft with more panels raised at the joins than flush. It's just a matter of preference, recessed panel lines are certainly easier to deal with and to highlight later. Interesting about the raised panel lines getting rave reviews, full circle indeed :) Boomer out (for now, as Arnie says I'll be back)

Quite fun to watch someone else do all the work! I do hate the odd ejection mark, especially in glass. Looks great!

Not encountered ejection marks inside a canopy before, so this is a new one for me. Cheers for the comment Neil.
 
Great to see this being built Joe. I like old Matchbox stuff and have never had a problem with them. But, an ejector pin mark on the canopy - what where they thinking ??
 
Status
Not open for further replies.
Back
Top