Theme editor

Scale Model Shop

Kursk. II S.S. Panzer corps slowly claw their way toward Obayan

Status
Not open for further replies.

tr1ckey66

Active member
Joined
Mar 6, 2009
Messages
3,592
Reaction score
1
Points
38
1/3
Thread owner
The story behind the build is this.

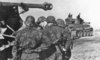
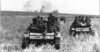
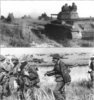
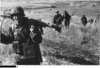
The date is July 6 1943, Operation citadel is 2 days old. Against dug-in and very stubborn resistance German advances are slow. The only real gains are in the southern pincer, southeast of Obayan, where German Fourth Panzer army has battled it's way to Prokhorovka.

Ok, that's the setting this is the idea :emo6:...

I'm going to attempt 2 new things in this build.

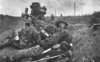
1. I'm going to build a knocked out and partially burnt out tank. I think this is going to be quite involved as it will require an interior and some careful study of burnt out vehicles.

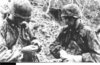
2. I have some German figures and, although I'm sort of happy with the poses, the uniforms require some alterations. The wehrmacht troops should be SS and therefore should be wearing the SS smocks. Short boots and gaters will also be required as well as some other stuff. This obviously requires some figure conversions

I'm going to use this build to try new techniques with particular emphasis on figure build and painting and the finish of the burnt out tank...

...Thats the idea, here's the kits...

View attachment 16568

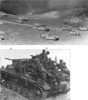
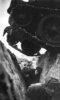
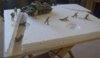
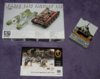
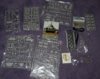
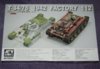
These are the kit parts to the AFV Club T34/76 with full interior.

View attachment 16569View attachment 16570

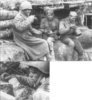
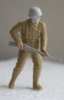
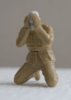
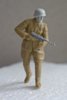
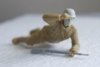
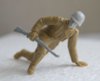
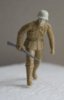
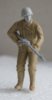
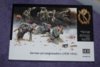
These are the figures

View attachment 16571

There's a big risk here of this going badly wrong! but hey, I'll give it a go and we'll see what happens!!!

Really looking forward to all this Red Army stuff

удачи! (Good luck everyone)

View attachment 24661

View attachment 24662

View attachment 24663

View attachment 24664

View attachment 137187

View attachment 137188

View attachment 137189

View attachment 137190
 

Attachments

  • Kits.jpg
    Kits.jpg
    2.7 KB · Views: 0
  • Parts.jpg
    Parts.jpg
    2.5 KB · Views: 0
  • AFV Club T34 76.jpg
    AFV Club T34 76.jpg
    2.4 KB · Views: 0
  • Figures.jpg
    Figures.jpg
    2.4 KB · Views: 0
Hi Paul. This is just brilliant what you are planing. And i think it encompasses all that the GB should be about....trying new things. I love both the tank kit and the figures you have gone for, i will be watching this with real interest. Well done and good luck with the build, regards Martin :-)
 
Good grief man!!! I thought I had bit off more than I could chew. This is going to be amazing, every faith in you Paul.
 
Thread owner
Thanks Martin, Graham.

I'm hoping that this build will move my figure building/painting on a notch, and this armour piece will be something a little different for me. I'm going to give it a go and anyone interested can follow my ups and inevitable downs (hopefully more of the former) as I go along. I'm going to try out Tyrel's tips for figure painting, what's the phrase? - 'Aim for the stars and you might reach the moon'?

Anyway, even if it ends in the bin I'll have learned something from it!

Graham - if I've bitten off more than I can chew, what about you! 2 tanks 1 rusky jeep and how many figures!!! You've got a bigger cast than Les Miserables! Let's face it we both like a challenge!

Cheers

P
 
Paul the kits look very nice especially the T34 and the setting you have put in place should be interesting.

scott
 
Hi paul not sure yet i have an idea based on forced perspective but iam not sure how or if it will work so i will have to work out some of the details.

scott
 
Thread owner
Oh yeah, sorry, I read that yesterday. Sturmoviks, right?

Mate, you gotta do that! I once saw a dio with a stuka dive-bombing a tank in 1/72. It looked amazing - the Stuka was pulling out of the dive and the t-34 had exploded blowing the turret completely off. There were some figures in there too. If you want to bounce any ideas or I can help at all just give us a shout. There's got to be a way of doing it that won't require a dio 6 feet long!

Paul
 
this sounding great! i love the idea of the action and destruction of including a burnt out tank. will you be daring and bold and maybe have a burnt figure too?
 
Thread owner
\ said:
this sounding great! i love the idea of the action and destruction of including a burnt out tank. will you be daring and bold and maybe have a burnt figure too?
Bobby, i'm not going to have any bodies in the tank as I don't want the tank totally burnt out. I'm thinking the round hits the rear quarter of the tank, splitting the track on it's way, and then enters the engine compartment. Here there is an explosion which blows a few hatches open/off and a localised fire develops. Basically, I want the rear of the tank to be burnt and the front end ok-ish - I think this will be a bit more interesting to look at than a totally burnt out tank. I may even have it still smoking with plumes of smoke belching out the back (a bit like the smoke on the box art of the figures I've got). In a nut shell the crew of the tank were able to bail out and run like the clappers.

I will have some bodies in the dio though as I've now decided to incorporate a trench into it with a couple of dead Russian soldiers.

I've been collecting some ref and got some good stuff...

General countryside land topography...

View attachment 16752View attachment 16753

Trenches...

View attachment 16754View attachment 16755

German uniform (interestingly enough it seems at Kursk the Germans were still wearing jack boots)...

View attachment 16756View attachment 16757View attachment 16758View attachment 16759View attachment 16760

I have a lot more pics but this selection gives a general impression of the scene I'm trying to recreate...

I've made a start on the planning stage and have already started some of the figures. When I get to a logical break I'll post the progress so far.

Cheers

Paul

View attachment 24816

View attachment 24817

View attachment 24818

View attachment 24819

View attachment 24820

View attachment 24821

View attachment 24822

View attachment 24823

View attachment 24824

View attachment 137342

View attachment 137343

View attachment 137344

View attachment 137345

View attachment 137346

View attachment 137347

View attachment 137348

View attachment 137349

View attachment 137350
 

Attachments

  • tiger-tanks-kursk.jpg
    tiger-tanks-kursk.jpg
    2.5 KB · Views: 0
  • 000-22.jpg
    000-22.jpg
    3.2 KB · Views: 0
  • german-mortar-team.jpg
    german-mortar-team.jpg
    2.4 KB · Views: 0
  • 000-5.jpg
    000-5.jpg
    2.6 KB · Views: 0
  • 000-24.jpg
    000-24.jpg
    2.1 KB · Views: 0
  • 000-17.jpg
    000-17.jpg
    3.2 KB · Views: 0
  • kursk-1943.jpg
    kursk-1943.jpg
    2.1 KB · Views: 0
  • 000-13.jpg
    000-13.jpg
    3.6 KB · Views: 0
  • 000-11.jpg
    000-11.jpg
    2.8 KB · Views: 0
Nice idea, looking forward to seeing this, good choice in kits as well.

Ade
 
Hi Paul, found this on a site, which a freind posted on, hope it helps

http://site.scratchmod.com/

Ade
 
Sounds like you got your work cut out Paul. Must be quite a big one too!

Oi, Cov That Site is the nuts!! Well worth a look. If you need rust thats the place to look!! Truly amazing!!

Ian M
 
Looking forward to this Paul as theres some techniques i'd like to try, like the burnt out tank. The T34/76 looks a very nice kit too.

Have fun, John
 
Thread owner
Thanks Ade for the site info - that will definitely come in useful when I get to the T-34. Excellent techniques

Ian - yep, there's a bit to do but it's all good learning fun.

I'm actually tackling the figures first, although I do intend to build up everything together. In this way I can get the composition of the piece looking correct.

The base actually isn't that big it's smaller than the Luftwaffe forest dio and definitely not as tall!

Paul
 
Thread owner
Ok, here are the figures roughly assembled. I've done the usual trick of mounting the standing figures on fuse wire to enable them to stand and to be handled more easily. At this stage my chief concern is to get the weapons 'sitting' in hands properly. I find it's a common problem with plastic figures that when you assemble them the weapons don't look right. To rectify this I've cut off some fingers, drilled out hands and in some cases cut hands from arms to enable the hands to better conform to the rifle/machine gun. At this stage it's quite rough and I'm just making sure that the figure stance is correct and any gestures look natural. As you can probably see I've replaced the heads by an appropriate set from Hornet (the sculpting on these resin heads is first class) and I also replaced the weapons with a 2nd Gen set by Dragon I had in the stash. More work is still required on the hands with some fingers to be sculpted but this will be done at another stage.

View attachment 16811View attachment 16812View attachment 16813View attachment 16814View attachment 16815View attachment 16816View attachment 16817

All of these figures will require a different uniform sculpting. The SS soldiers in Kursk would be wearing the M1940 Smock and I'm going to attempt to sculpt this (as well as some other refinements) from 2 part putty with other details possibly picked out in lead foil or wire. This is my first go at this so it'll be interesting to see how this turns out!

This is the aforementioned smock.

View attachment 16818

...In for a penny in for a pound!!!

View attachment 24853

View attachment 24854

View attachment 24855

View attachment 24856

View attachment 24857

View attachment 24858

View attachment 24859

View attachment 24860

View attachment 137379

View attachment 137380

View attachment 137381

View attachment 137382

View attachment 137383

View attachment 137384

View attachment 137385

View attachment 137386
 

Attachments

  • Figure02.jpg
    Figure02.jpg
    1.6 KB · Views: 0
  • Figure05.jpg
    Figure05.jpg
    1.5 KB · Views: 0
  • Figure03.jpg
    Figure03.jpg
    1.6 KB · Views: 0
  • Figure07.jpg
    Figure07.jpg
    1.7 KB · Views: 0
  • Figure04.jpg
    Figure04.jpg
    2 KB · Views: 0
  • Figure01.jpg
    Figure01.jpg
    1.4 KB · Views: 0
  • Figure06.jpg
    Figure06.jpg
    1.5 KB · Views: 0
  • German M1940 Smock001.jpg
    German M1940 Smock001.jpg
    2.3 KB · Views: 0
Some really interesting stuff you have going on here dude, i really like your outlook on the GB, trying new stuff/techniques etc, all credit to you for that. I do know exactly what you man about the hands on some figures, it often seems to be one area of a figure neglected when they are moulded, and they often apear very un-natural.

Love the camo design on the smock, that will be fun to achieve. Already loving following this thread, keep up the great work and posts bud, regards Martin :-)
 
Thread owner
Planning...

I've got the basis for the dio roughed out. On the left is a trench that will eventually contain 2 dead Russian soldiers (2 previous figures are playing dead!). The T-34 (which my Cromwell is standing in for) is just to the right of this with the front-end partly over the trench. 2 German figures look down into the trench temporarily stunned by the carnage in it whilst the other 5 make their way across the open plain where the lead figure is downed by shrapnel (possibly blind).

I'm considering adding another figure to this... I think that a figure leaping over the trench would be cool.

Here's the plan so far...

View attachment 16819

I'm also going to try Scott's long Grass tip. I've got myself some fur material and, although it may look like somebody skinned Orville and put it on my dio, I'm pretty confident that with a bit of work I can make this look like scrubby grass!

War is hell... unless it's carpeted - then it's quite comfortable!!!

View attachment 16820

Cheers

Paul

View attachment 24861

View attachment 24862

View attachment 137387

View attachment 137388
 

Attachments

  • Planning.jpg
    Planning.jpg
    2 KB · Views: 0
  • War is hell unless it's carpeted.jpg
    War is hell unless it's carpeted.jpg
    2 KB · Views: 0
Thread owner
\ said:
Some really interesting stuff you have going on here dude, i really like your outlook on the GB, trying new stuff/techniques etc, all credit to you for that. I do know exactly what you man about the hands on some figures, it often seems to be one area of a figure neglected when they are moulded, and they often apear very un-natural.Love the camo design on the smock, that will be fun to achieve. Already loving following this thread, keep up the great work and posts bud, regards Martin :-)
Hi Martin, thanks for the support.

The weapons /hands thing... Resin figures normally have the hands cast already grasping the weapon, it's then just a case of attaching hands to arms. In effect that's what i"ll be doing as all the hands will be cut off (attached to the weapons) and reattached later. This will also give me better access to the uniforms for sculpting (at least that's the theory!)
 
Status
Not open for further replies.
Back
Top