
You are using an out of date browser. It may not display this or other websites correctly.
You should upgrade or use an alternative browser.
You should upgrade or use an alternative browser.
Mirror Models Bulldozer.
- Thread starter outrunner
- Start date
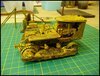
It has been too warm of late to get much done in the workroom the last few days so I spent a lot of time (and petrol money) on the bike. I have just been doing little bits here and there but it will get there in the end.
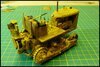
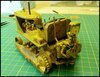
Fitting all those levers/pedals and the PE floor was a load of fun.
View attachment 392593
View attachment 392594
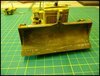
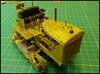
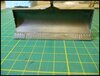
Test fitted the blade to see how it will look.
View attachment 392595
View attachment 392596
Obviously a lot more paint needs to come off the blade and some other parts to get the right effect.
Andy.
Fitting all those levers/pedals and the PE floor was a load of fun.
View attachment 392593
View attachment 392594
Test fitted the blade to see how it will look.
View attachment 392595
View attachment 392596
Obviously a lot more paint needs to come off the blade and some other parts to get the right effect.
Andy.
Attachments
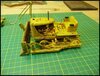
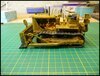
Slowly, very slowly, getting there with this model.
View attachment 392837
Have to be careful not to touch any of the fragile bits like levers and pedals that will break if you look at them the wrong way.
View attachment 392838
View attachment 392839
Next thing will be to try the system I have come up with to make the overhead blade actuating system removable as I have an idea for another use of this model.
Andy.
Attachments
G
Guest
Guest
Good and grimy. Great work Andy.
Thanks Peter, a lot more dirt/grime is needed to finish the model off.Good and grimy. Great work Andy.
Andy.
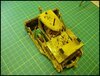
In order to make the blade mechanism removable I had to replace the rather flimsy plastic channel that carries the cable from the winch to the blade with a bit of brass tube I had, not exactly scale but it will do.

And removed.

The front frame hangs on 2 pegs below the radiator and the supports are supposed to be glued to the side frames but I just used a couple of small screws. Possibly a bit agricultural but they will never be seen behind the tracks.
 The rear support just sits in a couple of brackets from my spares box glued on to each side of the winch.

Now I need to figure out how many strands of fine wire I need to twist together to make a winch cable as all the kit provides is a bit of thread, Really?
Andy.
And removed.
The front frame hangs on 2 pegs below the radiator and the supports are supposed to be glued to the side frames but I just used a couple of small screws. Possibly a bit agricultural but they will never be seen behind the tracks.
The rear support just sits in a couple of brackets from my spares box glued on to each side of the winch.Now I need to figure out how many strands of fine wire I need to twist together to make a winch cable as all the kit provides is a bit of thread, Really?
Andy.
Thanks Jim, some parts of the model are indeed very fragile and need care when handling but on the whole it's an OK model, not for the first timer but a good, challenging build. It is the first Mirror Models kit I have built and I have another kit in the stash and I will have no trouble buying more from them.Hi Andy
Looking good. Also looks very, very fragile.
Jim
Andy.
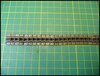
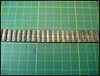
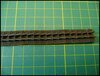
I have been playing with a new pigment that came in the post today, tried it out on the tracks which I have painted with my own dark rust mixture.
Before pic, sorry it's the underside but I forgot to take one of the top.
View attachment 393031
After, top and underside.
View attachment 393032
View attachment 393033
I think it gives a good look to the track chains as well, probably not for armour but tractors working in dry conditions have shiny track chains.
View attachment 393034
Tried it out on the blade as well.
View attachment 393035
All in all, I am happy with the results so far and we shall see what it's like with some other pigments on top.
Andy.
Attachments
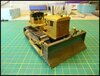
The dozer is slowly taking shape, not too much construction to do now, waiting for some fine wire to come in the post, hopefully tomorrow.
View attachment 393092
View attachment 393093
Then I can start to throw some dirt on it.
Andy.
View attachment 393092
View attachment 393093
Then I can start to throw some dirt on it.
Andy.
Attachments
I save all the end stubs from lamp wires they are nice and fine. I twist three strands up to make a thin cable then take three of those twisted the opposite way to make the finished cable.
Want thicker cables use more single stands for the first wire.
Love the look of this. Have built a few MM kits and they look great when done if a bit over the top on parts.
Want thicker cables use more single stands for the first wire.
Love the look of this. Have built a few MM kits and they look great when done if a bit over the top on parts.
Legal Notice
scalemodelling.co.uk is a privately operated online discussion forum. All content posted by members reflects their own views and opinions and does not necessarily represent those of the forum owners or administrators. While reasonable efforts are made to moderate content, no responsibility is accepted for user-generated material. By using this site, you agree to comply with UK law and the forum rules.