Theme editor

Scale Model Shop

Modifying a 1/16 Dragon British Airborne Figure

Status
Not open for further replies.

rtfoe

Well-known member
Joined
Apr 29, 2018
Messages
9,251
Reaction score
542
Points
113
1/3
Thread owner
Hi,
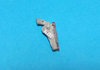
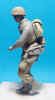
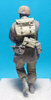
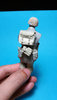
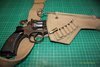
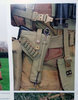
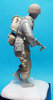
I'm jumping into an area I'm not acustomed to and that is converting or modifying large scale figures. I was loosing steam on the Pacific dio so was looking for something different. Actually it's just to improve the already nicely posed figure kit. This was a figure I purchased many years ago with dreams to paint it up and accompany my Hold Until Relieved dio. It got shelved but is now resuscitated to life. The figure looked a bit lean or the clothing a bit tight fitting for an airborne troop smock and parachutist trousers. I proceeded to beef it up with the recent purchase of Magic Sculp. In three days I got it up to this stage, it was so quick I forgot to take pictures of the progress...I did get a before and after picture of the cavalry style holster.

View attachment 303337 View attachment 303338

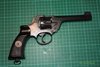
The kit does not provide a haversack, respirator or the revolver with the holster. All these had to be scratched and it was quick. I was lucky they provided the later entrenching tool and the second pattern smock and MkV Sten used on D-Day.

View attachment 303339 View attachment 303340 View attachment 303341

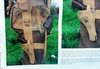
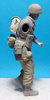
The front tab buttons still to be added. My Dads army issued first aid gause was used for the helmet netting. I had to sand off the rimm of the Mk1 helmet to get the shape of the steel Mk2 helmet before adding the netting. Missing at the moment are the haversack straps and buckles, toggle rope and helmet straps which I shaved off the molded ones from the face.

View attachment 303342 View attachment 303343

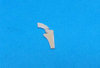
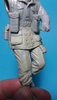
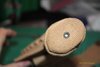
Pockets were bulged out to look full and below a template was made to aid the shape of the revolver handle and holster before adding the putty.

View attachment 303344 View attachment 303345

Reference was from the excellent For King & Country by Harlan Glenn. It states that the cavalry holster was highly sort after but typically worn by 1st Airborne. I'm still featuring a 6th Airborne NCO acquiring one just before the invasion.

View attachment 303346 Copper wire was used for the cleaning rod.

C & C welcomed.

Cheers,
Richard
 

Attachments

  • P1.jpg
    P1.jpg
    3.3 KB · Views: 0
  • P10.jpg
    P10.jpg
    1.6 KB · Views: 0
  • P9.jpg
    P9.jpg
    3.9 KB · Views: 0
  • P8.jpg
    P8.jpg
    1.3 KB · Views: 0
  • P7.jpg
    P7.jpg
    2.6 KB · Views: 0
  • P6.jpg
    P6.jpg
    2.5 KB · Views: 0
  • P5.jpg
    P5.jpg
    2.5 KB · Views: 0
  • P4.jpg
    P4.jpg
    2.4 KB · Views: 0
  • P3.jpg
    P3.jpg
    5.9 KB · Views: 0
  • P2.jpg
    P2.jpg
    5.6 KB · Views: 0
Hiya Richard.
What a great start to.your para.Think you have created some excellent detailing so far with great attention to detail.Its a great way to start doing figure sculpting by conversions.Im watching with much interest.
Richard
 
Thread owner
Thanks Richard. If this turns out good I might just try my hand in starting a figure from scratch...once I get the courage. :smiling4:

Cheers,
Richard
 
Thread owner
Hi Simon, thanks for the size reference.

I worked on size proportions against pictures and the kit figure. If you notice my shell casings are just a scale too large so I have five instead of six on the holster. What I couldn't see from the picture was that the holster shape was cut at a sharp angle rather than curved. That I can remedy. The position of the button for the securing tab seems to differ from yours. As yours is the later modified shorter strap I'm presuming that the manufacture may have been simplified and improved. Mine is based on early cavalry versions adopted by 1st Airborne...perhaps I may have to decide to remain with the curved shape as before as the author has mentioned simplified versions were manufactured later and some were even made in Canada in which my reference picture depicts stamped with a C. There is also possibilities of replicas.
But as a size reference it will come in handy as I am not convinced with my revolver grip size and shape....relying on the kits hand for measurement.

I envy you having these collections.

Cheers,
Richard
 
Thread owner
Hi Simon...just crossed reference with my book and there is an image of the shortened later version of the holster quite similar to yours however the top seems to be straight and has a split cut for the revolver handle. Might have been improvised in the field.

View attachment 303382

Cheers,
Richard
 

Attachments

  • P11.jpg
    P11.jpg
    3.9 KB · Views: 0
Very nice work Richard. I had a go at this kit in my early days, but ended up binning it. It's not Dragon's best and is crying out for a master like yourself to rescue it. It's already looking like a much more expensive kit. Bloomin' marvellous!
 
Thread owner
Hi Peter, thanks. Dragon seem to have saved on plastic as the paratrooper looked anemic. I increased some folds and the crisp sharp edge of the trousers. I am pleased with the new additions. Found the right thick string for the toggle rope. The buckles will be a challenge.

Cheers,
Richard
 
real nice modifications ,and repair work on him ,Richard ,looking better with each pic,:thumb2:
 
Thread owner
Thank you Jimbo and Monica, when Calvin Tan showed us how he modified figures with putty and solvents recently when he stayed over at a friends place, I just had to try on a large figure. I have always modified 1/35 figures with mixed results but learning about curing times of the putty and when best to add folds was the trick. Access to better putty also helped.

Cheers,
Richard
 
Hi Simon...just crossed reference with my book and there is an image of the shortened later version of the holster quite similar to yours however the top seems to be straight and has a split cut for the revolver handle. Might have been improvised in the field.

View attachment 303382

Cheers,
Richard

Hi Richard. Lovely job so far! The holster in your reference pic above has been modified to hold a Browning automatic, you can just see the hammer and the base of the magazine. They're shorter than the Enfield revolver so would need a cutout to enable a snug fit.

Keep up the excellent work!

Windy
 
Thread owner
Hi Alex, you are right. In later stages they carried the Browning automatic. General Urguhart used one to shoot a German through a window as he peerd in.

Anyway here is the latest I've done on the holster and webbing...note that I have marked in pencil where the ammo pouch will be placed on the belt.

View attachment 303465

Arms are still blu tac'd for easy painting later. Buckles. shoulder flap and toggle rope next.

Cheers,
Richard
 

Attachments

  • P12.jpg
    P12.jpg
    2.7 KB · Views: 0
Nice work so far Richard.

For buckles have you thought of square tube cut to size? I used to use a brass square tube, and cut thin cross sections
 
Hi Richard

I've used Aber 1/34 buckles on 1/16 figures. Those designed for belts work out at about the right size for equipment.
 
Thread owner
Thanks Peter and Jay...two great ideas for buckles.

Cheers,
Richard
 
Hi Richard.
Some great progress.Soon be sculpting your own stuff.A good thing to use for buckles made from cutting squares from sheets of etch mesh with Square patterns on.Laces for boots can be made from mesh etch as well with a netting pattern.(Andy Evans tip).
Keep up the good work.
Richard
 
Wow , some change in scale Richard.
Whats this with you loosing steam? that dio is fantastic , hope you will continue after this interlude.
Can't see you having any problems with this, that second square topped holster looks as it was for designed for an American Pistol .
Shall follow, worried that Simon is arming himself:surprised:
John.
 
Wow and thrice Wow! It's an awesome project. Keep it comin as it will be a real gem once done:thumb2:
 
Thread owner
Thank you Richard, John R and Steve, I've been away down south in Singapore last weekend and have not done any bench time or been on the net.

Richard, thanks for the tip on the buckles, have seen it somewhere in use however for the laces it seems it was regulation for the laces to be tied in ladder format so it's either thin wire or sprue.
John, I think when I tinkered with the figures that's when I suddenly had the urge to putty up the paratrooper...more of a distraction than a loss of mojo. Simon does have quite an arsenal doesn't he?
Steve, this one is current and am working to get it up by end of this month together with Peleliu.

Cheers,
Richard
 
Status
Not open for further replies.
Back
Top