Theme editor

Scale Model Shop

Need my eyes testing or my head for buying!

Status
Not open for further replies.

ojays

New member
Joined
Oct 16, 2011
Messages
1,713
Reaction score
0
Points
0
1/3
Thread owner
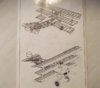
Fokker, almost the same as the expletive I used when I opened the box.

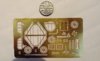
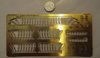
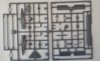
Plastic/Resin/PE and tools as well, but so small at 1/72 scale.

Some of the PE and resin parts are so miniscule, I'm unsure whether I should superglue, or liquid solder the mass of PE.

I may be putting this back in the cupboard for the moment, as I don't think my PE skills are up to tackling such a small subject.

View attachment 84000

View attachment 84001

View attachment 84002

View attachment 84003

View attachment 84004

View attachment 84005

View attachment 84006


View attachment 197023

View attachment 197024

View attachment 197025

View attachment 197026

View attachment 197027

View attachment 197028

View attachment 197029
 

Attachments

  • DSCF1748.JPG
    DSCF1748.JPG
    1.9 KB · Views: 0
  • DSCF1749.JPG
    DSCF1749.JPG
    1.9 KB · Views: 0
  • DSCF1750.JPG
    DSCF1750.JPG
    2.2 KB · Views: 0
  • DSCF1751.JPG
    DSCF1751.JPG
    1.4 KB · Views: 0
  • DSCF1745.JPG
    DSCF1745.JPG
    2.4 KB · Views: 0
  • DSCF1754.JPG
    DSCF1754.JPG
    2 KB · Views: 0
  • DSCF1746.JPG
    DSCF1746.JPG
    2.6 KB · Views: 0
wow! you're a brave man :-./

awesome project if you've got the time :D
 
\ said:
wow! you're a brave man :-./awesome project if you've got the time :D
could not of said it better, will look awesome,when done ;)

i did see a model in 1.72 of the ww11 prototype for the German bent wig done the same way at the model expo and she looked just fantastic :rolleyes:
 
Wow, that is a beautiful and detailed looking kit. Best wait until you have the patience to tackle it. Problem is, and I am guilty of it, nice kits such as your one can become 'cupboard queens'. That is, they sit there looking at you and you just can't bring yourself to attempt it. One day you just have to go and do it. Look forward to that day Gregg, this will be a beauty to watch.
 
Wow!! What a beauty!!

Ufff...:eek: they really look small O_o

Good luck, I'm sure you will obtain a magnificent model at the end ;)
 
Good luck with its,should make nice a model and me i would be heading for the hills by now.

Peter t
 
I have had my first attempt at pe with the Titanic centenary edition I haven't touched it for over a month and am seriously thinking of just building the rest of it as a standard kit. I think pe is for very patient talented people, and that's not me. Good luck you brave man.
 
Hahaha hahaha hahaha hahaha hahaha pure madness :oops: I'm sure you'll produce something quite amazing from it Gregg, I still think you mad ;)

Lee :)
 
That is insanity in a box!

The very best of luck with the kit I'm sure it will be a jaw dropper because even the fret pictures are intimidating!

Cheers

P
 
If I tried to build that most of the tiny wing ribs would end up getting lost or stuck to my fingers with superglue!.Good luck with it.Rather you than me!.
 
You are of course mad Greg but then that applies to 101% of us here. So no worries then you are in perfect company.

PE. I am just going through the PE process and there are I think 135 pieces. Oh yucks !

And so I decided after a fixing a few with Cyro., which I found an awful job, and either to little or to much. Either not enough to stick the edges or to much and it squishes out between the pattern or edges leaving an awful mess.

I then went into thought mode which did not do one bit of good. Then, sensibly, decided I would pick brains. Got this one which seems hopeful and should work as the chap who wrote about it is using it. May not be new to you but to me it is. He uses, when I read it I had a fit as I detest the stuff, Klear.

Paints the stuff on to the model then plants on the PE. Dries quickly. Then he paints on another coat to protect. As most know Humbrol have produced their own "Clear" which for me outshines ;) "Klear". Starting tomorrow, with PE and Clear", will give a sit.rep. on how I get on.

Laurie
 
Thread owner
\ said:
You are of course mad Greg but then that applies to 101% of us here. So no worries then you are in perfect company.PE. I am just going through the PE process and there are I think 135 pieces. Oh yucks !

And so I decided after a fixing a few with Cyro., which I found an awful job, and either to little or to much. Either not enough to stick the edges or to much and it squishes out between the pattern or edges leaving an awful mess.

I then went into thought mode which did not do one bit of good. Then, sensibly, decided I would pick brains. Got this one which seems hopeful and should work as the chap who wrote about it is using it. May not be new to you but to me it is. He uses, when I read it I had a fit as I detest the stuff, Klear.

Paints the stuff on to the model then plants on the PE. Dries quickly. Then he paints on another coat to protect. As most know Humbrol have produced their own "Clear" which for me outshines ;) "Klear". Starting tomorrow, with PE and Clear", will give a sit.rep. on how I get on.

Laurie
Thanks for the info Laurie,

I have used this system before on my 'SB' to attach several very small items & the windscreens.

I was just trying to build up the courage to have a go, when the postman delivered my (hopefully) repaired electrical gizmo for my 'SB'

So back in the cupboard it is again.

I want to get my Boote on the water before summer ends.

Gregg
 
All I can say is WOW and you are mad and insane, good luck with it as it looks a beauty.

scott
 
That looks like the mad brain kind of thing I would buy :-/

I would avoid the solder on this one. Get a pack of THESE and some thin CA. Oh and a magnifier.

Ian M
 
Thread owner
\ said:
That looks like the mad brain kind of thing I would buy :-/I would avoid the solder on this one. Get a pack of THESE and some thin CA. Oh and a magnifier.

Ian M
Got some of those from John already.

My soldering skills are pretty good especially with liquid solder/gas torch.

However I haven't yet decided if I have the skill, or the patience for this one.

Got sold (childlike) on the box art, plus the price had been reduced quite a lot. :oops::oops:

Gregg
 
Just finished one of these. Fantastically engineered kit, but definitely challenging. You should build it...
 
Thread owner
\ said:
Just finished one of these. Fantastically engineered kit, but definitely challenging. You should build it...
Are you posting on here ?

Any tips for me Mike before I put it away.

Am tempted, however looks daunting!

Gregg
 
Hi Gregg, I will post it on here but can't yet; it's for a magazine article and they don't allow me to post online before the article's published. The build isn't actually as daunting as I'd feared, once I got over the initial fear of starting it! Just examine the instructions really well before folding the etched parts. A couple of times I got careless and managed to fold parts back-to-front, which I only discovered later. Also the plastic spar for the lower wing is too long as moulded, so you'll need to chop a bit off. But even for an etchophobe like me, it was a pretty straightforward build.
 
Thread owner
\ said:
Hi Gregg, I will post it on here but can't yet; it's for a magazine article and they don't allow me to post online before the article's published. The build isn't actually as daunting as I'd feared, once I got over the initial fear of starting it! Just examine the instructions really well before folding the etched parts. A couple of times I got careless and managed to fold parts back-to-front, which I only discovered later. Also the plastic spar for the lower wing is too long as moulded, so you'll need to chop a bit off. But even for an etchophobe like me, it was a pretty straightforward build.
Cheers for that Mike, still not put it in the cupboard yet.!

Gregg
 
One thing I would recommend is to get hold of a pair of Tamiya's Photo-etch Folding Pliers. I have a proper PE folding tool as well but I used the pliers for probably 90% of the build.
 
Status
Not open for further replies.
Back
Top