
You are using an out of date browser. It may not display this or other websites correctly.
You should upgrade or use an alternative browser.
You should upgrade or use an alternative browser.
Neil's Airfix 54mm 95th Rifleman
- Thread starter Neil Merryweather
- Start date
Neil Merryweather
Active member
1/3
Thanks Ian.
to continue.....
I just had to do something about the shako cords as they had been seriously compromised by the moulding requirement.
This is the kit offering

and this is the reality

So I shaved it all off and made a length of cord by plaiting 3 very thin wires. I know how to do this as I have 3 daughters and I spend many hours doing their hair when they were little. Let me tell you ,1-1 scale hair is a lot easier, even on a wriggly five-year old……..
I wrapped the three strands around a drawing pin on one of the rafters in my loft- it was easier to do it standing up than hunched over the bench.

In the foreground is my first attempt which turned out to be TOO THIN, I couldn’t believe it. It was much easier with the thicker wire.
Here are the 2 shakos – the 95th Rifles badges from the kit seem so tiny in reality, but seen in close up in the photos they look MASSIVE. I had to make the second cockade from lead sheet as I didn’t have a spare for that .

I used a leather punch for the larger disc which I cut notches in, and the poor man’s rivet punch to get the smaller 0.7mm disc……

You can even push the disc out with the pencil lead!
I imagine you could also use hypodermic needles, although I haven't tried it myself. They should be even cheaper than the pencils,and they are available in various sizes on evil bay.
Anyway that's all for now, thanks for looking
Neil
to continue.....
I just had to do something about the shako cords as they had been seriously compromised by the moulding requirement.
This is the kit offering
and this is the reality
So I shaved it all off and made a length of cord by plaiting 3 very thin wires. I know how to do this as I have 3 daughters and I spend many hours doing their hair when they were little. Let me tell you ,1-1 scale hair is a lot easier, even on a wriggly five-year old……..
I wrapped the three strands around a drawing pin on one of the rafters in my loft- it was easier to do it standing up than hunched over the bench.
In the foreground is my first attempt which turned out to be TOO THIN, I couldn’t believe it. It was much easier with the thicker wire.
Here are the 2 shakos – the 95th Rifles badges from the kit seem so tiny in reality, but seen in close up in the photos they look MASSIVE. I had to make the second cockade from lead sheet as I didn’t have a spare for that .
I used a leather punch for the larger disc which I cut notches in, and the poor man’s rivet punch to get the smaller 0.7mm disc……
You can even push the disc out with the pencil lead!
I imagine you could also use hypodermic needles, although I haven't tried it myself. They should be even cheaper than the pencils,and they are available in various sizes on evil bay.
Anyway that's all for now, thanks for looking
Neil
G
Guest
Guest
Nice work with the Shako Neil :smiling3:.
You are indeed an honorary member of the dark side. Changing fingers and braid are a tribute to your desire to produce a realistic figure. Stunning work Neil and I look forward to seeing how you tackle his nose hair LOL Keep up the great work my friend
G
Guest
Guest
Brilliant work on the shako Neil.
Neil Merryweather
Active member
1/3
I’m afraid I’ve been away from the bench for a while due to work, but I have some more baby steps to report.

I’ve added a rifle sling from toothpaste tube with PE buckles – it doesn’t look like much but it took me several attempts and several sacrifices to the carpet monster…..
In my internet searches it seems that these days the well-dressed Rifles re-enactor cannot be without his D-shaped mess tin in oilcloth cover , which Airfix does not provide.
I was expecting to have to scratch this from Milliput or something, and then I remembered that I had something similar in the Revell WWI Tommies set.
In fact , something perfect

These remained unchanged for at least a hundred years!
I used tissue paper for the oilcloth cover, stuck with double sided tape, which is much less messy than glue

I carved into the rolled greatcoat a bit to define the edges and I filed a depression for the new strap

Then I strapped the mess tin to the rolled greatcoat with more toothpaste tube and made the retaining straps from tissue paper (I couldn’t believe how small these pieces were when I was doing this- I hope Steve the Rivet is impressed!)
I sealed the tissue with thin CA.

Well that’s all for now but I think the end of the making is in sight, and after that just the painting will be left, which I am not looking forward to.
Thanks for looking
Neil
I’ve added a rifle sling from toothpaste tube with PE buckles – it doesn’t look like much but it took me several attempts and several sacrifices to the carpet monster…..
In my internet searches it seems that these days the well-dressed Rifles re-enactor cannot be without his D-shaped mess tin in oilcloth cover , which Airfix does not provide.
I was expecting to have to scratch this from Milliput or something, and then I remembered that I had something similar in the Revell WWI Tommies set.
In fact , something perfect
These remained unchanged for at least a hundred years!
I used tissue paper for the oilcloth cover, stuck with double sided tape, which is much less messy than glue
I carved into the rolled greatcoat a bit to define the edges and I filed a depression for the new strap
Then I strapped the mess tin to the rolled greatcoat with more toothpaste tube and made the retaining straps from tissue paper (I couldn’t believe how small these pieces were when I was doing this- I hope Steve the Rivet is impressed!)
I sealed the tissue with thin CA.
Well that’s all for now but I think the end of the making is in sight, and after that just the painting will be left, which I am not looking forward to.
Thanks for looking
Neil
G
Guest
Guest
I'm sure we're all impressed Neil. Great work at such a small scale.
Neil Merryweather
Active member
1/3
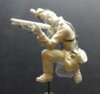
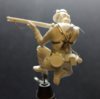
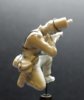
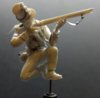
I'm calling the making part done ,now.
View attachment 349644View attachment 349645View attachment 349646View attachment 349647
the whispy bits are evidence of my first attempts with the pyrogravure ,of which more another time.
now for the painting :flushed:
View attachment 349644View attachment 349645View attachment 349646View attachment 349647
the whispy bits are evidence of my first attempts with the pyrogravure ,of which more another time.
now for the painting :flushed:
Attachments
G
Guest
Guest
Lovely work Neil. You've improved the kit offering no end.
Amazing work neil, it looks a million miles away from the original pose. Cant wait to see the paint start to go on , cheers tony
Brilliant work.He looks so much better and more natural.
Jon.
Jon.
Neil Merryweather
Active member
1/3
Peter, Tony, Jon,
many thanks chaps, I can see some faults but I'm keeping them to myself......
I've started the painting but nothing worthy of a photo.
Hopefully I'll get a decent session in tonight as the missus has friends round and I am not required to be sociable:thumb2:
many thanks chaps, I can see some faults but I'm keeping them to myself......
I've started the painting but nothing worthy of a photo.
Hopefully I'll get a decent session in tonight as the missus has friends round and I am not required to be sociable:thumb2:
- Joined
- Apr 27, 2018
- Messages
- 15,122
1/3
Neil,
Some really nice additions. The idea of the propelling pencils is a good idea
Some really nice additions. The idea of the propelling pencils is a good idea
Neil Merryweather
Active member
1/3
Thanks Scottie- yes I was thinking you might like that.Neil,
Some really nice additions. The idea of the propelling pencils is a good idea
Neil Merryweather
Active member
1/3
Simon, Steve, Jim
thank you !
Well, the hairy stick came out last night and tonight so I thought I would post a few shots.
I thought, 'being a dark green model I should use a white background', but the phone wasn't having any of it!

that was the best it could do :rolling: !
so I tried a black background, and got much better results


for those who are interested, although with me this is all experimental, I used Vallejo German Camo Green, but I didn't like it so I washed it all with GW Asurmen Blue(or something like that)-nicked from my son's Warhammer days")
I used the camo green as a highlight and added black for shading. The black bits have various amounts of brown or blue added, to make the shading more effective when the time comes.
I used Vallejo retarder medium in the green which helped a lot, and I used matt medium also but it's not that good, really. Then when I washed it with the blue it went totally glossy! AAARGH! I just have to be patient and matt lacquer it at the end.
I have bought a wet pallette but I haven't tried it yet.
thanks for looking
Cheers
Neil
thank you !
Well, the hairy stick came out last night and tonight so I thought I would post a few shots.
I thought, 'being a dark green model I should use a white background', but the phone wasn't having any of it!
that was the best it could do :rolling: !
so I tried a black background, and got much better results
for those who are interested, although with me this is all experimental, I used Vallejo German Camo Green, but I didn't like it so I washed it all with GW Asurmen Blue(or something like that)-nicked from my son's Warhammer days
I used the camo green as a highlight and added black for shading. The black bits have various amounts of brown or blue added, to make the shading more effective when the time comes.
I used Vallejo retarder medium in the green which helped a lot, and I used matt medium also but it's not that good, really. Then when I washed it with the blue it went totally glossy! AAARGH! I just have to be patient and matt lacquer it at the end.
I have bought a wet pallette but I haven't tried it yet.
thanks for looking
Cheers
Neil
Legal Notice
scalemodelling.co.uk is a privately operated online discussion forum. All content posted by members reflects their own views and opinions and does not necessarily represent those of the forum owners or administrators. While reasonable efforts are made to moderate content, no responsibility is accepted for user-generated material. By using this site, you agree to comply with UK law and the forum rules.