Theme editor

Scale Model Shop

Peugeot 405 T16 GR Paris Dakar

Status
Not open for further replies.

Wendall

New member
Joined
Jun 3, 2013
Messages
918
Reaction score
0
Points
0
1/3
Thread owner
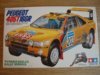
Happy New Year everyone. I've been looking forward to this! Here's my contribution, one of Ari Vatanens Dakar winning Peugeots.

View attachment 75708


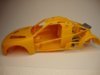
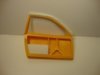
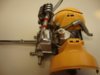
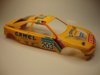
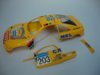
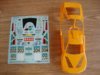
This kit is 24 years old so the decals are pretty yellow. I tried to source some new ones and there is a company called Shunko who have produced a replica set in the past but I could only find them on a Spanish website and they worked out at about £35! OUCH!!

So I currently have the decal sheet taped to the man cave window and I'm hoping that the sun might come out a lighten them.

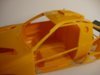
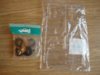
Also I'll need to get the Camel decals as they weren't supplied because obviously if they put them in, all of the little children would immediately start smoking 60 a day.

View attachment 75709

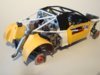
View attachment 75710

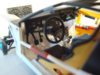
View attachment 75711

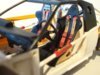
View attachment 75712


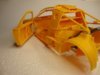
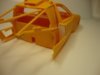
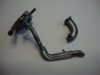
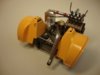
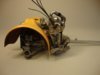
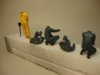
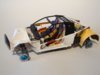
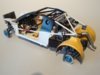
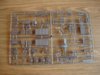
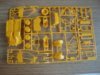
Not sure how it will end up at the moment. Probably gonna get a couple of figures, maybe drivers, maybe mechanics. Was thinking about opening the doors but I'm not sure if that will work yet. I have a few reference pictures so we'll see.

Jason

View attachment 188731

View attachment 188732

View attachment 188733

View attachment 188734

View attachment 188735
 

Attachments

  • DSC01089.JPG
    DSC01089.JPG
    3.2 KB · Views: 0
  • DSC01092.JPG
    DSC01092.JPG
    2.6 KB · Views: 0
  • DSC01093.JPG
    DSC01093.JPG
    2.3 KB · Views: 0
  • DSC01094.JPG
    DSC01094.JPG
    2.3 KB · Views: 0
  • DSC01095.JPG
    DSC01095.JPG
    2.8 KB · Views: 0
That looks well cool, i'll be keeping an eye on this one.

John
 
Nice subject Jason, don't see many of these around :)

Cheers, Neil
 
A 24 year old Peugeot? There isn't many of those knocking about!

Looks good.
 
Nice choice jason , good luck with the decals. The situation with the Camel logos is just plain silly, a bit like the swastika issue with german ww2 aircraft, If it had them on originally then why leave them off now , as you say its not as if seeing your model will cause youngsters to immediately start smoking !! (makes me think of the Surtees F1 car that used to be sponsored by Durex , wonder why no one ever did a model of that?) A while back I did a Pitts S2 special , the aerobatic aircraft , by LS models , luckily they didnt censor the Rothmans livery , i dont know if the laws are different in Japan or what? Anyway looking forward to seeing this one come together , that kick ass leaf blower on the box lid looks cool too LOL!! cheers tony
 
Thread owner
Made a start today. As I want to put this one on a base with a couple of figures I thought it would make for a more interesting scene if one of the doors were open.

Not as straight forward as it first appeared. The A pillar was very flimsy and as I made the final few passes with the panel scribe it broke:rolleyes:.

View attachment 75845

View attachment 75846

View attachment 75848


I mocked the body up and took some measurements, made a new A pillar from styrene and at the same time made a top for the sill cover and covered up an unsightly gap on the passenger door which would have shown with the engine cover up. Some milliput has been added to the drivers door frame as it needs to be about 1mm thicker. The A pillar looks to chunky and needs to be thinned a little bit.

View attachment 75849

View attachment 75850

View attachment 75851


Also started on the 'Kick ass leaf blower' which bizarrely has great big hollow bits which are fully visible when assembled?? Filled these as much as possible with styrene rod and will finish off with putty.

View attachment 75852


About 8 hours in the cave today and it doesn't feel like too much got done. Next problem, figure out how to hinge the door...

Jason

View attachment 188868

View attachment 188869

View attachment 188871

View attachment 188872

View attachment 188873

View attachment 188874

View attachment 188875
 

Attachments

  • DSC01111.JPG
    DSC01111.JPG
    1.8 KB · Views: 0
  • DSC01113.JPG
    DSC01113.JPG
    2.2 KB · Views: 0
  • DSC01115.JPG
    DSC01115.JPG
    2.3 KB · Views: 0
  • DSC01119.JPG
    DSC01119.JPG
    2 KB · Views: 0
  • DSC01120.JPG
    DSC01120.JPG
    1.9 KB · Views: 0
  • DSC01122.JPG
    DSC01122.JPG
    1.4 KB · Views: 0
  • DSC01118.JPG
    DSC01118.JPG
    1.5 KB · Views: 0
I had a 405 once.......................................looked a bit different than this.
 
Thread owner
Sorry for the lack of updates but modelling and forum time has been very limited lately.

I've been slowly painting all of the prepared parts in groups of one colour at a time and this weekend I managed to start some assembly and detail painting.

Spent most of today wrestling with the decals. These were very yellowed when I got the kit but they were taped to the man cave window for a couple of weeks and that seems to have done the trick. They were very brittle though so lots of patience was required. I'm happy with how they came out considering. Hopefully they'll be OK when I clearcoat over them. The Camel decals are from Virage, they're not 100% accurate but they'll do.

View attachment 77647

View attachment 77648


The engine almost ready...

View attachment 77649

View attachment 77650

View attachment 77651

View attachment 77652


And my headless mechanics. Never painted figures before and I cant bring myself to paint the heads yet for fear of buggering them up.

View attachment 77653

View attachment 77654

View attachment 77655


Hopefully it should start coming together a bit quicker now. Just have to figure out how to do the base.

Thanks for looking

Jason

View attachment 190670

View attachment 190671

View attachment 190672

View attachment 190673

View attachment 190674

View attachment 190675

View attachment 190676

View attachment 190677

View attachment 190678
 

Attachments

  • DSC01137.JPG
    DSC01137.JPG
    2 KB · Views: 0
  • DSC01137.JPG
    DSC01137.JPG
    2 KB · Views: 0
  • DSC01138.JPG
    DSC01138.JPG
    1.9 KB · Views: 0
  • DSC01139.JPG
    DSC01139.JPG
    2.3 KB · Views: 0
  • DSC01148.JPG
    DSC01148.JPG
    1.9 KB · Views: 0
  • DSC01150.JPG
    DSC01150.JPG
    2.2 KB · Views: 0
  • DSC01151.JPG
    DSC01151.JPG
    2.3 KB · Views: 0
  • DSC01132.JPG
    DSC01132.JPG
    2 KB · Views: 0
  • DSC01136.JPG
    DSC01136.JPG
    2.1 KB · Views: 0
Excellent engine!!! Those chrome parts looks spot on!!!

Very nice build so far.
 
Thread owner
So a quick update. Got the interior tub and roll cage mated to the engine, the fit wasn't brilliant so once it was glued I left it clamped up and in the vice for a couple of days and it all looks pretty square now. just the radiator and spare wheel left to fit.

View attachment 78637

View attachment 78640

View attachment 78644


As its going to be in a sort of diorama the interior has been weathered very slightly to give it a driven look. The seats originally had molded harnesses and it took a fair amount of time to sand them off and drill holes for the photoetch ones but worth it I think.

View attachment 78645

View attachment 78646


Hopefully get the body on at the weekend, should be finished soon.

Thanks for looking.

Jason

View attachment 191660

View attachment 191663

View attachment 191667

View attachment 191668

View attachment 191669
 

Attachments

  • DSC01154.JPG
    DSC01154.JPG
    2.1 KB · Views: 0
  • DSC01156.JPG
    DSC01156.JPG
    2.5 KB · Views: 0
  • DSC01157.JPG
    DSC01157.JPG
    2.8 KB · Views: 0
  • DSC01158.JPG
    DSC01158.JPG
    3.2 KB · Views: 0
  • DSC01159.JPG
    DSC01159.JPG
    3.5 KB · Views: 0
Status
Not open for further replies.
Back
Top