Theme editor

Scale Model Shop

Revell 1/32 Arado 196A-3

Status
Not open for further replies.
Your paint finish is out of this world! What a lovely looking model i'm very jealous lol
 
Thread owner
There is light at the end of the tunnel

Well the decals are down . It's taken two sessions a couple of hours last night and 4 1/2 hours this morning but I got there in the end. Some were more difficult than others. The 100 insignia on the fuselage was a real pig as the securing cable cuts right through the middle of it and it didn't conform with decal soft no matter how much I applied, so in the end I had to cut the decal in situ the cable will hide the gap. The sea horse insignia on the inspection covers also had to be cut in situ as it overlapped onto the fuselage. All the other decals went down fine, once cured overnight I will apply a final coat of Klear and then start on the weathering.

Vaughan

View attachment 43000

View attachment 43001

View attachment 43002

View attachment 43003

View attachment 43004

View attachment 43005

View attachment 156026

View attachment 156027

View attachment 156028

View attachment 156029

View attachment 156030

View attachment 156031
 

Attachments

  • IMG_0114.jpg
    IMG_0114.jpg
    6.2 KB · Views: 0
  • IMG_0125.jpg
    IMG_0125.jpg
    6.2 KB · Views: 0
  • IMG_0121.jpg
    IMG_0121.jpg
    6.1 KB · Views: 0
  • IMG_0119.jpg
    IMG_0119.jpg
    4.8 KB · Views: 0
  • IMG_0117.jpg
    IMG_0117.jpg
    5.8 KB · Views: 0
  • IMG_0116.jpg
    IMG_0116.jpg
    5.7 KB · Views: 0
That is just stunning Vaughan some great work there not long to go now well done so far
 
Thread owner

Attachments

  • IMG_0135.jpg
    IMG_0135.jpg
    6.3 KB · Views: 0
  • IMG_0129.jpg
    IMG_0129.jpg
    6 KB · Views: 0
  • IMG_0128.jpg
    IMG_0128.jpg
    6.2 KB · Views: 0
Hi Vaughan,you are getting there.

Have you tried putting a few drops of washing up liquid into the wash. It helps it to flow.

Cheers

Steve
 
This is looking great Vaughan...Don't be rushing these last few hurdles.

You have a stadium full of punters waiting for the finished model, so take your time....

No pressure either!lol

Cheers,

Ron
 
arado

what can i say about this build stunning paintwork your attention to detail is amazing

mobear
 
Thread owner
Thanks guys I'm chomping at the bit to get this one finished and I know I mustn't rush it. Steve that's a good idea will give it a go.

Vaughan
 
It's been a long time since I checked in on this one. It's looking brilliant. You'll need a holiday after this one.

Colin M....
 
Thread owner
Hi All

There has been lots of progress but alas only a few photos as I have been concentrating more on finishing the Arado. So here's the summery so far.

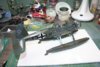
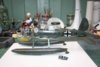
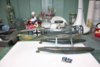
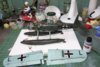
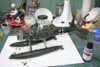
The wash is on and then wiped off just leaving it in the panel lines and recesses. I have sprayed the entire plane with a matt coat including engine covers.

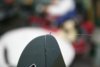
The folded wing has been permanently attached but note it's important that you get the correct angle despite the fact that the peg fits fairly tightly into the fuselage slot, there's a small amount of play which makes the wing hang low, this in turn means that the bracing rods don't line up with the fuselage anchorage point. What I did was to tape the wing tip to the tail plane at the correct angle and left it over night to set.

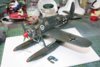
The canopy has had the masking removed and as I said in an earlier post that I had masked the top section of the frame wider than it should have been to cover up the join tabs this I think has worked out ok I'm pleased with the result.

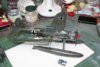
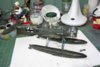
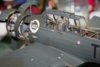
Lots of dangly bits have been added like the ariel mast and wire. This time I used lycra elastic for the wire, which believe it or not came from a pair of knickers that my wife bought at Christmas. This worked very well with the super glue, it seemed to set faster that when using fishing line.

I used the shaft of a broken drill bit on the tail fin as the original anchorage point had broken off early in the build.

The engine covers have been fitted in the open position they are a bit fiddly to fit as there is little to attach them to at the hinge point but the rods help to hold them in place.

The landing lights are yet to be added will fit them at the last moment.

That's about all for the moment, once I have finished I will post the pictures in the aircraft section.

I hope this build thread will be helpful to anyone who has a bash at building this waterbird. I have enjoyed it despite a few ups and downs and would recommend the Arado. You get a big kit, fantastic detail and at such an affordable price.

Vaughan

View attachment 43224

View attachment 43225

View attachment 156250

View attachment 156251
 

Attachments

  • IMG_0148.jpg
    IMG_0148.jpg
    5.7 KB · Views: 0
  • IMG_0189.jpg
    IMG_0189.jpg
    5.2 KB · Views: 0
Thread owner
Arado196A-3 Finished

Hi All

The Arado is finished and as promised I have posted the photos in the Aircraft Pictures Section. http://www.scale-models.co.uk/aircraft-pictures/14879-revell-arado196a-3-finished.html#post114496 Thanks again to everyone for your comments and helpful advice.

Vaughan
 
Status
Not open for further replies.
Back
Top