
You are using an out of date browser. It may not display this or other websites correctly.
You should upgrade or use an alternative browser.
You should upgrade or use an alternative browser.
Revell 1/32 Arado 196A-3
- Thread starter Vaughan
- Start date
- Status
- Not open for further replies.
G
Guest
Guest
Just read the build and its looking very good! Cant wait to see the finished item.
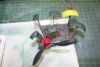
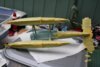
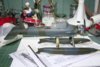
A bit of an update have just finished spraying the engine and the cowlings with RLM 70. I have also finished the prop and nosecone. Now starts the mammoth task of masking the fuselage and floats.
Vaughan
View attachment 42455
View attachment 42456
View attachment 155481
View attachment 155482
Vaughan
View attachment 42455
View attachment 42456
View attachment 155481
View attachment 155482
Attachments
G
Guest
Guest
Vaughan its looking awesome,do'nt envy the mask job you've got coming tho! I'm sure you'll slug it out and come out with a winner!
Thanks for that Trey.
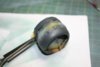
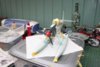
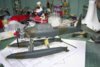
The camo is now complete on the engine cowling. I just need to mist a very thin coat of dark green as I did with the wings. Tomorrow I will start masking the fuselage, floats and struts. Wish me luck.
Vaughan
View attachment 42484
View attachment 42485
View attachment 155510
View attachment 155511
The camo is now complete on the engine cowling. I just need to mist a very thin coat of dark green as I did with the wings. Tomorrow I will start masking the fuselage, floats and struts. Wish me luck.
Vaughan
View attachment 42484
View attachment 42485
View attachment 155510
View attachment 155511
Attachments
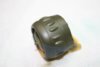
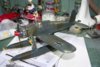
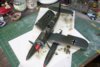
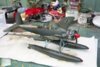
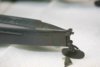
Have made a tentative start on the masking this morning. Floats and fuselage ok but still got to get my head around the struts. I had a go at dry fitting the engine and prop to the fuselage I'm pleased with the result so far.
Vaughan
View attachment 42501
View attachment 42502
View attachment 155527
View attachment 155528
Vaughan
View attachment 42501
View attachment 42502
View attachment 155527
View attachment 155528
Attachments
Nearly There!
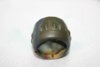
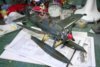
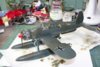
Thanks for the advice Ian and no I didn't it was a real struggle to get it off in places. I've had a bit of an issue with the tape or rather greasy fingers. The planes had a lot of handling over the last few months and I don't think I've been washing my hands enough so the tape has been pulling the paint off in places, we live and learn. So there has been plenty of touching up but I'm getting there. Will try and do some more today there's still lots to do like adding all the dangly bits, attaching the engine and all the inspection covers, a light misting of dark green to tone down the camo, a couple of coats of Klear, applying the decals, weathering the list does go on a bit. Anyway here are some photos.
Vaughan.
View attachment 42562
View attachment 42563
View attachment 42564
View attachment 42565
View attachment 42566
View attachment 155588
View attachment 155589
View attachment 155590
View attachment 155591
View attachment 155592
Attachments

Hi Vaughan,I just checked in to see how this one was getting along and getting along it certainly is! Despite a few tribulations you have to fix in the paintwork it looks absolutely superb. I always find that the final stages take me forever,waiting for various coats to dry etc,but you know this will be worth it.
Cheers
Steve
Cheers
Steve
Thats a great finish you have on that paint! bummer with the tape pull but as you have said, you only need to forget to wash your hands once, or scratch your nose and trouble lies ahead.
I am sure that you will not be able to see once repaired.
I must confess to having an urge to build one of those as well its on my list of German aircraft i would like to build. So thats up to four now!!! lol.
Ian M
I am sure that you will not be able to see once repaired.
I must confess to having an urge to build one of those as well its on my list of German aircraft i would like to build. So thats up to four now!!! lol.
Ian M
Really impressive stuff Vaughan....Nearly there now!
Although I haven't posted much, I have been watching this from day one, and what a treat it has been to see it come together, well done.
Ron
Although I haven't posted much, I have been watching this from day one, and what a treat it has been to see it come together, well done.
Ron
Looking real good now Vaughan. I hope I don't upset you, but I've just remembered a tip I read about masking struts. Some folks use a straw with a slit cut lengthwise - just cut it to the right length, slip it over the strut and fix with just a couple of bits of tape. You can cut out recesses where struts meet each other and fix any small gaps at these joints either with tape or blutack. You can also use those 'bendy' straws with the corrugated sections for curved struts the same way.
No good to you now of course, but maybe in the future!
Gern
No good to you now of course, but maybe in the future!
Gern
Almost there!
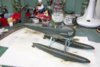
Well the masking is off which was a bit of a nightmare I should have as Ian said de-stickfy the tape or as Dave suggested use straws anyway it's off. The fuselage and floats have had a light misting of dark green to match the wings and reduce the contrast between the two colours. I've applied the first coat of klear in readiness for the decals. I have also pre drilled holes on the float sides to take the cables for the rudders. A second coat of klear maybe tomorrow and then on with the decals. Here's another dry run with the wings and the engine.
Vaughan
View attachment 42616
View attachment 42617
View attachment 42618
View attachment 42619
View attachment 42620
View attachment 42621
View attachment 155642
View attachment 155643
View attachment 155644
View attachment 155645
View attachment 155646
View attachment 155647
Attachments
G
Guest
Guest
I'm loving this one Vaughan, like Ron I've been watching without commenting but it's so good! The detail is great & your painting is of a very high standard. I only hope to do half as well as you.
Patrick
Patrick
Hi All
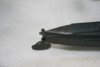
The second coat of Klear has been applied and I have attached the rudder cables. Hopefully I will make a start on the decals tomorrow.
Vaughan
View attachment 42794
View attachment 155820
The second coat of Klear has been applied and I have attached the rudder cables. Hopefully I will make a start on the decals tomorrow.
Vaughan
View attachment 42794
View attachment 155820
Attachments
- Status
- Not open for further replies.
Legal Notice
scalemodelling.co.uk is a privately operated online discussion forum. All content posted by members reflects their own views and opinions and does not necessarily represent those of the forum owners or administrators. While reasonable efforts are made to moderate content, no responsibility is accepted for user-generated material. By using this site, you agree to comply with UK law and the forum rules.