Theme editor

Scale Model Shop

Revell 1/32 Arado Ar196 B

Status
Not open for further replies.

Vaughan

Active member
Joined
Apr 1, 2011
Messages
3,246
Reaction score
51
Points
48
1/3
Thread owner
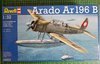
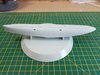
We'll this will be my next build. This is the mono float version having built the twin float version in 2012. It was going cheap at my LMS and I really enjoyed building the first one. I gather there is a resin canopy available so I might buy one as that's about the only flaw with the model, will have to see how much money there is in the purse.


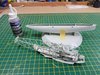
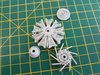
View attachment 297047
 

Attachments

  • 20180412_151952_resized.jpg
    20180412_151952_resized.jpg
    2.9 KB · Views: 0
Thread owner
Yes I think it is considering it was released in 2014 it still holds up well. The only slight niggle is the moulded on seat belts.

I've made a start this afternoon not really following the instruction sequence so have put the main float together and built the base. Float is just sat there so the stays are in the right position for glueing. As with the twin float version there needs to be plenty of weight at the front and for this float you need 50g. I'm going to be using liquid gravity which works really well you just pour it into the cavity and then fix with super glue or epoxy resin. Have also made a start on the internal frame work all a dry fit at the moment.

View attachment 297068
 

Attachments

  • 20180413_172644_resized.jpg
    20180413_172644_resized.jpg
    3.4 KB · Views: 0
Thread owner
A small update the front section of the float has been filled with 50g of Liquid Gravity and the top of the float has been glued in place. I have purchased a set of HGW harnesses from Hannants,
this one comes as a twin set one for this build and the other for the A variant that I have in my stash. They are not laser cut so will have to take care when cutting out. I've also made a start on the radial engine this has to be one of the best detailed engines that Revell has produced.


View attachment 297206

View attachment 297207


View attachment 297208

View attachment 297209


View attachment 297211
 

Attachments

  • 20180418_141706.jpg
    20180418_141706.jpg
    4 KB · Views: 0
  • 20180418_134213_resized.jpg
    20180418_134213_resized.jpg
    3.3 KB · Views: 0
  • 20180418_135006.jpg
    20180418_135006.jpg
    2.9 KB · Views: 0
  • 20180414_144000_resized.jpg
    20180414_144000_resized.jpg
    3.1 KB · Views: 0
  • 20180414_144012_resized.jpg
    20180414_144012_resized.jpg
    3.2 KB · Views: 0
Thread owner
I'm not sure if it is, it says that it's non toxic on the bottle so presume its not made of lead. Anyway it works a treat.


View attachment 297212
 

Attachments

  • 20180418_142606_resized.jpg
    20180418_142606_resized.jpg
    4.1 KB · Views: 0
That means the modelling version is about 6 times more expensive!
Or for a fiver more (plus post of course) you can get 5kg!

This is looking very nice so far V. Making me want to start my one!
 
Thread owner
It's been a couple of week but guess what back in hospital again only overnight this time (last Thursday with a ride in an ambulance) all well now just waiting for an MRI in July Doc says I will last that long...HaHa.

Anyway I have made some progress today spraying various parts. Again not sticking to the order of the instructions. Main float and wing floats have been primed and then Vallejo Metal Color applied. This paint is really good goes on like a dream dries in five minutes and gives fantastic results. Fuselage side walls sprayed RLM 02 along with the seat assembly. Floor pan yet to be sprayed. I have also started on the wings I'm going to opt for wings in flight mode so have attached the stays which are very strong and set the correct dihedral. Radial engine sprayed too this is a really enjoyable build.View attachment 298999

View attachment 299000

View attachment 299001
 

Attachments

  • 20180502_113333_resized.jpg
    20180502_113333_resized.jpg
    3.4 KB · Views: 0
  • 20180502_153232_resized.jpg
    20180502_153232_resized.jpg
    3.6 KB · Views: 0
  • 20180502_120427_resized.jpg
    20180502_120427_resized.jpg
    3.7 KB · Views: 0
Hi Vaughn
I'll sit in for this. I have learned a few things already :thumb2: Off to a great start. Lovely neat work. That is a nice metallic finish. Do you thin the Vallejo Metal Color for the airbrush? If so what with?
Sorry to hear you have health issues - wishing you well.
Jim
 
I remember the two float version you did, yes I can remember that far back.
Side by side, they will make a great pair. Oh that sounds just a bit wrong.
 
Vaughn

I'll pull up a pew and watch this mate, looks an interesting bird. I really like the metal finish, I've not had much luck spraying the Vallejo metal colour, except for the bronze and brass, so any tips would be appreciated.

cheers
Ross
 
Thread owner
Thanks Guys. Jim no need to thin the metal color it's like water. Important to under coat with a gloss black primmer to get the full effect of the depth and shine. I've also invested in some Vallejo gloss metal varnish to protect the finish this has been formulated not to dull the metal.

View attachment 299249

Colin they sure will. Next step will be to detail the internal frame work, cockpit and continue with the radial engine.
 

Attachments

  • 20180503_140332_resized.jpg
    20180503_140332_resized.jpg
    3.8 KB · Views: 0
Always nice to sit in on something a bit different. Great start to this one.
Mick
 
Status
Not open for further replies.
Back
Top