Nice detail work Tony

You are using an out of date browser. It may not display this or other websites correctly.
You should upgrade or use an alternative browser.
You should upgrade or use an alternative browser.
Revell 1/32 Grumman Martlet V
- Thread starter yak face
- Start date
- Status
- Not open for further replies.
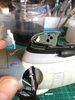
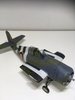
Been a while since i posted on this but things have been slowly progressing . Fixed the broken u/c leg and got the decals on . The decals were a bit thick and stiff but settled down nicely with a few treatments of decal softener ( gunze MR mark softer) and still show the raised rivets underneath nicely. The yellow sections however were quite see through (in fact the writing on the nose ‘that old thing’ was almost invisible) so i hand painted over them with yellow. Ive made a start on the undercarriage , thinning and replacing parts of the doors and fitting brake lines . Once the u/c is done i’ll be concentrating on the wing folds , quite a bit more to add to this area . Cheers tonyView attachment 306783View attachment 306784View attachment 306785View attachment 306786
Attachments


1/3
Looking good now, really stripey ...... not long to go. Notice you use a hit list as well....I do that sometimes, especially if it’s a complex build...usually write it on the instruction sheet.
Tim
Tim
me too , that yellowy piece of ancient looking paper is the back of the instruction sheet! Shows how old the kit is !! Cheers tonyLooking good now, really stripey ...... not long to go. Notice you use a hit list as well....I do that sometimes, especially if it’s a complex build...usually write it on the instruction sheet.
Tim
Some wonderful steady work Tony. She will certainly be worth it once done. Nice to see the hit list. I am always forgetting stuff so now I write down extensive to do lists as I go also. Good luck with the finishing work
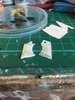
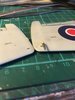
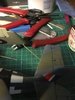
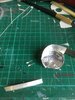
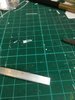
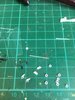
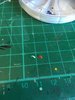
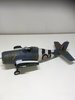
I managed to get a few hours in the shed tonight and enjoyed myself immensely ,farting about making the wing stays. When the wings were folded on the wildcat they were held back by two stays that hooked onto a pair of eyelets on the tailplane and wingtip. The eyelets were made from thin aluminium (actually some old 1” venetian blind slats that i saved when we threw the blind away, you never know when they might come in useful for modelling!) I drilled four small holes in the edge of the slat then cut 1 mm strips with the scissors . The strip with the hole in was then rounded and glued into small cuts i made in the wings and tailplanes. I made the stays from brass tube with fuse wire threaded through and bent over at each end into a hook . Obviously theyve got to be painted / touched up yet but the pic shows the idea . Next up is the wingfold area and little bits like the nav lights and canopy details, cheers tonyView attachment 309364View attachment 309365View attachment 309367View attachment 309370View attachment 309371View attachment 309372View attachment 309373
Attachments
-
 EB99DF89-A9AE-4F0D-A4AB-404DE816AC2E.jpeg2.6 KB · Views: 0
 -
 54BEC1AA-3652-486E-B4CB-353B52BA02D2.jpeg2.9 KB · Views: 0
 -
 05AD7EED-B6D7-4D22-8972-6391718ACA70.jpeg3.2 KB · Views: 0
 -
 64754389-ADAC-4CE8-91C8-CCE7C8DA4D6E.jpeg2.9 KB · Views: 0
 -
 F55CB17A-D228-4FF4-95B6-2AB2366AFDF4.jpeg2.8 KB · Views: 0
 -
 6EE121C1-6DF5-4353-AA70-7174F12BE609.jpeg3.1 KB · Views: 0
 -
 C661561A-AA35-4D49-9C00-3CA6573D864F.jpeg3 KB · Views: 0
Just caught up with this Tony and what can I say " damn nice bit of ingenuity on your behalf. Love the scratch built stays ( in that scale they really look the business.
Really looking good
Kind regards
Robert
Really looking good
Kind regards
Robert
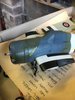
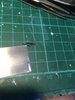
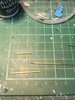
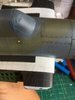
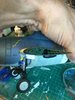
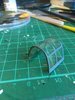
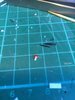
Made a start on the wingfold area today . Ive made the locking pin housings again as the original ones i fitted looked too small and were too far back . The winding handles were made from wire bent to shape and a bit of plastic sheathing from some telephone cable made the handle end. The pop up indicator that tells the pilot the wings are not locked and its mechanism have been rustled up from plastic card and stretched sprue , and ive drilled a slot in the wing top for these to go in after ive painted them red. The winding handle mechanism is accessed by opening a hinged door on the wing underside , ive already cut away the sections of wing and the curved door is going to be made from thin aluminium bent to shape , courtesy of an empty tea light candle. This has a folded edge on it which will nicely represent the piano hinge on the real thing , just a few scribes along its length should give the impression of a hinge .
Attachments
-
 4B44571D-6F26-49EC-BDDD-8F50479CEF00.jpeg3.2 KB · Views: 0
 -
 915A8048-06A3-4011-9A11-803D5B82A7C2.jpeg2.9 KB · Views: 0
 -
 4575D167-289A-4A68-B10F-49F572399B4A.jpeg2.7 KB · Views: 0
 -
 6233EDE3-FD5F-4CCA-8854-E2D7D9C4AB14.jpeg3.4 KB · Views: 0
 -
 56AE54DC-4653-4F48-BA2D-CBE939E14A34.jpeg3.3 KB · Views: 0
 -
 3E5BD6F4-0A1D-413A-A6A4-0E3CF75C5BF5.jpeg2.9 KB · Views: 0
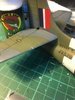
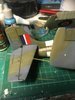
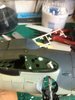
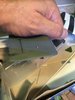
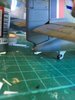
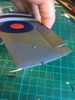
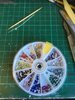
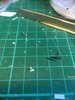
Bit more detailing done yesterday , the wingfolds have got a few more bits added , more to come yet and the tail hook has had two fillets either side added plus a formation light on the tail . Ive added the covers for the winding handle compartments and unmasked the canopies and added some guides to the sliding part . The nav and formation lights on the wings were added from my trusty poundland nail art gems set and these were also used to make the rear view mirror which will be attached to the top of the windscreen , not on the rail but on the clear part as per photos of the actual aircraft. Ive took a few photos of the fuselage as it is now because once the wings go on you wont be able to see much of it!
Attachments
-
 DA966BAD-141D-4197-ABF4-469019C8AB97.jpeg3.1 KB · Views: 0
 -
 CE1E856D-81B3-4AEF-B18E-8D0279B35BD3.jpeg3 KB · Views: 0
 -
 45D23E8B-29F9-4B1F-8E5D-9AFBDCDDE537.jpeg3.1 KB · Views: 0
 -
 5BAB2801-2EA1-405E-A4A0-D0D256912191.jpeg3 KB · Views: 0
 -
 53AA0D63-37D3-49C1-8614-08945E20B894.jpeg2.9 KB · Views: 0
 -
 3B71E7E1-94A4-4D60-88BD-0181D51AF391.jpeg3.5 KB · Views: 0
 -
 CEBAECF6-1C2D-4D8D-9A37-8AFC009AA68E.jpeg2.7 KB · Views: 0
 -
 0951322B-CA9B-4330-8131-4F684764FD44.jpeg2.7 KB · Views: 0
 -
 C94D79B7-FC20-4844-95EB-2FBC4697F00A.jpeg3 KB · Views: 0
 -
 3687C9A0-FE64-4AFB-BB9A-3A6094F19E32.jpeg1.8 KB · Views: 0
 -
 23A0026F-189A-47F6-B08C-4A233EA0ACC6.jpeg2.1 KB · Views: 0
- Status
- Not open for further replies.
Legal Notice
scalemodelling.co.uk is a privately operated online discussion forum. All content posted by members reflects their own views and opinions and does not necessarily represent those of the forum owners or administrators. While reasonable efforts are made to moderate content, no responsibility is accepted for user-generated material. By using this site, you agree to comply with UK law and the forum rules.