Theme editor

Scale Model Shop

Revell 1/32 He162 'salamander'

Status
Not open for further replies.

Vaughan

Active member
Joined
Apr 1, 2011
Messages
3,246
Reaction score
51
Points
48
1/3
Thread owner
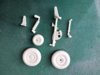
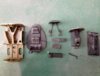
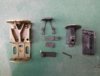
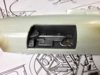
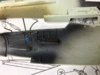
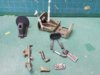
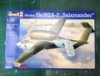
Well here's a departure from my usual builds this one's got no prop. I found this in my local toy shop for £15 which is a fare price and the first time I've seen the kit locally. The moulds date back to 2004 so not too old but there's some flash evident. The kit comprises of only three sprus and one clear part, the decal sheet looks good and in registration. There is some good detail in the office and wheel bays and the jet engine can be improved with the addition of some lead wiring. All in All not a bad kit!.

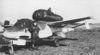
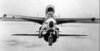
A quick look on the internet and I've found several builds and reviews plus even a restoration project with some very good detail.

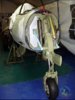
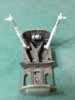
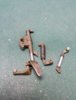
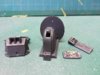
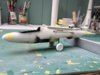
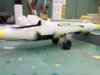
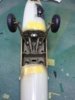
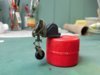
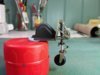
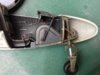
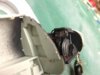
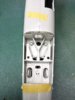
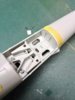
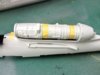
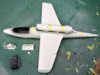
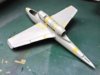
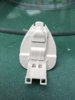
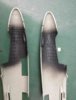
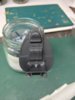
I've made a start with the office spraying the seat bulkhead and sidewalls RLM66. There is the option to remove the nosecone to expose the well detailed front wheel and suspension system but I think I'll opt for the closed version. The wings fit nicely together although I think they will require some filler at the wing roots here's my progress so far.

View attachment 67510

View attachment 67511

View attachment 67512

View attachment 67513

View attachment 67514

View attachment 67515

View attachment 67516

View attachment 67517

View attachment 67518

View attachment 67519

View attachment 67524

View attachment 67525

View attachment 67526


View attachment 180536

View attachment 180537

View attachment 180538

View attachment 180539

View attachment 180540

View attachment 180541

View attachment 180542

View attachment 180543

View attachment 180544

View attachment 180545

View attachment 180550

View attachment 180551

View attachment 180552
 

Attachments

  • 130208_6025.jpg
    130208_6025.jpg
    5.2 KB · Views: 0
  • 130208_6026.jpg
    130208_6026.jpg
    5.4 KB · Views: 0
  • 130208_6027.jpg
    130208_6027.jpg
    2.2 KB · Views: 0
  • 130208_6029.jpg
    130208_6029.jpg
    2.6 KB · Views: 0
  • 132907_6018.jpg
    132907_6018.jpg
    2.9 KB · Views: 0
  • 133007_6037.jpg
    133007_6037.jpg
    2.5 KB · Views: 0
  • 133007_6038.jpg
    133007_6038.jpg
    2.6 KB · Views: 0
  • 133107_6030.jpg
    133107_6030.jpg
    5.2 KB · Views: 0
  • 133107_6033.jpg
    133107_6033.jpg
    2.2 KB · Views: 0
  • 133107_6035.jpg
    133107_6035.jpg
    2.4 KB · Views: 0
  • Screen shot 2013-07-30 at 10.16.11.jpg
    Screen shot 2013-07-30 at 10.16.11.jpg
    2 KB · Views: 0
  • Screen shot 2013-07-30 at 10.16.48.jpg
    Screen shot 2013-07-30 at 10.16.48.jpg
    1.6 KB · Views: 0
  • Screen shot 2013-07-30 at 10.17.37.jpg
    Screen shot 2013-07-30 at 10.17.37.jpg
    1.7 KB · Views: 0
Looks great Vaughan, I built the airfix 1/72 version as a kid and always thought it was a pretty aircraft.

I'll follow your build with interest.

Tony.
 
Hi Vaughan

This is another kit you and I both have. I'm looking forward to seeing what you make of this 'older', inexpensive kit as I'm sure it will be quality.

If you get a chance to go to the Imperial War Museum they've got an example there.

Apparently these things were deathtraps to fly, still I think it is an interesting looking aircraft.

ATB

Paul
 
Interesting build, the plane looks elegant although has been said, for a cheap mass produced aircraft, a death-trap.

Si:)
 
Always fancied one of these, looking forward to following this build.

Tom
 
Nice subject Vaughan. I've not done any builds for a while and am contemplating a near contemporary, the Me 163, to break myself back in.

After your brilliant 190 I'll be watching this one :)

Cheers

Steve
 
Thread owner
Thanks Guys,

Unfortunately Paul I don't have time to get down to London but luckily there's plenty of info on the net.

I'm moving on at a bit of a pace with this one all cockpit components are sprayed including the wheel wells and gun bay so just the detail needs to be highlighted with a wash and some dry brushing. I've made a start on the wheels, which are well detailed, and the front wheel suspension it's a shame that none of it will be really visible as it's an accurate representation of the original.

View attachment 67584

View attachment 67585

View attachment 67585

View attachment 67586

View attachment 67587


View attachment 180610

View attachment 180611

View attachment 180612

View attachment 180613
 

Attachments

  • 130308_6042.jpg
    130308_6042.jpg
    2.3 KB · Views: 0
  • 130308_6041.jpg
    130308_6041.jpg
    2.2 KB · Views: 0
  • 130308_6040.jpg
    130308_6040.jpg
    2.1 KB · Views: 0
  • Screen shot 2013-08-03 at 19.55.36.jpg
    Screen shot 2013-08-03 at 19.55.36.jpg
    5.8 KB · Views: 0
Brilliant choice of subject vaughan, and a good kit too. I made the revell (ex frog) 1/72 as a nipper and always liked the shape. I dont know about death trap though , although they were cheaply and hastily made , by slave labour (who its rumoured sabotaged the airframes wing joints) the actual aircraft wasnt a bad design -when Eric 'winkle' Brown tested a captured example after the war he found it to be very pleasant to fly , although for a teenage hitler youth pilot with very little experience it might have been a different story! cheers tony
 
Thread owner
Thanks Guys

Have made a small amount of progress with undercart wells, cockpit walls and machine gun bay all weathered and dry brushed. I used the instrument panel decal straight over the existing moulded panel with plenty of decalsoft which seems to have worked well. Still have many components to add to the main wheel bay the detail is very good considering this is a Revell kit that's been around for nearly 10 years.

View attachment 67790

View attachment 67791

View attachment 67792

View attachment 67793

View attachment 67794

View attachment 67795


View attachment 180816

View attachment 180817

View attachment 180818

View attachment 180819

View attachment 180820

View attachment 180821
 

Attachments

  • 130808_6101.jpg
    130808_6101.jpg
    2.7 KB · Views: 0
  • 130808_6102.jpg
    130808_6102.jpg
    2.6 KB · Views: 0
  • 130808_6104.jpg
    130808_6104.jpg
    5.3 KB · Views: 0
  • 130808_6107.jpg
    130808_6107.jpg
    2.4 KB · Views: 0
  • 130808_6109.jpg
    130808_6109.jpg
    2 KB · Views: 0
  • 130808_6110.jpg
    130808_6110.jpg
    2.4 KB · Views: 0
Lots of lovely detail here Vaughan, looking really good.
 
Great looking build so far Vaughan,really perfect timing just got this kit as a gift. Nice to hear that the fit is good. Eagerly awaiting the next update ,cheers Trey
 
Thread owner
Thanks Guys

Trey here's a link to a really useful restoration build it's got some fantastic detailed shots of every stage of the rebuild http://memorial.flight.free.fr/He162uk.html and will come in handy when you do your build.

Small amount of progress with the undercarriage the front is now complete with just the wheel a dry fit, will most probably add at the end of the build. Still working on the main wheel bay but it's coming together slowly.

View attachment 67930

View attachment 67931

View attachment 67932

View attachment 67933

View attachment 67934


View attachment 180956

View attachment 180957

View attachment 180958

View attachment 180959

View attachment 180960
 

Attachments

  • 131308_6113.jpg
    131308_6113.jpg
    5.9 KB · Views: 0
  • 131308_6118.jpg
    131308_6118.jpg
    5.6 KB · Views: 0
  • 131308_6121.jpg
    131308_6121.jpg
    5.4 KB · Views: 0
  • 131308_6122.jpg
    131308_6122.jpg
    5.4 KB · Views: 0
  • 131308_6124.jpg
    131308_6124.jpg
    5.5 KB · Views: 0
Impressive work as always Vaughan.

I hope you haven't forgotten about a nose weight. She looks like quite a tail sitter even before you fit the tail fins and engine.

Gern
 
Thread owner
Thanks Dave the instructions state that you need to add 45g of weight in the nose and behind the pilots seat so will need to experiment to see what works best, there's not much room in the nose once the under-carts there so should be interesting
 
Status
Not open for further replies.
Back
Top