Theme editor

Scale Model Shop

Revell 1/32 JU88A-1

Status
Not open for further replies.

Vaughan

Active member
Joined
Apr 1, 2011
Messages
3,246
Reaction score
51
Points
48
1/3
Thread owner
Well I've not really had that much of a rest from the Shackleton but here goes with another model. (The Dauntless still remains unfinished not much to do paint and add a few more bits)


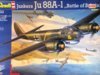
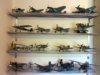
This ones been in my stash for several years so I thought it's time it was put on the bench. I gather there are a few fit issues but I'm used to that by now. It's a real beast not sure where it's going to go when it's finished as I have no shelf space left.


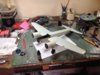
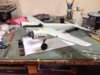
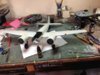
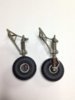
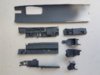
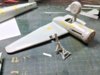
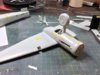
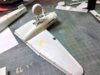
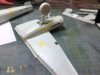
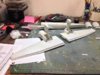
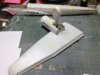
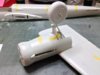
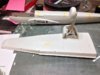
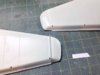
Anyway here's where I'm up to I would normally have started with the office but for a change I've started with the wings, engine nacelles, wheels, tail fin, rudder and control flaps. Wing tips have been added not a good fit on the underside but plastic card will fill the gap.  

View attachment 255801

View attachment 255800
 

Attachments

  • IMG_8301.JPG
    IMG_8301.JPG
    3.4 KB · Views: 0
  • IMG_8299.JPG
    IMG_8299.JPG
    3 KB · Views: 0
I built one of these a few years ago. The cockpit took me about 3 weeks to put together. There are a lot of parts in there!. One thing I found is the main wheel axles aren't strong enough for the weight of the finished model. Over a short period of time mine sagged. I had to drill through the centre of the axles and fix them to the undercarriage legs with metal pins. Other than that I thought it was a nice kit.
 
Thread owner
Ian that's fine, thanks for the info regarding the wheels Dave will keep that in mind I must admit they do look rather thin.


Here's some more photo's of my progress. The undercart is well detailed and quite a complicated structure. Everything is a dry fit at the moment but all's going together well. Plastic card in the wing tips has sorted out those gaps.

View attachment 255864

View attachment 255865

View attachment 255866

View attachment 255867

View attachment 255868

View attachment 255869

View attachment 255870

View attachment 255871

View attachment 255873
 

Attachments

  • IMG_8315.JPG
    IMG_8315.JPG
    2.9 KB · Views: 0
  • IMG_8313.JPG
    IMG_8313.JPG
    2.9 KB · Views: 0
  • IMG_8312.JPG
    IMG_8312.JPG
    2.8 KB · Views: 0
  • IMG_8311.JPG
    IMG_8311.JPG
    2.6 KB · Views: 0
  • IMG_8310.JPG
    IMG_8310.JPG
    3 KB · Views: 0
  • IMG_8309.JPG
    IMG_8309.JPG
    2.6 KB · Views: 0
  • IMG_8308.JPG
    IMG_8308.JPG
    2.6 KB · Views: 0
  • IMG_8305.JPG
    IMG_8305.JPG
    2.7 KB · Views: 0
  • IMG_8304.JPG
    IMG_8304.JPG
    2.1 KB · Views: 0
This looks to be a cracker. Don't know where you're going to put it though
 
stick it up as a hanging model with undercarriage up or maybe not as you've put them down
 
Good luck with that one.  I found this a very frustrating build when I did mine.  Some interior parts were not much more than blobs with some vague locations, one (allegedly) oxygen cylinder was left out in the end!


I look forward to seeing how you deal with the issues Vaughan to get another masterpiece no doubt.
 
Are you ready for this ? Rested fully ?  Oh look what's that on the bottom shelf........................................But anyway, those shelves, do you remember where they came from ? Just what I need for my new 'room'.


Colin M.
 
Thread owner
Colin I think I'm ready time will tell, gather there a few fit issues but I'm prepared after all it's a 2008 model. The shelves  are from Ikea http://www.ikea.com/gb/en/catalog/products/70022763/ come in two different widths stainless steel meant for the kitchen. They are made up of rods no good for planes so I bought some 5mm thick perspex from a local sign dealer, who cut it to size, not cheap but worth it. I can't remember the exact price. I don't think the Ju88 will fit if I bought another shelf unless I go for a deeper piece of perspex. I went for 5mm thick as a bit more sturdy. Hope this is of help. :)
 
Thread owner

Attachments

  • IMG_8352.JPG
    IMG_8352.JPG
    3.1 KB · Views: 0
  • IMG_8350.JPG
    IMG_8350.JPG
    3 KB · Views: 0
  • IMG_8347.JPG
    IMG_8347.JPG
    3.1 KB · Views: 0
  • IMG_8345.JPG
    IMG_8345.JPG
    1.9 KB · Views: 0
Great looking undercarriage Vaughan , the leather gaiters look totally real . keep the updates coming  , cheers tony
 
I'm gonna follow this too; a interesting subject. You really brought them wheels to life.


P.S. Are all the planes on the shelves 1/32 as well?
 
Thread owner
Yes Niel, apart from the BF109 G6 which is 1/24( bottom left) and the Shackleton which is 1/72 next to it. I've always built 1/32 scale, the Shackleton was ok being a larger plane but trying to detail small cockpit areas is too difficult for me. So I just stick to 1/32 scale. The only challenge now is to find a home for this one and the HE111 when I get round to building it.
 
The undercarriage lines sure do look nice. Will be probably doing something similar on my Ta 152. The red looks especially striking. Was the red a common feature across all luftwaffe aircraft?
 
Thread owner
A bit of gap with this one further heart problems, with an admission to a French hospital while on holiday with a suspected heart attack, have got in the way but I've managed to do a little bit of spraying the interior with RLM66. Still plenty to do yet. 

View attachment 260214
 

Attachments

  • 20160810_133015.jpg
    20160810_133015.jpg
    2.2 KB · Views: 0
Status
Not open for further replies.
Back
Top