Theme editor

Scale Model Shop

Revell 1/48 Beaufighter

  • Thread starter Thread starter Guest
  • Start date Start date
Thread owner
Thanks Jakko. I was thinking of a dark grey but wondered if there was anything else known to work better. Will stick with that and see how it goes.
 
Thread owner
I’m by no means an expert aircraft modeller, though :) You could always try a couple of panel lines and paint over them again if it doesn’t look right.
 
Hi Andy, I've been busy hosting relatives the past month through New Year so did a little catching up on your build. Very good I have to say including the pre-shading and invasion stripes. :thumb2:

I use watercolor for my panel lines and can mix up any shade and as translucent as I want. Just needs a dash of dishwashing detergent to break up the surface tension so it sticks. Easy clean up with a damp cloth or cutip and just needs a coat of varnish to seal it. Here's examples of what I normally do...the first picture looks scary...

View attachment 369679 View attachment 369680 View attachment 369681

Cheers,
Richard
 

Attachments

  • U59.jpg
    U59.jpg
    6.4 KB · Views: 0
  • U63.jpg
    U63.jpg
    5.5 KB · Views: 0
  • U60.jpg
    U60.jpg
    6.2 KB · Views: 0
Thread owner
Thanks Richard. I'd consider you a master of pre-shading so for you to give me a thumbs up is much appreciated.

I'm following your Night Fighter build and have been intrigued by the watercolour washes. If I had some I'd be giving them a go but I'll store that up as something to try in the future. I haven't had much luck with enamel or oil washes, and it's always a stage I dread, so anything that makes that part of the process easier and less stressful is a bonus!
 
Andy

Loving what you've done so far.

Considering you're a relative 'newbie' to the hobby you really are turning out some great work.

Very well done indeed.

Andrew
 
Thread owner
So, after a few days of applying washes, airbrush shading with "smoke", and several hours of oil dot work it looks...

virtually no different! :smiling5:

Before:

View attachment 369853

After:

View attachment 369854

Clearly time well spent lol.

Time to stop faffing around with the stuff I don't understand and just finish building it I think, then add it to my growing collection of 90% finished kits :upside:
 
It has turned a bit browner though or could be the tone of the image. :smiling2: Dirtying is not everyones cup of tea. You paint cars for a living that need to be spotlessly clean and shiny so you need to relax and let your hair down...I mean guard down and just go messy. Start by working on a spot, don't worry if one area looks more weathered...there are no mirror images of dirt like both wings can look different.

Anyway Andy, for now it just needs panel lines. Do you have any kids watercolor around the house?...try that with a little detergent. If you don't like it just wash it off.

Cheers,
Richard
 
Thread owner
Unfortunately not Richard. I had a look when I first saw you mention them.

You wouldn't know it but the panel lines have been done. Twice. Once with a MIG PLW that didn't really work, then again with thinned oilbrushers that wasn't much better. They are exceedingly shallow though so even with gentle wiping from a dry cloth after 24 hours to cure the paint just pulls out!

I guess next time I'll have to scribe them a bit deeper.
 
Thread owner
As seen on the underside - where the lines are deeper around the engines and undercarriage doors the PLW has stayed put. Elsewhere it's pretty much disappeared.

View attachment 369865
 
Thread owner
You wouldn't know it but the panel lines have been done. Twice. Once with a MIG PLW that didn't really work, then again with thinned oilbrushers that wasn't much better. They are exceedingly shallow though so even with gentle wiping from a dry cloth after 24 hours to cure the paint just pulls out!
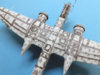
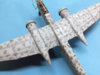
This is one of the advantages of my homebrew concoction: it’s based on acrylic floor or furniture varnish (not sure which off the top of my head) with black pigment mixed in, and it dries fast enough that I can wipe it away almost immediately after applying it with a thin brush, usually with a moist finger perpendicular to the direction of the line (but preferably towards the rear of the plane).
 
Love that Andy. I prefer the less dirty look and anyway I’m in awe of these that do it. But yours is a nice balance and a lovely looking aircraft.

I’m still twitchy about airbrushing my Spit. Like you cars are no problem but a 10-50 psi airbrush is scary.
 
Thread owner
Thanks Gary.

Like you say, airbrushing is a whole different kettle of fish and it's taking me a while to adapt. Deliberately putting on too little paint so that the underlying colours show through is against everything I've learnt lol.

A tip I picked up from here is to apply light thin coats, and when you think it still needs more, walk away for a while then come back and have another look.
 
Back
Top