
You are using an out of date browser. It may not display this or other websites correctly.
You should upgrade or use an alternative browser.
You should upgrade or use an alternative browser.
Revell 1/96 Spanish Galleon
- Thread starter Bobby Conkers
- Start date
Well chuffed with how the lanterns have turned out. Thanks to all for the advice on epoxy putty molding, they're very sharp when you get the technique right. A tiny bit uneven when really close up, but I'm more than satisfied.
Of course, I could have just bought a couple, but wouldn't have learned anything!

Of course, I could have just bought a couple, but wouldn't have learned anything!
Hi Andy
Glad to see this back on the go. Lanterns look great as does the whole model. You're probably right that the wiring needs tidying :rolling: :smiling: :hugging-face::hungry:
Jim
Lovely looking dog by the way :thumb2:
Glad to see this back on the go. Lanterns look great as does the whole model. You're probably right that the wiring needs tidying :rolling: :smiling: :hugging-face::hungry:
Jim
Lovely looking dog by the way :thumb2:
Thank you all.
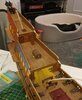
So, got the decks and sidey bits all in place, tested all the lights post-hammering and they all still seem to work. Phew.
On to 'normal' stuff for a bit, eyebolts, stringy tie-round things, windey-rope things, poles, ladders, and railings. I'm really getting the hang of this navy lingo.
View attachment 439207
Attachments
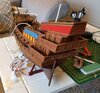
So I've pretty much completed the hull - few starting rigs and ropes to do, then onto the masts and, gulp, rigging.
The walkways at the rear are a disappointing fit, but not a surprise. I've managed to bash it together with minimal gappage. I'll touch up the paint at the end, I'm sure there's more damage I'll do before then.
The bowsprit is of course a little "Revell warped" but that can be straightened with rigging. Just hoping the masts are in line - I haven't had the courage to look yet. If they're beyond repair, I will do some balsa whittling.
Anyway, latest look below.
View attachment 439674View attachment 439675View attachment 439676View attachment 439677
Attachments

OH them frontal shots look great an its very nice work Andy very well done an its great to see you fitting in lights really brings the model to life in my opion great work
chris
chris
So the next problem I've given myself is to fit lights in the crow's nests while keeping it secret.
Sadly, my 'first' solution, feeding wires inside the masts themselves will not work, the hollow is just too narrow. So, for my next solution I'm going to 'fake' conduits using straws, feed the wiring through and try and make them look like secondary masts/mast supports of some kind. Not at all authentic but it's my bloody ship and I'll do what I want.
If it ends up looking rubbish I'll bin the lights.
View attachment 439807
Attachments
Looking good Andy but why lights in the crows nest...the lookout has a pension for reading novels at night does he? :smiling2: If the straw doesn't work, thin strand of wire minus the insulation stuck on either side of the pole may still light up the tiny bulb.
Cheers,
Richard
Cheers,
Richard
WELL :thinking:Richard they dint have lights in the crows nest as far as i know but all ships have a white lights called running or steaming lights up on their masts but on a galleon im not sure but you cant deniy the look out a good ole read if he gets bored can you lolLooking good Andy but why lights in the crows nest...the lookout has a pension for reading novels at night does he? :smiling2: If the straw doesn't work, thin strand of wire minus the insulation stuck on either side of the pole may still light up the tiny bulb.
Cheers,
Richard
") :rolling::smiling5::smiling5::smiling5: an Andy WHY not just glue tiny 1/2mm wires up the mast to the bulb an stick the wires to the mast as in my opinion a drink straw fixed to the mast will look out of place but thats how i would do it if it was me
:rolling::smiling5::smiling5::smiling5: an Andy WHY not just glue tiny 1/2mm wires up the mast to the bulb an stick the wires to the mast as in my opinion a drink straw fixed to the mast will look out of place but thats how i would do it if it was mechris
OK, so, with a bit of tidying still to do, this is what I managed.
View attachment 439843
I think this is the best I could do with this solution, and it isn't terrible once touched up and straightened, but perhaps not good enough.
Taking your ideas from above, womdering if I could perhaps 'invent' some rigging, wrap the wires in thread so they look like rope, and string them up. Might try that on the next mast and see how they look, then go back if I'm happy.
I know there shouldn't be lights in the crow's nest, but I have no sense of authenticity - if the model looks better lit up there, in they go, but not to the detriment of the model as a whole.
I also now have some tiny weeny drill bits which I think I may be able to use to open a couple of the hatches in the hull. TBC!
Attachments
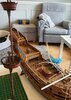
So, managed to get all the lighting together. Top tip for myself - set it all up inside the hull next time. As it goes, I couldn't have done that this time as I didn't have a bloody clue what I was doing.
Revell's masts as ever were bent as a Tory PPE contract. Managed with some judicious leaving on radiators to straighten enough for rigging to sort out.
Of course, we all know what this means: it's rigging time.
Photo below - doesn't show it in the best light as yet, I'll try and find time to take some better ones over the next week.
View attachment 440918
Attachments
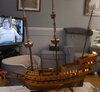
ITS looking really good Andy with the lights an brings the model to life im happy to say but should the rear mast go off at that angle ?
but very good work im pleased to say to you
chris
but very good work im pleased to say to you
chris
1/3
If you have problems with the yards you may consider using wooden knitting needles mate; all diameters, perfectly straight, readily available and inexpensive to boot!
Steve
Steve
ITS looking really good Andy with the lights an brings the model to life im happy to say but should the rear mast go off at that angle ?
but very good work im pleased to say to you
chris
Thank you. A perfectly valid question - in this case yes, it's at that angle. It's the only one which went in snug into its D slot, the other two wobbled about something rotten!
1/3
That’s so the mast can take the strain. Under load it would be pushed forward so wouldn’t look so strange.
Legal Notice
scalemodelling.co.uk is a privately operated online discussion forum. All content posted by members reflects their own views and opinions and does not necessarily represent those of the forum owners or administrators. While reasonable efforts are made to moderate content, no responsibility is accepted for user-generated material. By using this site, you agree to comply with UK law and the forum rules.
Currently on our website
Threads
37,634
Messages
710,270
Members
2,678
Latest member
sprues_and_spitfires