Theme editor

Scale Model Shop

Rick's Airfix 1/24 Hawker Hurricane MK1

Status
Not open for further replies.
I've taken to using plastic wrap (the food cling film stuff) on larger surfaces and the edges in Tamiya tape. I started doing that when I realised I needed to order some more tape. You just have to ensure you don't pierce or rip the wrap plastic.
 
Thread owner
Canopy masked. I had some issues with this. At first I sprayed all the glazing with Humbrol Clear which resulted in fogging and speckles. After washing it all off and polishing out the worst bits I coated it in Johnson's Klear and got a superb result. Humbrol Clear is most definately relegated to sealing cockpit decal from now on.


View attachment 115137


View attachment 228160
 

Attachments

  • image.jpg
    image.jpg
    2.5 KB · Views: 0
As Barry says, the underside pre-shading looks good. I do pre-shade and sometimes it doesn't work, but post shading is always there to save the day !
 
\ said:
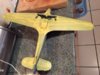
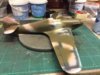
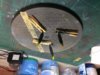
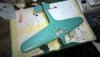
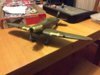
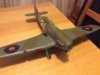
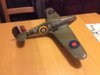
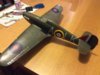
Underside masked, I just need to edge seal here and there with Maskol for a bit of added protection. Building 1/24 scale planes consumes a lot of masking tape!
View attachment 126148
Rick


Have you considered not masking under the wings at all?


I mask under the fuselage and any areas sticking out (such as the rad) that will catch overspray when I shoot the sides of the model, but with the wings I just shoot down and get a good delination between upper wing and lower wing colour that way.
 
Thread owner
\ said:
Rick
Have you considered not masking under the wings at all?


I mask under the fuselage and any areas sticking out (such as the rad) that will catch overspray when I shoot the sides of the model, but with the wings I just shoot down and get a good delination between upper wing and lower wing colour that way.
In hindsight Barry that would probably be a good way to go. This is my first time building any aircraft bigger than 1/72, I'm learning that techniques that work in smaller scales don't always transfer to larger scales.
 
Thread owner

Attachments

  • image.jpg
    image.jpg
    3 KB · Views: 0
  • image.jpg
    image.jpg
    3 KB · Views: 0
  • image.jpg
    image.jpg
    2.9 KB · Views: 0
Nice job, shame about the Humbrol clear, maybe it's not as good sprayed
 
You are doing an excellent and a very solid built.


Magnificent so far!
 
\ said:
I've taken to using plastic wrap (the food cling film stuff) on larger surfaces and the edges in Tamiya tape. I started doing that when I realised I needed to order some more tape. You just have to ensure you don't pierce or rip the wrap plastic.
Greaseproof paper works well too & is more robust than clingfilm
 
Thread owner

Attachments

  • image.jpg
    image.jpg
    2.8 KB · Views: 0
  • image.jpg
    image.jpg
    2.7 KB · Views: 0
  • image.jpg
    image.jpg
    2.5 KB · Views: 0
  • image.jpg
    image.jpg
    2.8 KB · Views: 0
Rick. I would suggest just adding a drop of white to the green, thin it heavily, then just spray the centres of panels. Don't worry if the contrast is then too great just knock it back by spraying a very heavily thinned green in mist coats drying down in between gradually reducing the contrast until you get the look you want. It's very controllable that way and you get a good modulated effect.
 
Thread owner
Not happy with the finish of the camouflage I re-sprayed both colours, again by freehand and although better it's not as I sharp as I would like but it's staying this way now. When the masking was removed some areas of paint bleed showed around the wheel wells but these were easily dealt with along with a patch of paint that came off with the tape.


I have been using gloss varnish from Vallejo and Humbrol Clear with acrylics and enamels over the last few years with fairly disappointing results so this has been coated in Railmatch acrylic varnish and has dried much better, the drawback is that it needs thinned.


When dry I can move on the masking and painting the gun muzzles and exhausts before applying the decals, thankfully there are relatively few to apply.


View attachment 116614

View attachment 116615

View attachment 116616

View attachment 116617

View attachment 116618


View attachment 229637

View attachment 229638

View attachment 229639

View attachment 229640

View attachment 229641
 

Attachments

  • image.jpg
    image.jpg
    2.4 KB · Views: 0
  • image.jpg
    image.jpg
    2.5 KB · Views: 0
  • image.jpg
    image.jpg
    2.3 KB · Views: 0
  • image.jpg
    image.jpg
    2.4 KB · Views: 0
  • image.jpg
    image.jpg
    2.5 KB · Views: 0
Thread owner
Landing gear fitted, what a dreadful fit though. One of the side stays has shed a short section on rod and I have discovered another missing part - the upper leg fairing for modelling the gear down is missing so I will have to butcher the part supplied for the gear up option. Masking applied for the exhaust and gun muzzle ports painting task later this week along with some touch up on the gear.


View attachment 117845


View attachment 230868
 

Attachments

  • image.jpg
    image.jpg
    2.9 KB · Views: 0
\ said:
First coat of Dark Earth.....it's a bit dark!
Better pic's.


View attachment 126342


View attachment 126343


I made the same mistake again with the yellow propeller tips and painted them black first, of course the yellow doesn't like sitting on the black very well so I sanded the tips back to bare plastic and re applied the yellow. When dry I'll mask and finish in the black.


View attachment 126340
I used to do that.Now I spray my props with white primer.Then I do the tips yellow,mask them and spray the blades black.The Hurricanes looking good.
 
Thread owner
I've painted the gun ports and exhausts since my last update and also applied the decals with the exception of some that go on the underside because the instructions aren't clear which way round they go. The microset is still wet but when dry I'll need to trim the fin flash and touch in some of the red.


My only setback is some white marks that appeared on one of the under wing roundels, not sure how to cure that.


View attachment 118321

View attachment 118322

View attachment 118323

View attachment 118324


View attachment 231344

View attachment 231345

View attachment 231346

View attachment 231347
 

Attachments

  • image.jpg
    image.jpg
    2.6 KB · Views: 0
  • image.jpg
    image.jpg
    2.5 KB · Views: 0
  • image.jpg
    image.jpg
    2.8 KB · Views: 0
  • image.jpg
    image.jpg
    1.9 KB · Views: 0
Looking superb Rick. Hard to see in the photos but the white blotches might just be glue residue. Have you tried to wipe over it very gently with a damp soft cloth? Otherwise from limited experience it may disappear under the final matt varnish. Alternatively you do happen to have a lot of roundel blue lying around at present ;)
 
Status
Not open for further replies.
Back
Top