
You are using an out of date browser. It may not display this or other websites correctly.
You should upgrade or use an alternative browser.
You should upgrade or use an alternative browser.
Simon's AEC Militant mkI GS truck. Asam models 1/48
- Thread starter simontie
- Start date
Sure hope so good job iv got till december lolPlenty of wee bits to keep you busy Simon, should build into a nice model.
Andy.
1/3
Looks good, remember those from back in the day, looking forward to the result!
Steve
Steve
Hi all not much of an update but i have cleaned up the rear twin axle assembly &
removed all the seam lines polished off the oxidisation and primmed it


more to follow once i get the chance but due to a small family turning up unannounced its put the brakes on ..my daughter gave birth to twins last weekend, 6 weeks early but all doing well Isabella and George., however we now have a six year-old to look after for the next few weeks till mum and babies are aloud home so as and when i can i will get moving on this
simon
removed all the seam lines polished off the oxidisation and primmed it
more to follow once i get the chance but due to a small family turning up unannounced its put the brakes on ..my daughter gave birth to twins last weekend, 6 weeks early but all doing well Isabella and George., however we now have a six year-old to look after for the next few weeks till mum and babies are aloud home so as and when i can i will get moving on this
simon
A nice progress, both in modelling and family life.")
Best wishes to your daughter and... Wow! twins! Welcome to Isabella and George.
Best wishes to your daughter and... Wow! twins! Welcome to Isabella and George.
1/3
Nice one on the family Simon, congratulations. Started in the truck as well I see :thumb2:
Out of interest, why polish off the oxidation?
Out of interest, why polish off the oxidation?
Wrong choice of words, i wire brushed it and buffed it of with scotch brite to give the paint the best chance, the shine is just a bonus.. hope that makes senseNice one on the family Simon, congratulations. Started in the truck as well I see :thumb2:
Out of interest, why polish off the oxidation?
Yes definatly a few extra parts, which is good as some have the odd blemish so good to have options, and both sets of axles for the front i am building the 6 wheel drive vertion but 4 wheel is there as well if requiredLooks like options or spares have increased the parts count. Seems a lovely kit though.
1/3
See what you mean now :thumb2: .Wrong choice of words, i wire brushed it and buffed it of with scotch brite to give the paint the best chance, the shine is just a bonus.. hope that makes sense
I used to use a suede brush on white metal railway wagons and military figures to do the same thing. I stopped when I had some softer than usual figures and realised it took all the sharp edges off, blurring the cast on detail…..made them much harder to paint :flushed:.
I moved on to using jif cream cleanser and an old toothbrush as the fine polishing grit it used was less destructive. Can’t use it now though, the jif formula was changed some years ago to remove the fine grit and it doesn’t work any more…......
I find paint takes extremely well to white metal anyway so haven’t missed that step. It needs a good scrub with dilute washing up liquid though, the casting process seems to leave all sorts of rubbish on the castings. Modern lead free castings are also harder than white metal of old so probably stand up to cleaning better…….a wire brush might be overkill though :tongue-out3:
Good advice i should point out its a very soft brass wire brush iv been trying and testing different methods and surprised my self with the amount of fine tooling i have lying around not usually used for plastic kits :smiling3:See what you mean now :thumb2: .
I used to use a suede brush on white metal railway wagons and military figures to do the same thing. I stopped when I had some softer than usual figures and realised it took all the sharp edges off, blurring the cast on detail…..made them much harder to paint :flushed:.
I moved on to using jif cream cleanser and an old toothbrush as the fine polishing grit it used was less destructive. Can’t use it now though, the jif formula was changed some years ago to remove the fine grit and it doesn’t work any more…......
I find paint takes extremely well to white metal anyway so haven’t missed that step. It needs a good scrub with dilute washing up liquid though, the casting process seems to leave all sorts of rubbish on the castings. Modern lead free castings are also harder than white metal of old so probably stand up to cleaning better…….a wire brush might be overkill though :tongue-out3:
i was worried about how soft or hard the material would be but most of it seems good quality my issue now being how brittle it might be but there in lies another challenge…
simon
1/3
Good stuff :thumb2:Good advice i should point out its a very soft brass wire brush iv been trying and testing different methods and surprised my self with the amount of fine tooling i have lying around not usually used for plastic kits :smiling3:
i was worried about how soft or hard the material would be but most of it seems good quality my issue now being how brittle it might be but there in lies another challenge…
simon
White metal is actually quite forgiving. Any misshapen parts can be carefully straightened by finger pressure alone, and it drills very cleanly and accurately. If you do inadvertently fracture a part, it can be repaired with solder. Just takes the right solder and flux and a light touch. You can then dress the part back down with cheap files and Emery paper until it looks like new. You will need a dedicated white metal bit if you go down this route though. Normal solder and white metal solder don’t mix well, so it’s best not to let them cross contaminate. It’s an old material, but is capable of good results if handled well.
Well i made it back to this build, twins are home and so is the six year old!!! She is fantastic but exhausting in a good way.
so hopefully i can spend some more time on this build, today i just sat down and started tinkering cleaning a few bits as i went and removing some of the duplicate parts and putting what remained in to a logical order (my logic) so heres were i am and this now looks less daunting than it first seemed,


so thats a good afternoon and a large chunk of evening out of the way, but its made a difference hope to crack on now, i can see the light logic end!!!…
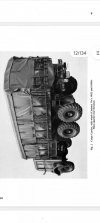
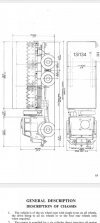
almost forgot by brother sent me some really great detailed pictures of the chassis and body work this did make a difference as well
View attachment 492949View attachment 492950View attachment 492951View attachment 492952View attachment 492953View attachment 492954View attachment 492955
more when i get it
simon
so hopefully i can spend some more time on this build, today i just sat down and started tinkering cleaning a few bits as i went and removing some of the duplicate parts and putting what remained in to a logical order (my logic) so heres were i am and this now looks less daunting than it first seemed,
so thats a good afternoon and a large chunk of evening out of the way, but its made a difference hope to crack on now, i can see the light logic end!!!…
almost forgot by brother sent me some really great detailed pictures of the chassis and body work this did make a difference as well
View attachment 492949View attachment 492950View attachment 492951View attachment 492952View attachment 492953View attachment 492954View attachment 492955
more when i get it
simon
Attachments
-
 IMG-20230620-WA0005.jpeg5.8 KB · Views: 0
 -
 IMG-20230620-WA0006.jpeg6.8 KB · Views: 0
 -
 IMG-20230620-WA0002.jpeg5.4 KB · Views: 0
 -
 IMG-20230620-WA0003.jpeg6.6 KB · Views: 0
 -
 IMG-20230620-WA0004.jpeg7.4 KB · Views: 0
 -
 IMG-20230620-WA0008.jpeg5.7 KB · Views: 0
 -
 IMG-20230620-WA0007.jpeg5.2 KB · Views: 0
Seen this the other day Simon and thought of your build 
- Joined
- Apr 27, 2018
- Messages
- 15,018
1/3
Simon,
Looking good mate.
Looking good mate.
Well I got serious with this over the last few days and have started construction!!
chassis and front mud guard's drive shafts all in place along with exhaust and air tanks


slow going but getting there, will push on this weekend due to the wonderful weather and Friday i have a carpel tunnel op so this might hamper progress after next week, I will keep you posted, hope everyone has managed to avoid the worst of this storm?
simon
chassis and front mud guard's drive shafts all in place along with exhaust and air tanks
slow going but getting there, will push on this weekend due to the wonderful weather and Friday i have a carpel tunnel op so this might hamper progress after next week, I will keep you posted, hope everyone has managed to avoid the worst of this storm?
simon
Coming together well, lots of filing and sanding but looking okay (well in my opinion!!!)
cab in place not fitted yet and rear cargo bed complete with the panel latches, rear door hinges
and final picture with cargo cover and outer cab all just sitting in place, i need to come up with a painting plan before i get to far ahead of myself & few other parts to finish off as well
simon


cab in place not fitted yet and rear cargo bed complete with the panel latches, rear door hinges
and final picture with cargo cover and outer cab all just sitting in place, i need to come up with a painting plan before i get to far ahead of myself & few other parts to finish off as well
simon
It's going to be a really nice model. Those cargo bed panels are a pleasure to see.
Legal Notice
scalemodelling.co.uk is a privately operated online discussion forum. All content posted by members reflects their own views and opinions and does not necessarily represent those of the forum owners or administrators. While reasonable efforts are made to moderate content, no responsibility is accepted for user-generated material. By using this site, you agree to comply with UK law and the forum rules.