Enjoying this piece very much. If anyone is interested there is a pretty good book by Vasiliy Krysov called Panzer Destroyer-he crewed one of these in The Great Patriotic War. It's a very good read.
 (for informational purposes only)

You are using an out of date browser. It may not display this or other websites correctly.
You should upgrade or use an alternative browser.
You should upgrade or use an alternative browser.
SimonT - 1/35 SU-122
- Thread starter SimonT
- Start date
real nice,work,with this,one,do like the added detailing and scratch work,
just adds so much to a build,the engine deck louvres ,look real good,
were did you find the eyelets for the railing,that I,do real like,
keep up the great work with this one,:hungry:
just adds so much to a build,the engine deck louvres ,look real good,
were did you find the eyelets for the railing,that I,do real like,
keep up the great work with this one,:hungry:
John - no, nothing clever. Dad currently as well as can be expected ta
Allen - I have caught the brackets a few times but luckily the plastic card just bent rather than breaking. The brackets will be stiffened up once I get their top plates on. The track pins are just single size on these
Si - cheers
Jim - thanks. A lot less messing about to just make them in this case
Mike - thanks
Paul - cheers
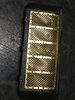
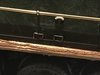
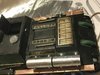
Monica - thanks. The eyelets for the rails are made from brass wire that has been flattened with smooth jaw pliers
View attachment 320830
as is usual with Eduard etch they only provide an indication of where rivets/bolt heads need to go (either by etching a hole or an engraved circle) so I added all the missing rivet heads - and that was all I got done apart from cleaning up more track links
Allen - I have caught the brackets a few times but luckily the plastic card just bent rather than breaking. The brackets will be stiffened up once I get their top plates on. The track pins are just single size on these
Si - cheers
Jim - thanks. A lot less messing about to just make them in this case
Mike - thanks
Paul - cheers
Monica - thanks. The eyelets for the rails are made from brass wire that has been flattened with smooth jaw pliers
View attachment 320830
as is usual with Eduard etch they only provide an indication of where rivets/bolt heads need to go (either by etching a hole or an engraved circle) so I added all the missing rivet heads - and that was all I got done apart from cleaning up more track links
Attachments
There are a lot of builds get done with etch that is devoid of the rivets/bolt heads
If you look on the etch fret Steve you will usually find a series of holes - they are provided so you can mould your own rivets/bolt heads if you don't have punch and die sets
Heat up the end of a length of sprue and push it against the fret then slice off the resulting bumps and glue to the etch
If you look on the etch fret Steve you will usually find a series of holes - they are provided so you can mould your own rivets/bolt heads if you don't have punch and die sets
Heat up the end of a length of sprue and push it against the fret then slice off the resulting bumps and glue to the etch
- Joined
- Apr 27, 2018
- Messages
- 15,119
1/3
Simon great work as always. A great idea about forming a block of the individual items to get them the same.
Paul - no problem
Greg - ta
Scottie - cheers. Have used that method a lot over the years - generally works quite well. Need to take care when sanding to keep things square otherwise you will end up with one end thicker than the other
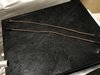
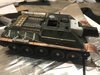
Morning all, a small amount of progress to report:
View attachment 321467
plastic cables cut off, ends drilled out and twisted copper wire CA'd in place
View attachment 321463
View attachment 321464
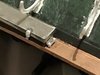
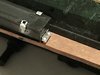
main stowage box had the lock and hinge blobs removed and the sides scraped to square them up
new locks and hinges made up then end mounting plates added from pewter and punched disks
View attachment 321465
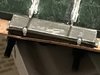
View attachment 321466
the smaller box got similar treatment plus a complete lid from pewter
the track link clean up is also continuing - nearly done now so then I get to drill out all the holes for the link pins
Greg - ta
Scottie - cheers. Have used that method a lot over the years - generally works quite well. Need to take care when sanding to keep things square otherwise you will end up with one end thicker than the other
Morning all, a small amount of progress to report:
View attachment 321467
plastic cables cut off, ends drilled out and twisted copper wire CA'd in place
View attachment 321463
View attachment 321464
main stowage box had the lock and hinge blobs removed and the sides scraped to square them up
new locks and hinges made up then end mounting plates added from pewter and punched disks
View attachment 321465
View attachment 321466
the smaller box got similar treatment plus a complete lid from pewter
the track link clean up is also continuing - nearly done now so then I get to drill out all the holes for the link pins
Attachments

1/3
Hi Simon
Nice tip on the etch rivets. Always surprises me that military model based etch doesn’t follow the convention established at least thirty years ago for railway kit. With quality railway stuff the rivet locations are half etched on the rear of the piece so they can be pushed through to the working face with a rivet punch or blunt scriber, so embossing the rivet.
To be clear, to a railway scratchbuilder (who usually works in brass or nickel silver) a rivet punch is an embossing tool, not a punch and die tool such as plastic modellers use... don’t use your expensive die set to emboss rivets on etch because you will probably ruin both....
G
Guest
Guest
Probably because of parallel development, where one “side” came up with a solution that the other didn’t see. Modelling is (oddly enough) fairly compartimentalised, where techniques that are commonly used by people building one subject seem to be hardly even known in another, even if they use the same basic material (like all building plastic kits).Always surprises me that military model based etch doesn’t follow the convention established at least thirty years ago for railway kit.
G
Guest
Guest
Simon.
Great tip on the PE and using a piece of sprue to produce a rivit.
What I enjoyed most was the thought of heat being employed. Fire ! Fire !
I have some sprue now where are the matches !
John.
Great tip on the PE and using a piece of sprue to produce a rivit.
What I enjoyed most was the thought of heat being employed. Fire ! Fire !
I have some sprue now where are the matches !
John.
Tim - definitely not a good idea to use punch and die set on brass
Steve - it is going ok so far I think. Photos follow
Jim - cheers
Rick - :thumb2:
John - oh dear, forgot you were a pyromaniac, better get a fire extinguisher....
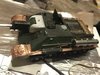
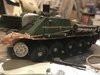
Morning all,
View attachment 321568
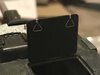
added rail deflectors over the pistol ports as per reference photos
front vision slot cover modified again as per photos
View attachment 321567
modded the main hatch hinges
the commanders vision block covers have a circular bulge at one end. The kit parts have the bulge too small and in the wrong place so they were shaved off and new ones added from punched pewter
View attachment 321569
added some new wire handles on the inside of the main hatch to replace the moulded ones
View attachment 321566
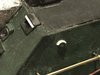
made a start adding the tie down loops on the right hull - looking at them now though they are a bit uneven so these will be coming off again
Steve asked for some overall photos.....
View attachment 321564
View attachment 321565
View attachment 321570
View attachment 321563
Steve - it is going ok so far I think. Photos follow
Jim - cheers
Rick - :thumb2:
John - oh dear, forgot you were a pyromaniac, better get a fire extinguisher....
Morning all,
View attachment 321568
added rail deflectors over the pistol ports as per reference photos
front vision slot cover modified again as per photos
View attachment 321567
modded the main hatch hinges
the commanders vision block covers have a circular bulge at one end. The kit parts have the bulge too small and in the wrong place so they were shaved off and new ones added from punched pewter
View attachment 321569
added some new wire handles on the inside of the main hatch to replace the moulded ones
View attachment 321566
made a start adding the tie down loops on the right hull - looking at them now though they are a bit uneven so these will be coming off again
Steve asked for some overall photos.....
View attachment 321564
View attachment 321565
View attachment 321570
View attachment 321563
Attachments
-
 su122-046_2018-12-3.jpg2.7 KB · Views: 0
 -
 su122-045_2018-12-3.jpg3.1 KB · Views: 0
 -
 su122-044_2018-12-3.jpg3 KB · Views: 0
 -
 su122-043_2018-12-3.jpg2.8 KB · Views: 0
 -
 su122-042_2018-12-3.jpg4 KB · Views: 0
 -
 su122-041_2018-12-3.jpg4 KB · Views: 0
 -
 su122-040_2018-12-3.jpg3.9 KB · Views: 0
 -
 su122-047_2018-12-3.jpg3.8 KB · Views: 0
G
Guest
Guest
Wonderful work Simon. A joy to behold.
..... and they show just what incredible work has gone into this.Steve asked for some overall photos.....
Jim
Legal Notice
scalemodelling.co.uk is a privately operated online discussion forum. All content posted by members reflects their own views and opinions and does not necessarily represent those of the forum owners or administrators. While reasonable efforts are made to moderate content, no responsibility is accepted for user-generated material. By using this site, you agree to comply with UK law and the forum rules.
Currently on our website
Threads
37,633
Messages
710,253
Members
2,678
Latest member
sprues_and_spitfires