Theme editor

Scale Model Shop

SimonT - 54mm RFC Figure 'Anyone for cricket?'

Status
Not open for further replies.

SimonT

New member
Joined
Apr 27, 2018
Messages
2,824
Reaction score
0
Points
0
1/3
Thread owner
Had been hunting around for this figure for ages - put it down somewhere for safekeeping then forgot what I had done with it :smiling4:

Came across it by accident yesterday when looking for something else :rolling:

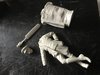
He is a four piece 54mm resin kit from Elan13 and it just took my fancy when I saw it even though figure painting is not something I am very good at

View attachment 312575
this is the picture supplied with the kit - the original is tiny, about 30mm x 40mm which is why it looks a bit grainy
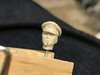
there are no painting instructions

View attachment 312576
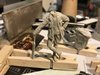
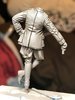
there are only four parts so assembly instructions not required, which is handy as they don't give you any :smiling:

View attachment 312577
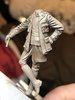
his noggin was missing a lower lip and chin had a hole in it

a bit of careful carving gave him a lip and a bit of filler took care of the hole

View attachment 312578
the body took a while to clean up as there were mould seams to get rid of that were hard to spot - hopefully I got them all

I also opened up all the solid areas that should be undercut - they are filled to ease casting but it means there are a lot of solid bits on show

the main visible areas are the lower jacket front where it hangs over his breeches

I carefully chiselled the excess resin away to leave the jacket separate

A few creases were sharpened up as well

That's the easy bit done - now comes the hard part as painting is not really my strong point :tongue-out3:

I shall give him a clean down with zippo fluid then prime with Halfords finest later today
 

Attachments

  • crk-001_2018-8-27.jpg
    crk-001_2018-8-27.jpg
    4 KB · Views: 0
  • crk-002_2018-8-27.jpg
    crk-002_2018-8-27.jpg
    3.1 KB · Views: 0
  • crk-003_2018-8-27.jpg
    crk-003_2018-8-27.jpg
    2.8 KB · Views: 0
  • crk-004_2018-8-27.jpg
    crk-004_2018-8-27.jpg
    4.2 KB · Views: 0
Nice unusual pose, look forward to watching this as figure painting isn't my strong point.
 
What an awesome figure Simon. I am so glad you found it. Great work on the cleaning up and I hope all goes well with the wet stuff
 
Looks like a very nice figure Simon, are you going for the full picture. As in oil drum wickets and grass?
Very nice start.
 
Hi Simon
Great looking figure. Elan 13 has some unusual stuff. Didn't Ian Succamore sell his stuff through them? I think I got the cavalier with the apple from Elan 13.
Jim
 
Thread owner
Mick - nor mine so don't expect too much. I do like the pose though

Steve - this is the one I was trying to find to convert into RAF for the GB on the defunct site. Not sure about the painting

Ian - that's the intention. The drum is supplied - has a flying helmet and coat laid on top

Jim - yes that's the place. Ian has a few pieces on there now. I have one of his Napoleonic Brit infantry. I also did that chap with the apple and a bust of a steampunk pirate lass with monkey, and a bust!
I also have a 120mm German mountain trooper bust that they do
 
Thread owner
Primed this chap yesterday morning and then sprayed him with Tamiya flat earth as a starting base

The oil drum has had a stippled coat of red brown - I shall give it a coat of AK effects fluid then a top coat of green
 
Smashing figure Simon. The pose is so natural and top marks for chiselling the coat bottom from the pants. I have reservation when it comes to painting figures everytime I start on a new one. It doesn't help if every new one happens in a space of a year of each attempt. I'm sure you'll do well... as I've said a good sculpt will bring up surprises of unseen talents within the painter.

Cheers,
Richard
 
Simon.
Well what ever next ?.
Have to admire you , not hacking apart, no pewter , why this could even get finished :smiling2::smiling2:
John .
 
This looks interesting Simon. Painting is definitely not my strong suit, so I shall watch your progress, if I may?
Steve
 
Hi Simon, nice one something a bit different :thumb2:, rather you than my with the the painting, good luck sir.
Lashings of ginger beer in the clubhouse after the game and Simon's paying :tears-of-joy::tears-of-joy::tears-of-joy::tears-of-joy::tears-of-joy:.
Pete.
 
Nice touch with the undercutting of the clothing. Looking forward to see how you get on with this.
 
Thread owner
Richard - I know what you mean with the time between figures. It is like starting anew every time. Already off to a bad start so don't hold your breath

John - no mods other than removal of the undercuts. As for finishing him.......not sure that will happen

Steve - good to see you. What are you scratching currently?

Pete - thank you, I need as much luck as I can get

Peter - should probably just send him to you to ensure it turns out ok

Si - thanks. Without cutting it out there is rather a lot of resin which would need clever painting to make it look like shadow. I don't do normal painting never mind clever painting :smiling5:

Scottie - I fear watching the paint dry will be more exciting

View attachment 312858
View attachment 312861
first up is the oil drum

the chipping fluid didn't work too brilliantly (bound to be attributable to user error) and the green was a bit on the dark side.

I stippled on some NATO green then dry brushed it with a mix of NATO green and buff followed by VJ pigment fixer and some rusty orange pigment - not used the pigment fixer and it doesn't have instructions so just painted it on and then dropped pigment on to it. Seemed to work ok

Wickets were added next using deck tan - thought white would look too bright

I then added thinned VJ dark rust into the tops of the dents and around the barrel rings building it up in a few layers

View attachment 312859
View attachment 312860
started adding some well thinned VJ german camo black brown into the uniform shadows then I noticed a previously unseen hairline mould line running all down his right arm

Will have to sand that off and start again

I also managed to snap off the cricket bat - handle is too thin to drill and pin and if glued will just snap off again as the contact point is so small

I am hoping that I can replace the entire handle with a piece of metal rod but it will take some work to get the resin handle out of his hand without damaging the fingers

So remedial works required followed by a re-prime then I can try again

Thanks for looking in
 

Attachments

  • crk-005_2018-8-30.jpg
    crk-005_2018-8-30.jpg
    3.7 KB · Views: 0
  • crk-006_2018-8-30.jpg
    crk-006_2018-8-30.jpg
    3.5 KB · Views: 0
  • crk-007_2018-8-30.jpg
    crk-007_2018-8-30.jpg
    3.5 KB · Views: 0
  • crk-008_2018-8-30.jpg
    crk-008_2018-8-30.jpg
    3.7 KB · Views: 0
Hi Simon, good progress...
Even with the mis-use of the chipping fluid, it's turned out quite nice. I like the way the pigments have created the crusty look on the edges.

The figure just needs more darkening of the shadows. I have seen some figure painters just adding a thin tint of the base color over the shadows and highlights and that's all. As for the bat, I would leave it and paint it separately and only attach it after posing the figure and touch up in situ.

Cheers,
Richard
 
Hi Simon
Wicket looks good. Nice finish on the drum. Sorry about the bat issue. Resin can be fragile but you have sorted far worse problems.
Jim
 
Simon.
Like Jim I thought the drum was great, as for the pigment you are supposed to put the pigment on and let the fixer wick into it. Mind you I have done it both ways ! The main thing it sticks what ever it finds. :smiling2:
John.
 
Thread owner
Hi Richard - this was only the first pass and I broke it before I finished. Bat handle is too thin to get a strong join - needs replacing

Jim - thanks

John - I thought that and that is how I have done it when using X20 thinners to fix it. The AV stuff is more like Matt varnish with a different name on the bottle - doesn't flow so easily as thinners

Bat is now fixed

I cut the handle off near the top of the bat and drilled a hole down the centre

I then sliced off the top end flush with his fingers and carefully drilled out using successively larger bits

The wrist to arm joint also proved to be none too strong and his hand fell off so I also drilled the wrist and pinned it to the arm

The new bat handle is a short length of a large paper clip as the wire was just the right diameter

All now CA'd back together and a little filler added around the bat end of the handle to blend it in

A little sanding will be required once dry and then I can have a second try at painting
 
Status
Not open for further replies.
Back
Top