
You are using an out of date browser. It may not display this or other websites correctly.
You should upgrade or use an alternative browser.
You should upgrade or use an alternative browser.
SMER 1/48 Sukhoi su 22m4 in polish service
- Thread starter yak face
- Start date
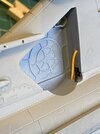
Little bit more done on this today. Ive masked up and sprayed the black patches on the nose and around the cannon blast plates. On the real thing these areas are very roughly sprayed so i tried not to get too fine an edge on them . The oval blast plates and panel around the cannons now need to be sprayed steel . I made a couple of masks for this by putting some wide tape on and gently rubbing to see the line then using a sharp pencil marked the shape . This was then peeled off and stuck onto a piece of shiny sticky label backing paper. I could then cut it out carefully with the scissors and it can be peeled off and re used.


Allen Dewire
New member
1/3
Wow Tony, top quality work going on here and you're doing a bang-up job on the camo too!!! So many decals, fergitaboutit. You'll end up in a ward with the rubber walls in a white coat with extra long sleeves. Then again, knowing you, they will all end up on the model, even if it takes a month.......
Prost
Allen
Prost
Allen
Got a good session in the shed today so its coming on slowly . I masked up the cannon blast shields , exhaust area and the unpainted areas on the outer wing ( the bits that are covered when the wing is at full sweepback ) ready for the vallejo metal color . I used a bright chrome for the blast shields ,dull aluminium for the wings and pale burnt metal for the exhaust . Once these had been sprayed and left to dry for an hour or two I added the dark steel areas on the wings and misted some thinned metallic blue and vallejo smoke on the end section of the exhaust area. Theres still lots of little bits to do before I can start decalling ( oh no, ive just remembered those stencils :tired")


- Joined
- Apr 27, 2018
- Messages
- 15,128
1/3
Tony.
Some great paint work going on.
Some great paint work going on.
G
Guest
Guest
Very neat indeed Tony. Had another look at that video as well, the pilot showed some good moves .:thumb2:
Been looking at the undercarriage and wheel wells and decided they are a bit bare , so after looking at some excellent walkarounds i decided to add a bit of extra detail . The legs have been jazzed up with some brake lines and other wires and the wheel wells have had a couple of pipes added . I’ll be adding a few more wires to the wells , not every single one thats visible on the walkaround but just enough to lift it a bit. Another area thats sadly lacking in any detail is the inside of the gear doors but thats another day , cheers tony


Attachments
Very slow progress on this but heres a quick update. Ive glued the main undercarriage legs on and been tittivating the wells a bit more with wire and a few scratched hydraulic linkages. Its not a full recreation as theres so many bits and pipes on the real thing but its a bit busier than the bare kit wells . All it needs now is a bit of a wash to add shadows and mucky it up a little. Ive also added some detail to the inside of the gear doors as they were just completely featureless . The main airframe has also had a coat of Klear and is ready for the decals :confounded:


- Joined
- Apr 27, 2018
- Messages
- 15,128
1/3
Excellent scratchery mate.
WOW,WOW,WOW..Just stumble on your post and Im quite impress.. Looking forward to view your next move !...
Hi Tony
Excellent work. You're going the extra mile on this and it shows. Most impressed with your thoughtful, neat work.
Jim
Thanks guys , its come to a bit of a stop at the minute , hopefully i can get a bit of shed time this bank holiday weekend and start the dreaded decals :disappointed: , cheers tonyTony,
Ditto completely missed the updates. That's coming on beautifully. I love the extra little additions!!!!
ATB.
Andrew
Legal Notice
scalemodelling.co.uk is a privately operated online discussion forum. All content posted by members reflects their own views and opinions and does not necessarily represent those of the forum owners or administrators. While reasonable efforts are made to moderate content, no responsibility is accepted for user-generated material. By using this site, you agree to comply with UK law and the forum rules.