
You are using an out of date browser. It may not display this or other websites correctly.
You should upgrade or use an alternative browser.
You should upgrade or use an alternative browser.
Special Hobby 1/32 Yak 3
- Thread starter BarryW
- Start date
- Status
- Not open for further replies.
I am in the last stages of this pig of a kit and it has not given up fighting.
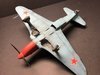
Here she is after touch ups and the final matt coat
View attachment 294399
I unmasked the canopy and found something of a problem. First as I feared with the amount of work needed on poor fitting part some cement got under the mask and left a mark on the rear of the canopy. Worse than that, something broke loose inside and I was hoping it would not be something visible but it’s a side panel and is very visible.
View attachment 294400
The back harness has come away from the seat as well, probably knocked out of position by the loose side panel.
There is nothing that can be done as removing the canopy for a repair is not viable.
I decided to press on and finish to get some photos from selected angles before binning the model. I won’t keep one like this on my display shelves.
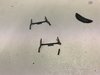
However the bad engineering, poor fit and lack of a positive locations provided more problems. Fitting the inner wheel doors. How on earth you are meant to get the pieces in the right angles and cemented into position is beyond me. I decided to leave off the parts as a result, just attaching the inner doors without these supports. One of the parts broke in the process anyway having already been repaired once.
View attachment 294401
I will post some more pics once the rest of the u/c is done probably in a couple of days.
Here she is after touch ups and the final matt coat
View attachment 294399
I unmasked the canopy and found something of a problem. First as I feared with the amount of work needed on poor fitting part some cement got under the mask and left a mark on the rear of the canopy. Worse than that, something broke loose inside and I was hoping it would not be something visible but it’s a side panel and is very visible.
View attachment 294400
The back harness has come away from the seat as well, probably knocked out of position by the loose side panel.
There is nothing that can be done as removing the canopy for a repair is not viable.
I decided to press on and finish to get some photos from selected angles before binning the model. I won’t keep one like this on my display shelves.
However the bad engineering, poor fit and lack of a positive locations provided more problems. Fitting the inner wheel doors. How on earth you are meant to get the pieces in the right angles and cemented into position is beyond me. I decided to leave off the parts as a result, just attaching the inner doors without these supports. One of the parts broke in the process anyway having already been repaired once.
View attachment 294401
I will post some more pics once the rest of the u/c is done probably in a couple of days.
Attachments


A pig of a kit seems a fair description. The nightmare of re-occurring seams, when this happens to me, I resort to CA glue, you have to be a bit careful, but it does the trick.
I can't help thinking, this must be more of a pig than the 190 you suffered ?
I can't help thinking, this must be more of a pig than the 190 you suffered ?
In some ways Colin but this is the only Yak 3 in 1/32 available while there are better 1/32 FW190's with a ZM one also soon to be released so it is/was worth persevering with. But there are limits!!!
I will get it done, at least after a fashion....
Then I will get started on a 'goody'....
I will get it done, at least after a fashion....
Then I will get started on a 'goody'....
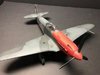
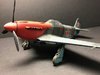
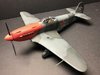
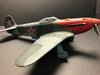
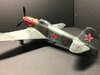
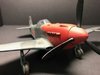
Well, its finished....
I have a few shots avoiding pics of the cockpit of course and the 'levers' that retract the inner wheel doors are not accurate as I just used some scrap plastic. not one to be pleased with and it won't be on the shelf for long....
View attachment 294649
View attachment 294650
View attachment 294652
View attachment 294653
View attachment 294654
View attachment 294655
View attachment 294656
View attachment 294651
One thing is for sure. Much as I would love a Westland Whirlwind (the twin engined WW2 fighter, not the chopper...) I will not be buying the forthcoming Special Hobby release. Imagine attaching those twin booms with one of their poorly engineered and fitting kits... I model for relaxation and have enough stress without fighting one of those.
Attachments

G
Guest
Guest
It's been an interesting journey to follow the build of your Yak!
Too many issues with the kit if you ask me but you soldiered on and prevailed - just to have bits inside the cockpit come loose...
Popping off the canopy isn't something you'd do and this I can understand but would it be possible to drill a tiny hole somewhere on the side so you could manipulate the loose bit with a metal wire?
Just enough so it doesn't bother you so much?
Top notch paint job!!!
Hi Jens. No, not really it is not a practical option. Two parts came loose, these were cockpit top sidewalls that are added after the fuselage is joined and I opted for c.a. rather than cement as I thought it would be less problematical for the paint. With all the filling and sanding around the pit they just broke loose. There are some lessons there!!!
I think Barry you couldn't have done anymore it's a build that has fought you all the way. The paintwork is up to your high standard and everything else looks good to me. Just a question regarding the eduard harnesses where do you purchase them from? looking forward to your next build let's hope it's a less stressful experience.
I think we all have the odd one or two models unfinished, but to get to the end and be given two fingers from the kit isnt fair. Mind it probably accurate in the way they were built !! :thinking: ") as the penguins say "Just Smile And Wave Boys Smile And Wave"
as the penguins say "Just Smile And Wave Boys Smile And Wave"
as the penguins say "Just Smile And Wave Boys Smile And Wave"I get them from Hannants Vaughan. They have a good and varied stock. The ‘steel’ ones conformalot better than the others.I think Barry you couldn't have done anymore it's a build that has fought you all the way. The paintwork is up to your high standard and everything else looks good to me. Just a question regarding the eduard harnesses where do you purchase them from? looking forward to your next build let's hope it's a less stressful experience.
You've done a great job Barry, it looks stunning. And it's that, that makes what's happened to the pit even worse. A great fight all the way, I hope you don't get too disheartened.
Because of the amount of filler and sanding to attach it in the first place as it was such a poor fit. It was something of a struggle to say the least and this is such a pig of a kit I dont feel motivated to try and to then do the complete new paint job ot would need. Its time to move on to a good kit Pete.Barry, it'd be a pity to bin it after all your struggle. Why can't you take the canopy off?
Pete
The finish you've given this Barry proves what this should have been - another Barry Triumph!
I think you've gone to extraordinary lengths to try and fix the shortcomings of this kit, and the result you have despite the setbacks is nothing short of miraculous.
If there was a DSO for kit building you'd be a deserving recipient!!!
All the best
P
I think you've gone to extraordinary lengths to try and fix the shortcomings of this kit, and the result you have despite the setbacks is nothing short of miraculous.
If there was a DSO for kit building you'd be a deserving recipient!!!
All the best
P
I understand Barrie. Perhaps you should fix those cockpit sides back on with a 6 inch nail and a large hammer.Because of the amount of filler and sanding to attach it in the first place as it was such a poor fit. It was something of a struggle to say the least and this is such a pig of a kit I dont feel motivated to try and to then do the complete new paint job ot would need. Its time to move on to a good kit Pete.
Pete
A large hammer I expect in a few days!!!I understand Barrie. Perhaps you should fix those cockpit sides back on with a 6 inch nail and a large hammer.
Pete
- Status
- Not open for further replies.
Legal Notice
scalemodelling.co.uk is a privately operated online discussion forum. All content posted by members reflects their own views and opinions and does not necessarily represent those of the forum owners or administrators. While reasonable efforts are made to moderate content, no responsibility is accepted for user-generated material. By using this site, you agree to comply with UK law and the forum rules.