
You are using an out of date browser. It may not display this or other websites correctly.
You should upgrade or use an alternative browser.
You should upgrade or use an alternative browser.
Stirling Glider Tug
- Thread starter rtfoe
- Start date
- Status
- Not open for further replies.
- Joined
- Apr 27, 2018
- Messages
- 15,128
1/3
Richard,
Great work as one would expect from yourself mate.
Scottie
Great work as one would expect from yourself mate.
Scottie
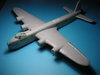
Thanks Steve, I've been away down south in Singapore last weekend and have not done any bench time or been on the net. This is another one of those old builds that is being shown again. The engines would mostly be covered so strong contrast highlights helped bring out the detail when peering though the cowling.
Cheers,
Richard
Cheers,
Richard
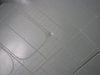
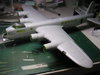
Continuing the blog on the Stirling. I masked the many windows on the fuselage with white glue using a coctail stick for application. I let the glue flow slowly into the edges.
View attachment 304570 View attachment 304571 View attachment 304572 View attachment 304573
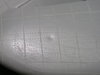
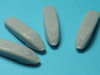
I forgot to show how I scribed panel lines with the help of a strip of dymo tape as a guide. Then dimples from the injection molding was filled with Tamiya putty after carefully masking the area with cello tape. This helps prevent detail from being sanded of whn sanding the putty.
View attachment 304574 View attachment 304575 View attachment 304576 View attachment 304577
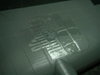
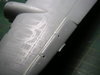
Any raised plasting from the scribing or raised panel lines were sanded down. The many hundred revits were toned down by wet sanding as well.
View attachment 304578 View attachment 304579
Cheers,
Richard
View attachment 304570 View attachment 304571 View attachment 304572 View attachment 304573
I forgot to show how I scribed panel lines with the help of a strip of dymo tape as a guide. Then dimples from the injection molding was filled with Tamiya putty after carefully masking the area with cello tape. This helps prevent detail from being sanded of whn sanding the putty.
View attachment 304574 View attachment 304575 View attachment 304576 View attachment 304577
Any raised plasting from the scribing or raised panel lines were sanded down. The many hundred revits were toned down by wet sanding as well.
View attachment 304578 View attachment 304579
Cheers,
Richard
Attachments

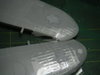
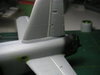
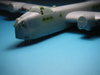
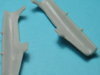
Any bits that didn't look right was tackled like the flaps which at the wing was hinged and squared off so you can see right through...I covered that with a strip of plastic and flushed it with the wing. The same was done to the tail flaps.
View attachment 305063 View attachment 305064 View attachment 305065 View attachment 305066
The plane was made ready for masking.
Cheers,
Richard
View attachment 305063 View attachment 305064 View attachment 305065 View attachment 305066
The plane was made ready for masking.
Cheers,
Richard
Attachments
Continuation of the Stirling...it should be paint now...actually no as there is the little details to touch up and mask...
View attachment 307778 View attachment 307779 View attachment 307780 View attachment 307781
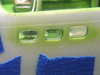
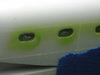
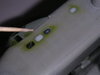
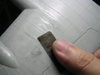
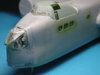
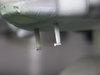
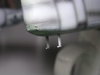
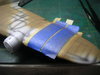
If anyone of you have built an old Airfix kit will know that not all their clear parts fit snuggly, dimples and thick parts are encountered. Proper masking and then filler added at the joints and smoothing out with fine sanding. Dimples filled and edges on thick parts shaved thin to give an optical illusion of a thinned panel for the undercarriage door.
View attachment 307782 View attachment 307783 View attachment 307784 View attachment 307785
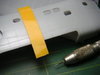
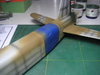
Then pre-shading is done with a steady hand and sore index finger. Then a final burnish to the masking and plugging up any gaps before painting commences.
View attachment 307786
Next painting begins...
Cheers,
Richard
View attachment 307778 View attachment 307779 View attachment 307780 View attachment 307781
If anyone of you have built an old Airfix kit will know that not all their clear parts fit snuggly, dimples and thick parts are encountered. Proper masking and then filler added at the joints and smoothing out with fine sanding. Dimples filled and edges on thick parts shaved thin to give an optical illusion of a thinned panel for the undercarriage door.
View attachment 307782 View attachment 307783 View attachment 307784 View attachment 307785
Then pre-shading is done with a steady hand and sore index finger. Then a final burnish to the masking and plugging up any gaps before painting commences.
View attachment 307786
Next painting begins...
Cheers,
Richard
Attachments
No worries Ian, I find this sight has a blind spot after 10 postings unless you are searching specifically on a subject or modeller that you prefer. Glad you found it...it has just a few posts more to the finish line then I'll start one on the Horsa glider.
Cheers,
Richard
Cheers,
Richard
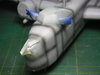
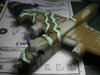
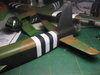
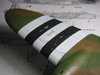
D-Day stripes painted and masked with the dark earth layer applied leaving areas for the dark green to be sprayed...
View attachment 307951 View attachment 307952
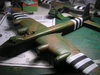
Blue tac masking in rolls were stretched and contoured for the next color. All masks removed...
View attachment 307953 View attachment 307954
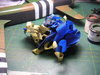
You can see the Horsa in the background
View attachment 307955 View attachment 307956
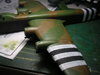
There was some paint lifting when the masks were removed so retouching was done. Just look at the heap of masking.
View attachment 307957 View attachment 307958
Cheers,
Richard
View attachment 307951 View attachment 307952
Blue tac masking in rolls were stretched and contoured for the next color. All masks removed...
View attachment 307953 View attachment 307954
You can see the Horsa in the background
View attachment 307955 View attachment 307956
There was some paint lifting when the masks were removed so retouching was done. Just look at the heap of masking.
View attachment 307957 View attachment 307958
Cheers,
Richard
Attachments
Thanks Colin, I just wanted to see how far I could go with my old Airfix kits. Got a whole lot of them at a bargain price at a warehouse back when we thought we might never see them again. Now they're back...some with new tooling.:smiling4:
Cheers,
Richard
Cheers,
Richard
- Joined
- Apr 27, 2018
- Messages
- 15,128
1/3
Richard,
Great work always a pleasure to follow your builds.
Great work always a pleasure to follow your builds.
Sorry to read about the paint lifting, but a great paint job Richard.:smiling:
Nice work in keeping the pre-shade intact, in multi-colour camo I find it very hard to keep it intact but you've done it.:thumb2:
Nice Horsa too:hungry:
Nice work in keeping the pre-shade intact, in multi-colour camo I find it very hard to keep it intact but you've done it.:thumb2:
Nice Horsa too:hungry:
G
Guest
Guest
Paint lifting or not, you're doing a mighty fine job sir !
- Status
- Not open for further replies.
Legal Notice
scalemodelling.co.uk is a privately operated online discussion forum. All content posted by members reflects their own views and opinions and does not necessarily represent those of the forum owners or administrators. While reasonable efforts are made to moderate content, no responsibility is accepted for user-generated material. By using this site, you agree to comply with UK law and the forum rules.