
These Tamiya's are real beauties. They are complex but not complicated, they have a high price tag but are not expensive for what you get. They are brilliantly engineered but, in some ways over engineered. Their fit is simply outstanding but possiblly in a way too good with the very tight tolerances involved. The designers were ambitious in their vision, but possibly over ambitious.
All in all if you like building aircraft, these Tamiya WW2 1/32 'superkits' are 'must builds' and you will never regret buying one. Tammy brought out three versions of the Spitfire, the Mk IX, Mk VIII and this, the Mk XVI. These were the second of their 1/32 superkit range and were preceded by two versions of the Zero, two versions of the P51D Mustang followed (one with a K option), two versions of the Corsair carrier fighter and the last one, a Mosquito. Further Tammy releases in this range are always a subject of discussion and are always eagerly awaited.
So what are the negatives with the Spitfire...
The rubber tyres, nuff said - aftermarket resin is available.
The cockpit door, could be better, I used the kit door but aftermarket resin is available.
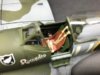
The overengineering I referred to is in respect of the toy like aspects. We build staic models, not toys to play with swapping an in-flight aspect to a wheels down model. This model was designed to have a sliding canopy, to have wheels that can be swapped between two sets one for in-flight and one for sitting on the ground, there is a superb Merlin and Tamiya provide engine panels with magnets so you can remove them to display the engine. It really is all very clever, but too clever. If you do somehow manage to glue the canopy to the very small sliding mechanism without gluing it to the fuselage as well then it is so delicate it will break the first time you try sliding it. No ifs and buts, it will break off. My advice just glue it into place closed or open, it is a perfect fit. Then there is the landing gear, a clever arrangement where it fits into a hole and you screw in a piece that sets the right angle, then fit a cover held by a magnet over it. Well once you get the gear fitted you will simply not want to remove it again. Just add a drop of extra thin cement and leave it, I did. Removing and fitting the weheels up set would carry significant risk of damage every time and, besides it is soooo fiddly. The engine panels, yes they work BUT - the tolerances are so tight it takes only the tiniest misalignment somewhere and it will have a knock on effect preventing the panels from fitting as perfectly as they can. The problem is you cannot find out if there is a misalignment until the engine block is glued in place. Dry fitting is fine but get a spot of dust trapped in there when gluing or a bit of surplus glue, varnish or residual paint - maybe just scraping off paint you scraped away a little bit too much - yes I am not exaggerating about the tolerance, and there is a problem getting the panels to fit. Decide whether you want to display then engine, all of it or part of it ahead and stick to that is my advice. Any slight misalignment can be dealt with in the usual way, filler, sanding, cutting etc.
Whatever - do not let the negatives put you off. The positive are much greater, its a brilliant kit and do not hesitate to buy one. I am looking forward to my other Tamiya 1/32 Spitty builds.
It is also worth saying that Tamiya learned from feedback and their later Corsair and Mosqito releases lack the gimmicks.
Now - this aircraft..
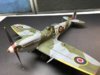
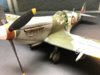
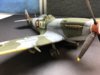
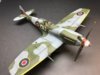
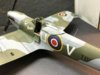
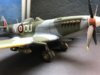
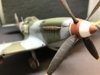
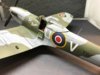
The Mk XVI was a derivative of the Mk IX with a Packard built Merlin, built to metric standards. They all had the e wing and were clipped for optimum low level performance. Most also had the cut down rear fuselage as per my example with the bubble hood. The aircraft I built is depicted in 1945 when based in Germany.
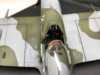
The pictures.
View attachment 266594
View attachment 266595
View attachment 266596
View attachment 266597
View attachment 266598
View attachment 266599
View attachment 266600
View attachment 266601
View attachment 266602
View attachment 266603
View attachment 266604
All in all if you like building aircraft, these Tamiya WW2 1/32 'superkits' are 'must builds' and you will never regret buying one. Tammy brought out three versions of the Spitfire, the Mk IX, Mk VIII and this, the Mk XVI. These were the second of their 1/32 superkit range and were preceded by two versions of the Zero, two versions of the P51D Mustang followed (one with a K option), two versions of the Corsair carrier fighter and the last one, a Mosquito. Further Tammy releases in this range are always a subject of discussion and are always eagerly awaited.
So what are the negatives with the Spitfire...
The rubber tyres, nuff said - aftermarket resin is available.
The cockpit door, could be better, I used the kit door but aftermarket resin is available.
The overengineering I referred to is in respect of the toy like aspects. We build staic models, not toys to play with swapping an in-flight aspect to a wheels down model. This model was designed to have a sliding canopy, to have wheels that can be swapped between two sets one for in-flight and one for sitting on the ground, there is a superb Merlin and Tamiya provide engine panels with magnets so you can remove them to display the engine. It really is all very clever, but too clever. If you do somehow manage to glue the canopy to the very small sliding mechanism without gluing it to the fuselage as well then it is so delicate it will break the first time you try sliding it. No ifs and buts, it will break off. My advice just glue it into place closed or open, it is a perfect fit. Then there is the landing gear, a clever arrangement where it fits into a hole and you screw in a piece that sets the right angle, then fit a cover held by a magnet over it. Well once you get the gear fitted you will simply not want to remove it again. Just add a drop of extra thin cement and leave it, I did. Removing and fitting the weheels up set would carry significant risk of damage every time and, besides it is soooo fiddly. The engine panels, yes they work BUT - the tolerances are so tight it takes only the tiniest misalignment somewhere and it will have a knock on effect preventing the panels from fitting as perfectly as they can. The problem is you cannot find out if there is a misalignment until the engine block is glued in place. Dry fitting is fine but get a spot of dust trapped in there when gluing or a bit of surplus glue, varnish or residual paint - maybe just scraping off paint you scraped away a little bit too much - yes I am not exaggerating about the tolerance, and there is a problem getting the panels to fit. Decide whether you want to display then engine, all of it or part of it ahead and stick to that is my advice. Any slight misalignment can be dealt with in the usual way, filler, sanding, cutting etc.
Whatever - do not let the negatives put you off. The positive are much greater, its a brilliant kit and do not hesitate to buy one. I am looking forward to my other Tamiya 1/32 Spitty builds.
It is also worth saying that Tamiya learned from feedback and their later Corsair and Mosqito releases lack the gimmicks.
Now - this aircraft..
The Mk XVI was a derivative of the Mk IX with a Packard built Merlin, built to metric standards. They all had the e wing and were clipped for optimum low level performance. Most also had the cut down rear fuselage as per my example with the bubble hood. The aircraft I built is depicted in 1945 when based in Germany.
The pictures.
View attachment 266594
View attachment 266595
View attachment 266596
View attachment 266597
View attachment 266598
View attachment 266599
View attachment 266600
View attachment 266601
View attachment 266602
View attachment 266603
View attachment 266604
Attachments
-
 IMG_1766.JPG2.7 KB · Views: 0
 -
 IMG_1767.JPG2.8 KB · Views: 0
 -
 IMG_1768.JPG2.5 KB · Views: 0
 -
 IMG_1769.JPG2.5 KB · Views: 0
 -
 IMG_1770.JPG2.7 KB · Views: 0
 -
 IMG_1771.JPG2.9 KB · Views: 0
 -
 IMG_1772.JPG2.8 KB · Views: 0
 -
 IMG_1773.JPG2.4 KB · Views: 0
 -
 IMG_1775.JPG2.4 KB · Views: 0
 -
 IMG_1776.JPG2.7 KB · Views: 0
 -
 IMG_1782.JPG2.8 KB · Views: 0
")