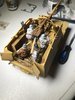
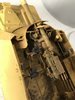
Evening all. Would love thoughts on the progress of the Nashorn. Probably the most enjoyable kit I have ever made...now embarking on painting and weathering, which has never been my strong suit. Here is gun compartment WIP...most effort so far has gone into the crew. Really appreciate as honest a comment as possible. My main thoughts are: Is the wash on the gun carriage too much, have I highlighted the uniforms enough. (shell cases on the floor are wrong size, just wanted to get a feel of how it looked.

You are using an out of date browser. It may not display this or other websites correctly.
You should upgrade or use an alternative browser.
You should upgrade or use an alternative browser.
Tamiya 1/35 Nashorn
- Thread starter Jack L
- Start date
- Status
- Not open for further replies.

1/3
Figures look good Jack. I would personally lighten the wash as I think it is a little heavy. However, it depends on the effect you are after. Do you want to stain the surface or highlight the detail....
Best advice with weathering is do it little by little....and let each layer dry before adding the next. That way you can gradually build up the effect, which will make for a more subtle and believable finish. Don’t rush it and try to do everything in one sitting. However, there are as many ways to do this as there are modellers to do it....
Best advice with weathering is do it little by little....and let each layer dry before adding the next. That way you can gradually build up the effect, which will make for a more subtle and believable finish. Don’t rush it and try to do everything in one sitting. However, there are as many ways to do this as there are modellers to do it....
Figs look good. Have to agree w/Tim on the gun. Most accounts I've read get the brass overboard soonest as they get in the way big time. Would half expect the brass to bounce out the open doors anyhow. PaulE
Hi Jack, I agree with the two gentlemen Tim and Paul. The wash needs a bit of control for both filtering or highlighting the detail. On application, a moist brush with thinner is used to tease the wash to corners and edges of raised detail as can be seen on some of your rivet and bolts on the gun cradle edge. Excess wash stains on wide flat surfaces should be wipe away with a clean cotton bud. To ecentuate further detail is to do a darker pin wash in places that you want highlighted.
Filters and washes can vary in different hues of cool or warm pigments depending on the base colour.
Cheers,
Richard
Filters and washes can vary in different hues of cool or warm pigments depending on the base colour.
Cheers,
Richard
G
Guest
Guest
The wash on the gun is far too strong — I mistook it for camouflage at first, until I recalled you asked about itIs the wash on the gun carriage too much
")
The wash on the gun is far too strong — I mistook it for camouflage at first, until I recalled you asked about it :smiling3:
Yup...same thought too, Jakko.
Cheers,
Richard
1/3
Hi Jack,
A great attempt but agree with the others a little at a time. Plus another thing to remember the gun would have been kept fairly clean as heavy dirt would not have been tolerated by those in charge. As Steve said a gentle dry brush will tone it down.
A great attempt but agree with the others a little at a time. Plus another thing to remember the gun would have been kept fairly clean as heavy dirt would not have been tolerated by those in charge. As Steve said a gentle dry brush will tone it down.
I admit I got impatient...the first few layers were fine...then I went over the top!Hi Jack,
A great attempt but agree with the others a little at a time. Plus another thing to remember the gun would have been kept fairly clean as heavy dirt would not have been tolerated by those in charge. As Steve said a gentle dry brush will tone it down.
G
Guest
Guest
Jack .
I agree with my good friend Steve " Rivet " Jones. There can't be anyone who has not done it. I still do !
Don't be put off, take the advice as you have and lets see the results. :thumb2:
John.
I agree with my good friend Steve " Rivet " Jones. There can't be anyone who has not done it. I still do !
Don't be put off, take the advice as you have and lets see the results. :thumb2:
John.
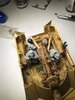
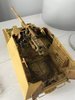
Ok some dry brush and some oils work and I think it has been rescued/getting there. Would love your thoughts/further advice.
Attachments
1/3
Jack,
That is a great improvement, you have achieved a much more natural look of wear and grime.
That is a great improvement, you have achieved a much more natural look of wear and grime.
G
Guest
Guest
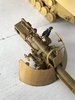
Something I thought of the order day, but forgot to post: you aren’t going to put brass-coloured shell cases in the model, are you? By this stage of the war, most German cases were made from brownish, varnished steel, so a steel metallic colour with a brown wash over it will be more historically accurate than bare turned brass cases.
G
Guest
Guest
Jack.
Great, you've got it. Nice work mate.:thumb2:
Looking fwd to seeing more of this, I've a couple of open topped SPG, ( fun to do the weathering on ). in my stash .
John.
Great, you've got it. Nice work mate.:thumb2:
Looking fwd to seeing more of this, I've a couple of open topped SPG, ( fun to do the weathering on ). in my stash .
John.
Thanks all...certainly a very enjoyable build so far. Next step is some green/brown cammo, light weathering on that, and then a winter cammo whitewash (never attempted that before), so looking forward to it.
Thanks Jakko...hadn't considered that. I initially wanted brass to add a bit of colour (call it artistic license), especially with the detail of the crew holding them, but the shells I ordered don't quite fit in the racks...so need to have a bit of a re-think there anyway.
Something I thought of the order day, but forgot to post: you aren’t going to put brass-coloured shell cases in the model, are you? By this stage of the war, most German cases were made from brownish, varnished steel, so a steel metallic colour with a brown wash over it will be more historically accurate than bare turned brass cases.
Thanks Jakko...hadn't considered that. I initially wanted brass to add a bit of colour (call it artistic license), especially with the detail of the crew holding them, but the shells I ordered don't quite fit in the racks...so need to have a bit of a re-think there anyway.
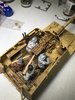
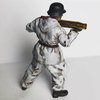
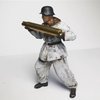
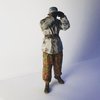
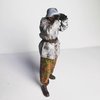
Some more detail on the figures...pretty happy with these, apart from the faces. Need a bit more practice there. Thoughts or critique welcome as always.
Attachments
- Status
- Not open for further replies.
Legal Notice
scalemodelling.co.uk is a privately operated online discussion forum. All content posted by members reflects their own views and opinions and does not necessarily represent those of the forum owners or administrators. While reasonable efforts are made to moderate content, no responsibility is accepted for user-generated material. By using this site, you agree to comply with UK law and the forum rules.