Hi Dan
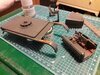
This may help....
Thank you Tim, all sorted now :thumb2:

Hi Dan
This may help....
At least you followed the instructions!:smiling6:So the big question is, is that my left or your left ? From the front or the rear ?
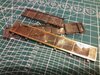
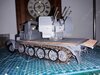
How about in this pic....
I totally admit to just chucking them on without a thought. Rookie mistake. However.....
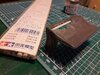
" I know", I thought, "I'll check the instructions".
Yep, that helps !
:thinking:
Left as in the usual side when you’re referring to a vehicle: as if you’re standing behind it.So the big question is, is that my left or your left ? From the front or the rear ?
Left as in the usual side when you’re referring to a vehicle: as if you’re standing behind it.
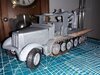
") I always have to think which is which, but in this case, it’s offside, I think?
I always have to think which is which, but in this case, it’s offside, I think?You make a good point John.Well think we've all been there, I have to have a photo on the wall showing the pattern.
I once did a build with track the wrong way, and Jakko found a photo of one in a museum exactly the same !
Causes more confusion than damned multi wheeled German Armour !
Ooo, that's evil - but fun! :tears-of-joy: :tears-of-joy: :thumb2:I actually have a little project in mind where I will deliberately do something officially wrong, wait for the rivet counters to jump on me and at which point I'll pull out the photo that proves I'm right! Small minded I know but enjoyable nonetheless. :smiling2:
ATB.
Andrew
I have that and never noticed …When the Plastic Soldier Company created their 1/72 quickbuild Churchill's (I have several) they got the tracks the wrong way round
Try this one:but I've seen more than one photo from the war showing exactly that. Proof that the troops who worked with the things every day were only human and just as easily confused as us!
Those are the kinds of pictures that make for interesting models, partly exactly because of the fun of waiting for people to point out that you’ve done it wrongI actually have a little project in mind where I will deliberately do something officially wrong, wait for the rivet counters to jump on me and at which point I'll pull out the photo that proves I'm right! Small minded I know but enjoyable nonetheless. :smiling2:
I've a photo about here of a British Policeman directing German officers taken during WWII, apparently it was used by the German high command for propaganda, yes, it was an actual occurrence as it was taken in the Channel Islands - tempting dio that is!Those are the kinds of pictures that make for interesting models, partly exactly because of the fun of waiting for people to point out that you’ve done it wrong :smiling3:
You say that but we've all been talking about it for nearly a page of the thread.so it’s not really a big deal if you do that by accident on your model.
Well I didn't know that, every day's a learning day even at my great age!As an added tip, material stretched in this way will keep its cross-section, so if you need thin square rod, for example, you can file a few centimetres of sprue into a square cross-section and stretch it.
Didn't realize that it keeps its cross section, one to file away! ThanksStretch some sprue instead: cut a length of sprue (10 cm is easily enough), light a candle and hold the sprue above it, rotating it all the time to heat it evenly in one spot; when it gets soft enough that it bends, take it away from the flame and pull the two ends apart. With a little bit of practice you should be able to get this to the diameter you need quite easily.
As an added tip, material stretched in this way will keep its cross-section, so if you need thin square rod, for example, you can file a few centimetres of sprue into a square cross-section and stretch it.
scalemodelling.co.uk is a privately operated online discussion forum. All content posted by members reflects their own views and opinions and does not necessarily represent those of the forum owners or administrators. While reasonable efforts are made to moderate content, no responsibility is accepted for user-generated material. By using this site, you agree to comply with UK law and the forum rules.