
You are using an out of date browser. It may not display this or other websites correctly.
You should upgrade or use an alternative browser.
You should upgrade or use an alternative browser.
Tamiya 1/48 Fw 190 A-3 Ian M
- Thread starter Ian M
- Start date
- Status
- Not open for further replies.
I read somewhere that they were removed (not from this aircraft,I think it was the captured Bf109F that was tested by the RAF) but I can't find the reference anywhere. I don't know what the standard procedure was, if there was one.They certainly removed other equipment for investigation and presumably would have replaced it with ballast.
Steve
Steve
Hmmm.
I think I'll leave them on then. Should I find evidence to the contrary, I can alway cut them off.
Tank arials are much easier than aircraft! (still easier than rigging a boat though!)
I think I'll leave them on then. Should I find evidence to the contrary, I can alway cut them off.
Tank arials are much easier than aircraft! (still easier than rigging a boat though!)
AAAAAAAAAAAGGGGGGGGGGGGGGGHHHHHHHHHHHHhh!:shocking:
Live and learn! I have learnt that DIY decal paper has a rather thick carrier.:smile11:
I have also learnt that decals printed on transparent carrier are just that: Transparent!!!:bigmistake:
So it looks like my easy 'cheat' of decals insted of paint has just done a runner!!!
Off to make a stensil!
Ian M
Oh! there were at least two then!
I think that one is PM639, Which i found in my searches, but then I found a colour profile of PE682. It would seem that the Germans were better pilots than they were navigators. If I have done the right one, the RAF aquired it after the pilot landed her in a field in Kent thinking he was safe and sound in France. Duh!
I think that one is PM639, Which i found in my searches, but then I found a colour profile of PE682. It would seem that the Germans were better pilots than they were navigators. If I have done the right one, the RAF aquired it after the pilot landed her in a field in Kent thinking he was safe and sound in France. Duh!
I don't know how many Fw190s they got. I think the one I posted may be PN999. We got hold of nine Bf109s here in the UK.
2 x 10⁹ E (AE479 and DG200)
2 x 10⁹ F (ES409 and NN644)
1x 10⁹ G-2 (RN228)
2x 10⁹G-6 (TP184 and VX101)
2x 10⁹ G-14 (VD358 and VD364
But my favourite is the Ju88A-5 that "dropped in" in November 1941. Here it is resplendent in its RAF markings and sporting the serial HM509. I thought about doing this a while ago but chickened out.
Anyway,back to the 190s!
Cheers
Steve
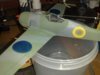
Roundels here roundels there, Im seing Roundels every where!
I have just worked out that it is going to take me longer to paint the markings that I have used so far to build and paint!!!!
This is quite fun this aeroplane stuff!
Thus far:
View attachment 22743
View attachment 22744
View attachment 135269
View attachment 135270
I have just worked out that it is going to take me longer to paint the markings that I have used so far to build and paint!!!!
This is quite fun this aeroplane stuff!
Thus far:
View attachment 22743
View attachment 22744
View attachment 135269
View attachment 135270
Attachments

Shame about the decals ian, Im sure itll turn out great. I was tempted too by the captured 190's, very cool paint job! cheers tony
Why do people use decals for some thing as simple as a roundel?
I'll tell you why: They take freaking ages to do with an air brush!
First make the mask, after you have found the frisk film that is. And sharpend the cutting compass.
The roundel on the fusalage is Yellow, Blue, White and Red. Four colours, four times masking and painting.
Then of course there is the air brush that needs to be cleaned endlessly.
A minuet to stir the paint, a minuet to thin and load the air brush. Ten seconds to do the painting. One colour down. remove mask and leave to dry 110%. Clean air brush. Repeat as often as needed.
Ok you can do one upper wing, one lower, fuselage and tail at the same time. You could make several masks and do them all together, but there is still a silly amount of waiting time.
Enough waffle. This is how far i have come since yesterday.
Is it worth the effort? Hell Yes, look 100 times better than a decal. Even if I do say so my self!!!
View attachment 22784
View attachment 22785
View attachment 135310
View attachment 135311
Attachments

G
Guest
Guest
Too late I guess but you could have sprayed the outer roundel white, then put your transparent decals over that. Then it's just one circle to mask and spray, but I think the sprayed version looks better.
Coming along nicely, well done.
Tony B
Coming along nicely, well done.
Tony B
Good idea Tony. Problem is not so much the roundels them self as there printed on white. They where just to small!
The real problem comes with the large yellow P in a yellow ring. What the hey! S'pose I'll just have to paint that to.... Oh carp!"
The real problem comes with the large yellow P in a yellow ring. What the hey! S'pose I'll just have to paint that to.... Oh carp!"
Well it was a hard day going back to work after the Easter Holidays, so it was rather nice to come home and unwind with a bit of paint work.
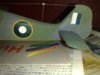
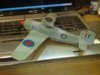
Finnished the roundels off!
Question. The four cannons that stick out of the wing. Black og Gun metal?
The long thin thing next to the outermost cannon on the right wing: What is it?
Here are a couple of snaps of the results of my roundel painting.
Once all the guns are done its time for a coat of Klear I guess.
Washes? Could any one give me a clue as to a good colour for a wash.
I dont want the full weather effect, just to bring out the panel lines and the like.
View attachment 22818
View attachment 22819
View attachment 135344
View attachment 135345
Attachments
Bugger. Just noticed on the photos, that I lifted a touch of paint! Touch up time!
Also need to do the exhaust areas...... Dude, loads to do yet!
Ian M
Also need to do the exhaust areas...... Dude, loads to do yet!
Ian M
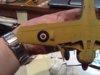
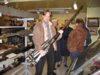
I'd go for this sort of colour. The Finnish chap is holding an MG151 from a Bf109,all 40 Kg of it. I think the other device you are referring to is the pitot tube.The last skinny section (furthest from the wing) was a bronze colour and could be electrically heated to prevent iceing.
Cheers
Steve
View attachment 22821
View attachment 22822
View attachment 22823
View attachment 135347
View attachment 135348
View attachment 135349
Cheers
Steve
View attachment 22821
View attachment 22822
View attachment 22823
View attachment 135347
View attachment 135348
View attachment 135349
Attachments

Right: Bodges are touched up and the last bits and bobs painted.
Went for black for the guns, as my Gun metal is not very good freinds with paint brushes. PE682 is now sitting in the hanger, waiting for the first coat of clear to dry...so not much going on here until thats dried. Washes?
Oil paint and turpentine? Will Future survive that? its new to me so dont know what you can/cant get away with. And I dnt want to find out on my GB model!
I'm thinking black around engine cowl and panels, and dirty brown for the rest. Does that sound ok? I know nothing about weathering an aircraft!
Ian M
G
Guest
Guest
I only use the Promodellers washes so I cannot really comment. On my spitfire, I used the Promodeller Dark Dirt wash overall which was then rubbed off so it only remained in the panel lines and other scribed detail, shows best on the underside pics as it is a lighter colour underneath. On the dark green areas on the topside where I thought that the Dark Dirt wasn't showing up enough, I ran a little Promodeller Black wash into the panel lines just to emphasise the detail.
I would have no idea how to use a paint type wash as I prefer the paint on and, when required, rub off of the clay based washes.
I would have no idea how to use a paint type wash as I prefer the paint on and, when required, rub off of the clay based washes.
- Status
- Not open for further replies.
Legal Notice
scalemodelling.co.uk is a privately operated online discussion forum. All content posted by members reflects their own views and opinions and does not necessarily represent those of the forum owners or administrators. While reasonable efforts are made to moderate content, no responsibility is accepted for user-generated material. By using this site, you agree to comply with UK law and the forum rules.