Theme editor

Scale Model Shop

The New Italeri Hurricane 1/48

Status
Not open for further replies.

Ian M

Administrator
Staff member
Joined
Dec 14, 2008
Messages
18,334
Reaction score
571
Points
113
Location
Falster, Denmark
1/3
Thread owner
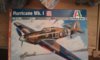
Well it seems there are a few of you that would like to see more of this View attachment 34864 before handing over their hard earned.

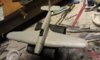
So I will oblige here. I promise that I will try to take a few more photos than my last build. I will be building the ride of William McKnight who flew with Bader in 242 squadron.

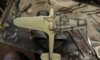
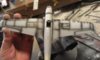
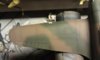
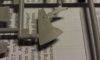
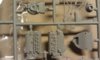
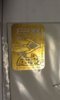
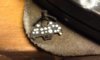
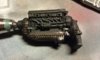
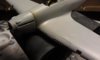
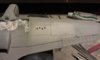
Having said that, I will start with a few closer shots of the rather finely done detail/engraving, before I muck it up by touching it!!! ;-O

View attachment 34873 View attachment 34869 View attachment 34868 View attachment 34867 View attachment 34866 View attachment 34871View attachment 34872

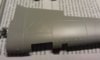
These are the parts that show the detail in the wings and fuselage. A nice little Merlin engine and one of the sets of gear bay doors. There are a pair for open and a pair for closed. Over kill? bump up the parts count? saves having to shave bits off here and there, so why not!

View attachment 34876 View attachment 34877

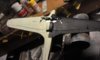
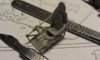
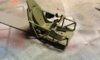
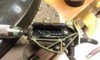
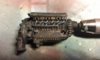
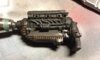
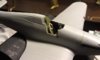
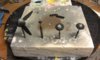
After a couple of minutes with the sprue cutters and Mr Swann and Morten the Merlin looks something like this. Far from finished yet, but you get the idea.

View attachment 34875 View attachment 34874

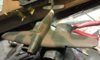
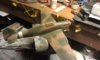
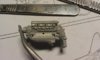
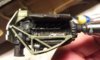
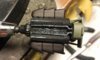
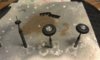
A little later and you have a cock pit. Dont go this far before you paint. You, like I, will regret it!!! Bugger. On the bright side its all the same colour so not impossible to paint in one go. I will just have to look out for shadows- then loads of fun picking out the twiddly bits (tech talk).

Right now the primer is drying so no more for a while.

Ian M

View attachment 39342

View attachment 39343

View attachment 39344

View attachment 39345

View attachment 39346

View attachment 39347

View attachment 39348

View attachment 39349

View attachment 39350

View attachment 39351

View attachment 39352

View attachment 39353

View attachment 152368

View attachment 152369

View attachment 152370

View attachment 152371

View attachment 152372

View attachment 152373

View attachment 152374

View attachment 152375

View attachment 152376

View attachment 152377

View attachment 152378

View attachment 152379
 

Attachments

  • IMAG0229.jpg
    IMAG0229.jpg
    2.4 KB · Views: 0
  • IMAG0237.jpg
    IMAG0237.jpg
    1.6 KB · Views: 0
  • IMAG0238.jpg
    IMAG0238.jpg
    2 KB · Views: 0
  • IMAG0239.jpg
    IMAG0239.jpg
    1.9 KB · Views: 0
  • IMAG0240.jpg
    IMAG0240.jpg
    2.4 KB · Views: 0
  • IMAG0242.jpg
    IMAG0242.jpg
    1.4 KB · Views: 0
  • IMAG0243.jpg
    IMAG0243.jpg
    1.7 KB · Views: 0
  • IMAG0244.jpg
    IMAG0244.jpg
    1.8 KB · Views: 0
  • IMAG0245.jpg
    IMAG0245.jpg
    2.4 KB · Views: 0
  • IMAG0246.jpg
    IMAG0246.jpg
    2.3 KB · Views: 0
  • IMAG0247.jpg
    IMAG0247.jpg
    2 KB · Views: 0
  • IMAG0248.jpg
    IMAG0248.jpg
    2.1 KB · Views: 0
ooooo follow follow follow.... seriously wanting this kit (get ready for my order John)
 
Looks like a very good kit and in your hands no doubt it will turn out fantastic
 
Thread owner
You are to kind Ian!

Right then Friday = home from work earlier = more time at the bench.

View attachment 34949

After a lot of faffing about, I got the decals for the dials in sort of the right place. There are in fact two decals, one with all the details for the panel should you not wish to use the PE panel. The other decal is just the dial faces for if you wish to use the PE panel. This is the way I went.

Now its just hope the 'glass' dries clear and the dials are indeed in the right place.

View attachment 34955View attachment 34956

Next the cock pit got a splattering of Green and the fiddly bits then picked out in black. After a cuppa, it was time for the harness to go in. A job made more difficult than it need be by my building the seat into position before putting them harness in!!! Worked out OK in the end. Didn't it?

View attachment 34954View attachment 34951

One tiny little Merlin. Flat black then a dry brushing with grey and silver. A Washy "burnt oil" around the joins to give it a look of a well run motor. Added the Gloss to make it look wet like oil and not so much like rust!!! Then a few smaller bits went on before putting it in its cage!

View attachment 34953View attachment 34952View attachment 34958

Monster caged and ready to roar.....

View attachment 34957

And the result of the did the dials line up or not quiz....... Thank Goodness for that!

Right time to stick some big bits together!

Ian M

View attachment 39425

View attachment 39426

View attachment 39427

View attachment 39428

View attachment 39429

View attachment 39430

View attachment 39431

View attachment 39432

View attachment 39433

View attachment 39434

View attachment 152451

View attachment 152452

View attachment 152453

View attachment 152454

View attachment 152455

View attachment 152456

View attachment 152457

View attachment 152458

View attachment 152459

View attachment 152460
 

Attachments

  • IMAG0254.jpg
    IMAG0254.jpg
    2.1 KB · Views: 0
  • IMAG0255.jpg
    IMAG0255.jpg
    2.5 KB · Views: 0
  • IMAG0256.jpg
    IMAG0256.jpg
    1.9 KB · Views: 0
  • IMAG0257.jpg
    IMAG0257.jpg
    2.8 KB · Views: 0
  • IMAG0253.jpg
    IMAG0253.jpg
    2.1 KB · Views: 0
  • IMAG0259.jpg
    IMAG0259.jpg
    2.7 KB · Views: 0
  • IMAG0250.jpg
    IMAG0250.jpg
    2.1 KB · Views: 0
  • IMAG0251.jpg
    IMAG0251.jpg
    2.2 KB · Views: 0
  • IMAG0252.jpg
    IMAG0252.jpg
    2.3 KB · Views: 0
  • IMAG0258.jpg
    IMAG0258.jpg
    2.6 KB · Views: 0
Looking v.nice - am toying with a 1/48 Hurricane to sit with my 1/48 Spitfire so following this with interest, looks great in fact!
 
Thread owner
Well been a busy day in more ways than one but still got loads of time in at the bench.

View attachment 34988 View attachment 34989 View attachment 34990 View attachment 34991

As I said last, time to stick some big bits together. A word of advice, some parts of the instructions can be misleading. For an example they say to put the exhaust manifolds on the engine before mounting. In a moment of weakness I followed the instructions. The result of which I had to remove them again to avoid a masking and mucky paint job.

The door. Now should the door be open. true to RAF norms 99% of all photos show aircraft from the port side. The door is on t'other side. ( I cant spell starboard). So not to many pictures of the door. I think I will go for an open door and canopy so as to show the inside of the pit a bit better. BUT is this correct for a parked Hurricane?

On the other photos you can ogle at the, what I think is, rather good detail engravings on the fuselage and wings.

I think that overall its a good kit and the fit is good. (not Tamiya just good). For a new tool kit I am a little miffed at the clean up. Not huge flash every where, but I think some one was more intent on tea break than on checking the tools for dust. If you buy this kit keep an eye on corners and edges.

View attachment 34992 View attachment 34993

The propeller and spinner. Have I gone for the wrong one. The plans call for the wide blades and the blunt spinner, but I am not 100% this is correct. More web searching..... Unless some one knows what McKnight's ride was sporting Dec, '41

I now have a date with some primmer.

Ian M

View attachment 39464

View attachment 39465

View attachment 39466

View attachment 39467

View attachment 39468

View attachment 39469

View attachment 152490

View attachment 152491

View attachment 152492

View attachment 152493

View attachment 152494

View attachment 152495
 

Attachments

  • IMAG0262.jpg
    IMAG0262.jpg
    2.6 KB · Views: 0
  • IMAG0263.jpg
    IMAG0263.jpg
    2 KB · Views: 0
  • IMAG0264.jpg
    IMAG0264.jpg
    2.2 KB · Views: 0
  • IMAG0265.jpg
    IMAG0265.jpg
    1.9 KB · Views: 0
  • IMAG0266.jpg
    IMAG0266.jpg
    2.6 KB · Views: 0
  • IMAG0267.jpg
    IMAG0267.jpg
    2.2 KB · Views: 0
\ said:
I think I will go for an open door and canopy so as to show the inside of the pit a bit better. BUT is this correct for a parked Hurricane?The propeller and spinner. Have I gone for the wrong one. The plans call for the wide blades and the blunt spinner.
No door at all on the Hurricane. The panel on the starboard side could be kicked out in an emergency,or removed for maintenance. You could have it removed but not hinged down like a Spitfire.

McKnight's Hurricane had a Rotol spinner/airscrew and that's what it looks like you've done. It's the blunter looking spinner. It should be slightly wider than the nose of the aircraft. It was originally designed for the Spitfire.

The kit is looking good,quick progress!

Cheers

Steve
 
Looking great Ian. It's certainly on my shopping list.
 
Thread owner
Thanks for that Steve. I was aware that it was an escape panel, its just quicker to write door! (lazy git...)

Still another error on Italeri's part. The instructions show that it can be posed open or closed....I was in doubt, which is I why I thought I would ask.

This is good as it means I can just glue it in place and have even less trouble masking.

Well I think the primer is dry by now, so time to play with some paint me thinks!

Ian M
 
Looks like a good looking model will emerge here.

The kits definitely one for a later purchase for me, the detail looks top notch and you get PE parts with it (?)

Keep the photos and review comments coming, i'll be using this thread as a reference no doubt :)
 
Thread owner
Thanks Colin.

As far as reference goes I would recommend stona's build thread. Its what I am doing.....

Young Steve has been a great help to me in this little project..I could be inclined to say he is almost as knowledgeable on the RAF as he is on the Luftwaffe.

Right! Steve, that photo you posted last was not McKnights, was it? If it is it is not the one I am doing.... I ask because of the demarcation between the camo and the underside colour. Was this a later aircraft?

Interesting to hear.

Ops, I almost forgot to post a picture of the primed and pre shaded bit. I was not a great fan of pre shading, as I always "lost it! under the paint. I thing its a mix of starting to use Xtracrylics which are slightly translucent and learning to paint!!! (about time too).

View attachment 35011 View attachment 35012

Got it right this time. You can see the pre-shading AND I remembered to paint the light colour first. Not like the Spitfire where I painted the black wing first..... Duh!

Ian M

View attachment 39487

View attachment 39488

View attachment 152513

View attachment 152514
 

Attachments

  • IMAG0268.jpg
    IMAG0268.jpg
    2.5 KB · Views: 0
  • IMAG0269.jpg
    IMAG0269.jpg
    2.5 KB · Views: 0
Excellent progress Ian.

No that's not McKnight's Hurricane. It's on my HD under 'Rotol' so I saved it from somewhere just because it's a nice picture of the Rotol spinner/prop assembly.

Did you know that Rotol is a contraction of the two companies that developed the system ROlls Royce and BrisTOL?

Cheers

Steve
 
Thread owner
Thanks Steve, I thought as much. I was looking for such a photo earlier. I should of known you would of had one. ;-)

I had actually read about that somewhere while surfing for info on Props for Mosquito's. T'was a good read, all about the mass replacement where a whole fleet of lorries set of to the airfields around the country loaded with the new props and teams of fitters....(Hmm good diorama in there for some one.....)

Ian M
 
Thread owner
Right then! I had a nice Sunday and Monday evening to throw some paint at things, so now in colour!

The Dark earth was lightened a little with a drop or to of white (!) and the Dark Green with a couple of drops light green....

The pre shading worked in part but as normal suffered a bit when the green went on. Having foreseen that I just post shaded a bit with the un-lightened colours....

I had a total brain fart and free handed the Dark Green. This has resulted in a slightly patchy effect. I am not sure if it works but what the hey, I wasn't going for factory fresh.

Nuff waffle; Pictures.View attachment 35093 View attachment 35094 View attachment 35095 View attachment 35096

I also lightened the Sky on the bottom as I thought it looked way to dark.

Right now I am waiting for the clear coat on the bottom to dry so I can do the top, then it will be time for a gentle wash and staining. AFTER the decals.

Ian M

View attachment 39567

View attachment 39568

View attachment 39569

View attachment 39570

View attachment 152593

View attachment 152594

View attachment 152595

View attachment 152596
 

Attachments

  • IMAG0273.jpg
    IMAG0273.jpg
    2.7 KB · Views: 0
  • IMAG0274.jpg
    IMAG0274.jpg
    2.7 KB · Views: 0
  • IMAG0275.jpg
    IMAG0275.jpg
    2 KB · Views: 0
  • IMAG0276.jpg
    IMAG0276.jpg
    2.3 KB · Views: 0
Hi Ian nothing wrong with that green it looks spot on as does the rest by the way. I think i should try having a brain fart with my builds lol
 
Status
Not open for further replies.
Back
Top