Theme editor

Scale Model Shop

The New Italeri Hurricane 1/48

Status
Not open for further replies.
Thread owner
Well not a lot to do now.

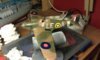
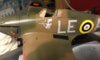
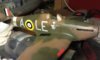
The Decals are on. One day if I buy another one of these I might add the kick in the pants, decal to the other side of the cowls. Recent evidence has been unearthed which would suggest that this marking was on both sides on both McKnight's and Bader's machines....

Erm, Oh waiting for the last of the decals to dry 100% before I lock them down and do a bit of weathering. Nothing to extreme, bit of gun grime, exhaust stains, you know.

The next pictures after these will be in the finished section.

View attachment 35197 View attachment 35201 View attachment 35204

Ian M

I have just been outbid on a figure from evil bay!!!!!! bummer.

View attachment 39661

View attachment 39665

View attachment 39668

View attachment 152687

View attachment 152691

View attachment 152694
 

Attachments

  • IMAG0277.jpg
    IMAG0277.jpg
    2.6 KB · Views: 0
  • IMAG0278.jpg
    IMAG0278.jpg
    2.3 KB · Views: 0
  • IMAG0279.jpg
    IMAG0279.jpg
    2.3 KB · Views: 0
Looking really lovely there, nice one.

May I ask (and hope you've not already said it) how you've fixed the middle bit of the canopy on while painting? I notice it's off at the end, and this is one of my long list of unanswered questions - how do you temporarily affix a part of a canopy so that paint doesn't get in when you're spraying?
 
Thread owner
Hi Rob,

On this one it was easy. There is a grove that the canopy fits into. I just pressed it in place and it held its own!

You can use Klear to hold a canopy in place while painting. Indeed several also use it for the final fix, it holds that well. Should you want to get it off again, a sharp blade can pop it off. If you dont fancy that, Klear dissolves in its self, so a touch of klear will also loosen its grip! Smart.

Ian M
 
Thread owner
Heads up on the paint Guide!!!

Hope that any one else building this in the near future reads this in time.

Italeri have made a cock-up on the painting guides; they have transposed the colours for the camouflage!!!!! :-(

I first noticed it after I had decaled, so to late! I now have a reverse paint job; Green where it should be brown and brown where it should be green.

Looking at the guides it's the same on them all. Both pattern A and Pattern B although they did get the patterns the right way around....

Bugger!

Ian M
 
I think it's looking great. Your patchy paint is exactly what I usually try to achieve on most of my builds. Shame they got the colours back to front, but to be honest, I wouldn't have noticed.

Colin M.
 
\ said:
I think it's looking great. Your patchy paint is exactly what I usually try to achieve on most of my builds. Shame they got the colours back to front, but to be honest, I wouldn't have noticed.Colin M.
Nor would I. It's a lovely build. A word of warning about the relationship between the A and B pattern camouflage and serial numbers. The oft quoted relationship between these and odd and even serials just ain't so. The only way of being sure is a photograph showing enough of the aeroplane to discern the scheme.

Cheers

Steve
 
Thread owner
Thanks Steve. The main point/problem is that the Colours for the camouflage are transposed. I can live with it.

Been busy with a new PC today so I will post the finished pictures tomorrow.

Ian M
 
Lovely job ian, and if you hadnt said about the camo ,i doubt many people would have known. cheers tony
 
Very nice build coming along there Ian. If I didn't have so many 1:32's I am itching to get on with, I might have got this one!
 
Status
Not open for further replies.
Back
Top