
You are using an out of date browser. It may not display this or other websites correctly.
You should upgrade or use an alternative browser.
You should upgrade or use an alternative browser.
"There's an old mill by the stream, Nelly Dean!"
- Thread starter spanner570
- Start date
- Status
- Not open for further replies.
")
G
Guest
Guest
I konw, I know....\ said:Hey mi amigo, it's not the boxes that are made of polystyrene, but the actual base the pizza sits on when in the box......possibly to stop the pizza bending and breaking.
Here there isn't any kind of polystyrene.... the pizza comes directly over the cardboard...

")
 and a soggie pizza

G
Guest
Guest
\ said:Younger members probably won't recognise the title. To you older ones, I only know the Rugby Song version!!Hello folks....
I had reached a blank for a diorama idea when I passed an old mill recently, complete with water wheel, and Bingo! What a great subject to have a bash at, so......
It's 1/72 scale, and is just my imagination running riot and not a copy of anything. I alway start dios. with just a rough idea of what I want, then things happen as I go along. I never plan to the 'enth degree, as I find the great thing with unplanned dioramas is the chopping, changing and yes, binning, as ideas come along.
I hope you join in the fun as I attempt to come up with something. It might have some military in it, I don't know yet.....I've been pootling away at it for a couple of weeks now, so this is the first installment of the story so far.
O.k., let's make a start. As usual all the material is for free, scrounged or dead cheap anyway. I found some pieces of polystyrene and an old cork notice board at our local tip - sorry, Re-cycling Center! This formed the base. Then, with some shed paint, I roughly painted where I wanted the water to flow and made a paper template of my imaginary mill building.
First stage. The rough painting of the water and the paper template...plus my wee man!
View attachment 82215
Next a thin layer of polystyrene glued down with PVA for the lower river bank and mill race...
View attachment 82216
Thicker poly. formed the top level....See my mysterious plung pool? I didn't spot it 'till I'd stuck the piece down....Hey ho!
View attachment 82217
Then the top water course was formed, complete with weir. ( More on this later!) I also cut my template to suit the contours a bit better and to get the wheel summat like for height. View attachment 82218
You can see how it is starting to take some form now. I'm never fussy about how rough it looks at this stage 'cos now I'm getting a 'feel' for the scene anything can happen and usually does!
I hope you approve of this initial stage and all comments and suggestions are always welcome as we have some fun and roll along into the unknown together.......
Cheers,
Ron
G
Guest
Guest
Hi Ron yet another masterpiece in the making, a very interesting beginning cant wait to see what you come up with.
scott
scott
Thanks folks for the continuing support....It's nice to have you along.
With trepidation, and not a clue how to proceed, I turned my attention to the waterwheel, which I suppose in a way, will be the centre piece.
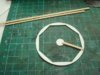
I had a look at pictures of these things, some complicated, others less so. In the end I decided to create my own relatively simple design, which I reckoned would be easier to do than try and copy a real one. It's made from scrap plastic card, coffee stirrers and an RAF Cosford cafe plastic straw for the 'axle'!
After a bit of idea scribbling I came up with this :-
Here are the stages.......
First off I marked a circle from a piece of thin plastic card
View attachment 82267
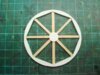
I didn't want a simple second inner circle, so I came up with this idea and divided the wheel into 8 segments and cut these out. Then I cut a centre hub and marked around the centre with my straw axle to get the right diameter hole, then made some 'spokes' from coffee stirrers........
View attachment 82268
Here is one side finished...Now the other!
View attachment 82269
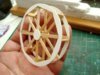
The second side done and joined to the first with suitable cross members...I was so chuffed with my wheel thus far, that I forgot to make holes for my drinking straw axle......Too late now!!
View attachment 82270
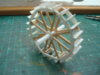
Next I made a scale pattern for the paddles, again from bits of thin plastic card...and cut out 24 of them!
View attachment 82271
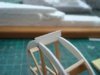
This shows the finished bare wheel ready for painting...Because of my previous excitement, I had to make the axle in three bits - a middle and two outers......Sorry for the fuzzy picture.
View attachment 82272
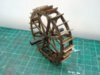
Here is the finished water wheel, painted in a first coat and ready for weathering.
I'm well happy with my first ever go at one, and the design is mine, all mine I tell you!!! lol
View attachment 82273
That's it for the wheel. I'm pleased to have got this part of the diorama behind me, as at first I had no idea how to tackle it.
Mind you, I won't be doing another in a hurry!
Next I will make a start on the mill building.
Thanks for looking in.
Cheers,
Ron
View attachment 195290
View attachment 195291
View attachment 195292
View attachment 195293
View attachment 195294
View attachment 195295
View attachment 195296
With trepidation, and not a clue how to proceed, I turned my attention to the waterwheel, which I suppose in a way, will be the centre piece.
I had a look at pictures of these things, some complicated, others less so. In the end I decided to create my own relatively simple design, which I reckoned would be easier to do than try and copy a real one. It's made from scrap plastic card, coffee stirrers and an RAF Cosford cafe plastic straw for the 'axle'!
After a bit of idea scribbling I came up with this :-
Here are the stages.......
First off I marked a circle from a piece of thin plastic card
View attachment 82267
I didn't want a simple second inner circle, so I came up with this idea and divided the wheel into 8 segments and cut these out. Then I cut a centre hub and marked around the centre with my straw axle to get the right diameter hole, then made some 'spokes' from coffee stirrers........
View attachment 82268
Here is one side finished...Now the other!
View attachment 82269
The second side done and joined to the first with suitable cross members...I was so chuffed with my wheel thus far, that I forgot to make holes for my drinking straw axle......Too late now!!
View attachment 82270
Next I made a scale pattern for the paddles, again from bits of thin plastic card...and cut out 24 of them!
View attachment 82271
This shows the finished bare wheel ready for painting...Because of my previous excitement, I had to make the axle in three bits - a middle and two outers......Sorry for the fuzzy picture.
View attachment 82272
Here is the finished water wheel, painted in a first coat and ready for weathering.
I'm well happy with my first ever go at one, and the design is mine, all mine I tell you!!! lol
View attachment 82273
That's it for the wheel. I'm pleased to have got this part of the diorama behind me, as at first I had no idea how to tackle it.
Mind you, I won't be doing another in a hurry!
Next I will make a start on the mill building.
Thanks for looking in.
Cheers,
Ron
View attachment 195290
View attachment 195291
View attachment 195292
View attachment 195293
View attachment 195294
View attachment 195295
View attachment 195296
Attachments

That wheel looks the biz!
My pizzas come out of the oven on a stone tile. Havent bought a pizza in donkey's years.
How ever, as an alternative to the stuff you use Ron, you can get some foam bord, about 5mm thick which is normally used under laminate flooring.
(Makes great gliders as well...)
I'm going to have to have a go at this building lark one day.
Ian M
Thanks Ian, I'm glad you like my wheel.....\ said:That wheel looks the biz!My pizzas come out of the oven on a stone tile. Havent bought a pizza in donkey's years.
How ever, as an alternative to the stuff you use Ron, you can get some foam bord, about 5mm thick which is normally used under laminate flooring.
(Makes great gliders as well...)
I'm going to have to have a go at this building lark one day.
Ian M
When I fancy one, I buy the cheap £1.00 large pizza, then pile my own stuff on top of the junk that came on it.
I too have an oven stone to cook them on, it looks rather like a flattened plate.
Ron
G
Guest
Guest
That wheel is excellent Ron! You really ought to think about marketing some of your stuff! That looks shop-bought
And where do you get large pizza's for a quid??
And where do you get large pizza's for a quid??
G
Guest
Guest
This looks good.
G
Guest
Guest
Truly amazing scratch work Ron,that wheel looks awesome!
Excellent work as usual Ron, but I do sometimes wish you wouldn't make it look so simple. I'm always disappointed when my stuff doesn't come out as well as I hoped. Mind you, I'm over the moon when it does look OK so I suppose it balances out.
Gern
Gern
G
Guest
Guest
Magnificent wheel Ron! You are a genius 
G
Guest
Guest
\ said:Thanks folks for the continuing support....It's nice to have you along.With trepidation, and not a clue how to proceed, I turned my attention to the waterwheel, which I suppose in a way, will be the centre piece.
I had a look at pictures of these things, some complicated, others less so. In the end I decided to create my own relatively simple design, which I reckoned would be easier to do than try and copy a real one. It's made from scrap plastic card, coffee stirrers and an RAF Cosford cafe plastic straw for the 'axle'!
After a bit of idea scribbling I came up with this :-
Here are the stages.......
First off I marked a circle from a piece of thin plastic card
View attachment 82379
I didn't want a simple second inner circle, so I came up with this idea and divided the wheel into 8 segments and cut these out. Then I cut a centre hub and marked around the centre with my straw axle to get the right diameter hole, then made some 'spokes' from coffee stirrers........
View attachment 82380
Here is one side finished...Now the other!
View attachment 82381
The second side done and joined to the first with suitable cross members...I was so chuffed with my wheel thus far, that I forgot to make holes for my drinking straw axle......Too late now!!
View attachment 82382
Next I made a scale pattern for the paddles, again from bits of thin plastic card...and cut out 24 of them!
View attachment 82383
This shows the finished bare wheel ready for painting...Because of my previous excitement, I had to make the axle in three bits - a middle and two outers......Sorry for the fuzzy picture.
View attachment 82384
Here is the finished water wheel, painted in a first coat and ready for weathering.
I'm well happy with my first ever go at one, and the design is mine, all mine I tell you!!! lol
View attachment 82385
That's it for the wheel. I'm pleased to have got this part of the diorama behind me, as at first I had no idea how to tackle it.
Mind you, I won't be doing another in a hurry!
Next I will make a start on the mill building.
Thanks for looking in.
Cheers,
Ron
G
Guest
Guest
Hi Ron that bit of scratch building is up there with the invention of the wheel. Top build mate, I do agree you should replicate some of this in resin.
scott
scott
- Status
- Not open for further replies.
Legal Notice
scalemodelling.co.uk is a privately operated online discussion forum. All content posted by members reflects their own views and opinions and does not necessarily represent those of the forum owners or administrators. While reasonable efforts are made to moderate content, no responsibility is accepted for user-generated material. By using this site, you agree to comply with UK law and the forum rules.