Theme editor

Scale Model Shop

Tim's mid-life crisis build...

Status
Not open for further replies.
Thread owner
Hi Simon
Thanks for this, good to see them in the flesh as it were....
Plug leads are pretty short aren’t they :thumb2:
 
Morning Tim,
with the coils practically touching the heads the sparks definitely don't have far to travel
Annoying Tamiya didn't see fit to include them so the leads could be connected up
 
Thread owner
Agreed, I may mock them up just to make sure they don’t screw up the tank fit.....to be fair to Tamiya though, this kit is about thirty years old....and is cheap as chips...
 
Hi Tim
Stunning stuff. I am sure you will sort all the wires etc.
Look forward to the rest of the build.
Jim
 
Thread owner
Thanks Steve, still plodding on LOL. Detail is good except those screws grrrrrr!!!
 
Thread owner
Hi all
Here is my most recent update.....
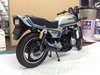
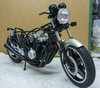
Forks and clocks are now on, as are the pipes and the radiator and hoses. Most of the remaining parts are now undergoing detail painting following spray work.....so here are some pictures...
View attachment 316339
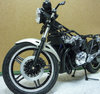
Front right shot. this shows how poor the screws look.....fit and finish is excellent though.....
View attachment 316340
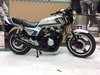
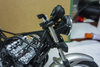
Close up of the headstock....Simon had better look away now as I wimped out regarding the plug leads.....just used a hairgrip shape made out of nickel silver wire....I would certainly rig up coils if I ever did this again though....
View attachment 316344
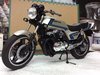
Another front right image....
View attachment 316345
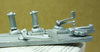
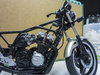
Left side was feeling left out.....I have some tubing to fit to this side for brake lines and speedo cable....
View attachment 316346
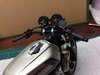
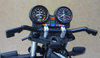
Riders eye view of the clocks, a little bit of reflection here, sorry....interestingly, the screw here is disguised with a glue-on bolt....pity we couldn't have those for the other screws......
View attachment 316348
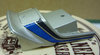
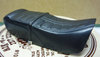
Saddle done and ready to fit. I went for a polished plastic finish here. This is just the kit part polished with Tamiya coarse and fine compound, finished with a bare metal foil fitting with a polished pin through it....
View attachment 316349
View attachment 316350
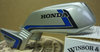
Tail and tank finished apart from the detail parts....
View attachment 316351
Last of the black bits waiting detail painting....
View attachment 316356
Awful picture of the last of the aluminium bits waiting detail painting.....
Hope it meets with approval.....I must admit I'm really enjoying this......great fun for a few quid....
Cheers
Tim
 

Attachments

  • P1040474-1.jpg
    P1040474-1.jpg
    4.7 KB · Views: 0
  • P1040485-10.jpg
    P1040485-10.jpg
    2.7 KB · Views: 0
  • P1040484-9.jpg
    P1040484-9.jpg
    3.3 KB · Views: 0
  • P1040483-8.jpg
    P1040483-8.jpg
    3.3 KB · Views: 0
  • P1040482-7.jpg
    P1040482-7.jpg
    3.4 KB · Views: 0
  • P1040481-6.jpg
    P1040481-6.jpg
    3.3 KB · Views: 0
  • P1040479-5.jpg
    P1040479-5.jpg
    3.7 KB · Views: 0
  • P1040477-4.jpg
    P1040477-4.jpg
    5.2 KB · Views: 0
  • P1040476-3.jpg
    P1040476-3.jpg
    4.9 KB · Views: 0
  • P1040475-2.jpg
    P1040475-2.jpg
    4.2 KB · Views: 0
Thread owner
Hi Steve
Thanks for the support, it’s getting close to finished now, I may post another update tonight....I’ve only got the coloured lenses and the sticky out bits to add...
 
Hi Tim
I can well understand how you would enjoy this. It really is looking excellent. Can't be much more to do now. Certainly it will deserve a nice display case.
Jim
 
Thread owner
Hi all
Quick update in between clear red and clear orange coats on the lenses.......
View attachment 316646
View attachment 316647
View attachment 316648
Bodywork, seat, and handlebar controls now on....looks like a bike now :thumb2:
View attachment 316649
And a riders eye view of the clocks and controls....
Looks good enough to ride doesn’t it :cool: Even a mid sized Honda like this looks cooler than Miles Davies in shades to my eye.....
Must stay strong or I’ll try to buy a real one.....
Cheers
Tim
 

Attachments

  • F5E3A4A0-E4C0-40D0-B5EB-DC13D9578093.jpeg
    F5E3A4A0-E4C0-40D0-B5EB-DC13D9578093.jpeg
    3.3 KB · Views: 0
  • E29E3A76-13A4-4C25-BB3F-C642FA944014.jpeg
    E29E3A76-13A4-4C25-BB3F-C642FA944014.jpeg
    3.4 KB · Views: 0
  • 1A2CB71B-93B2-4A64-9D65-EC165E6B0F47.jpeg
    1A2CB71B-93B2-4A64-9D65-EC165E6B0F47.jpeg
    3.6 KB · Views: 0
  • 43788037-C321-41FB-AF5A-73268D3B36AB.jpeg
    43788037-C321-41FB-AF5A-73268D3B36AB.jpeg
    2.9 KB · Views: 0
Thread owner
Thanks Paul.
The wheels were basically Tamiya semigloss black with Humbrol matt aluminium highlights. Struggled with the Humbrol a bit though, it dried too quickly and the finish is a little grainy....trouble is, I don’t know what else to use.....acrylic metallic paint always looks plastic to me.....
I won’t use plastic chrome parts again either. I think Alclad chrome looks more in scale.....
Still loving this, built almost completely out of the box it really looks the part.....planning my next one already.....
 
Hi Tim cracking work see is coming to together very , I'll dig out my skid lid and be round for run.
Keep it coming sir.:thumb2:
Old Puffer Pete.
 
Thread owner
Hi Pete
More than welcome mate, glad you like it.....

Hi Simon
:flushed: I know, I know....couldn’t bring myself to drill the finished paint on the frame....funnily enough, Tamiya have added vestigial coils, but they run the wrong way.....and don’t have connections....nice of you to notice though ....
 
Status
Not open for further replies.
Back
Top