Theme editor

Scale Model Shop

Trumpeter 1/32 Bearcat F8F-1B

Status
Not open for further replies.
Thread owner
Help pe seat belts

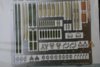
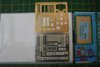
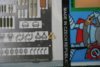
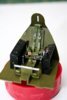
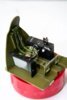
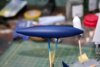
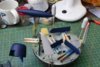
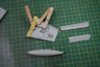
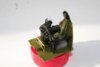
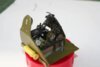
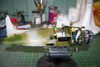
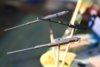
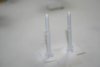
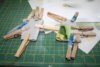
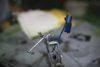
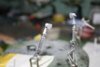
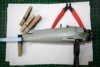
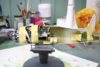
HI All the PE seat belts arrived today from Hannants look great BUT they seem to be the same size as the ones that came with the kit (too big). Have they been packaged up wrong? although the code number suggest they are the right ones. So if some one could give me some advice it would be of great help as the belts cost £8 so I want them to be correct.

View attachment 37950

View attachment 37951

View attachment 37952

View attachment 150976

View attachment 150977

View attachment 150978
 

Attachments

  • IMG_0208.jpg
    IMG_0208.jpg
    5.6 KB · Views: 0
  • IMG_0209.jpg
    IMG_0209.jpg
    5.5 KB · Views: 0
  • IMG_0210.jpg
    IMG_0210.jpg
    6 KB · Views: 0
Hi vaughan, ive managed to find a pic of a bearcat cockpit (although it may be restored, so might not be the original harness) and the lap belts are in fact alot wider than the shoulder ones. Seeing the etched fret in its entirety, the shoulder straps are indeed alot narrower so it may be nearer than we thought, your first pic just showed the lap belts which on their own look very big . anyway heres the link ,see what you think Grumman F8F BEARCAT hope this helps cheers tony
 
Thread owner
Hi Tony

Thanks for the info and link. I will study it in detail tomorrow. On a side note my thread notification via email is not working since the server changed don't know if this is the same for everyone.

Vaughan.
 
Thread owner

Attachments

  • _MG_0214.jpg
    _MG_0214.jpg
    5.6 KB · Views: 0
  • _MG_0215.jpg
    _MG_0215.jpg
    5.6 KB · Views: 0
Ive missed this one, god i have some catching up to do. Fantastic work, keep it up.

Cheers

Andy
 
Thread owner
Thanks guys

I'd got a bit of a sweat on thinking that the belts wouldn't work. Thanks again Tony for the Bearcat link it's going to be really useful.

Vaughan.
 
Thread owner
Hi All

Have finally finished the cockpit area and have tried a dry run with engine, battery, radio and bulkheads in the fuselage half. There will be a lot of lining up to do and I'm not looking forward to squeezing it all in. As a distraction I've started on the wing halves, flaps, gun bays and under fuselage fuel tank. This has a seam running around it but this has not been included. So I have used a thin strip of Tamiya masking tape to simulate it. This is the first kit that I have used vallejo surface primer and it seems to be working ok. The images are out of order I never seem to get that bit right.

Vaughan

View attachment 38048

View attachment 38049

View attachment 38050

View attachment 38051

View attachment 38052

View attachment 38053

View attachment 38054

View attachment 38055

View attachment 151074

View attachment 151075

View attachment 151076

View attachment 151077

View attachment 151078

View attachment 151079

View attachment 151080

View attachment 151081
 

Attachments

  • 9.jpg
    9.jpg
    5.8 KB · Views: 0
  • 8.jpg
    8.jpg
    6.2 KB · Views: 0
  • 7.jpg
    7.jpg
    5.5 KB · Views: 0
  • 6.jpg
    6.jpg
    5.5 KB · Views: 0
  • 1.jpg
    1.jpg
    4.9 KB · Views: 0
  • 3.jpg
    3.jpg
    5.2 KB · Views: 0
  • 4.jpg
    4.jpg
    5.9 KB · Views: 0
  • 5.jpg
    5.jpg
    5.6 KB · Views: 0
Coming on great now vaughan, that cockpit looks like it must have been very tight for the pilots of these aircraft, cheers tony
 
Thread owner
Hi All

I'm still holding back on putting the fuselage halves together. I seem to always end up with a noticeable seam line and if I fill and sand tend to loose the panel and rivet detail. I know some of you use the Tamiya extra thin cement which I gather is not available in this country and I'm wondering if this type would help. My local model shop sells what appears to be an equivalent but would appreciate anyones tips on this.

Vaughan.
 
I use humbrol liquid poly, It works just as good if you ask me.

I often find it better to use a normal glue, Revell contactor at the moment, and lay a good bead. Thae when you press the parts together, you will get a nice oze of glue. Leave it for at least overnight. The ouze of glue whick is by then hardend can be trimmed of with a new scapel blade and given a light scrape to get the rest.

After a few goes at it you shoud get a near invisible join.

Ian M
 
Thread owner
Thanks for that Ian it's nice to get another slant on things. I did find a thread with images on another forum that used the very thin tamiya cement but it still looked quite daunting and when you've spent a fair bit on a kit you don't want to get it wrong.

Vaughan.
 
Thread owner
Hi All

Still putting off joining the fuselage halves together so have been working on the under wing armament. Bombs primed and finished off with olive drab and the rockets white( I presume that they are rockets). Main wing section have been joined I opted to glue the machine gun covers so there is no great detail inside. Wing tips and rudder primed and sprayed deep sea blue.Tail wheel assembly primed and painted aluminium and deep sea blue. Will make an attempt at joining the fuselage halves tomorrow.

Vaughan.

View attachment 38125

View attachment 38126

View attachment 38127

View attachment 38128

View attachment 38129

View attachment 151151

View attachment 151152

View attachment 151153

View attachment 151154

View attachment 151155
 

Attachments

  • IMG_0014.jpg
    IMG_0014.jpg
    4.2 KB · Views: 0
  • IMG_0018.jpg
    IMG_0018.jpg
    5.7 KB · Views: 0
  • IMG_0019.jpg
    IMG_0019.jpg
    5.1 KB · Views: 0
  • IMG_0020.jpg
    IMG_0020.jpg
    5.6 KB · Views: 0
  • IMG_0022.jpg
    IMG_0022.jpg
    5.9 KB · Views: 0
This is looking well nice thus far! The picture you posted earlier of the half fuselage with all the gubbins looks very good indeed!

The pictures are best sorted after you have them in the post. Look in the preview and if they are not in the correct order, you can drag them around in the area where you actually write the message and then check them out in the preview window. Sorting them in the attachment manager don't work for me either.....

Hope you get the fuselage buttoned up with out to much hassle.

Ian M
 
Thread owner
Hi All

Well I have finally taken the plunge and joined the fuselage halves it was a bit of a struggle but I got there. Unfortunately I managed to damage the tail wheel assembly, there's no way that you can fit it after the fuselage is joined, but it has been repaired and I will rig up a cover to protect it.

Wing tips have had a coat of klear and the decals applied. I thought it best to do it at this point as the wings will be the raised position. Well that's all for now busy over the W/E so will make a start again next week.

Vaughan.

View attachment 38136

View attachment 38137

View attachment 38138

View attachment 151162

View attachment 151163

View attachment 151164
 

Attachments

  • _MG_0029.jpg
    _MG_0029.jpg
    5.8 KB · Views: 0
  • IMG_0024.jpg
    IMG_0024.jpg
    6.1 KB · Views: 0
  • IMG_0025.jpg
    IMG_0025.jpg
    4.7 KB · Views: 0
Status
Not open for further replies.
Back
Top