Theme editor

Scale Model Shop

UH-34 in the Padi

Status
Not open for further replies.
Richard

very skillfully done and a major improvement to the basic kit. I will continue to learn and look for ideas to steal.

John
 
Thread owner
Thanks gentlemen...

Ian, I hope the next will be nice for you too. :smiling4:
Jim, that's why the engine was pretty spartan...just enought o see contours through the mesh. Canopies are a make or break of an aircraft build so I put a lot of attention to it.
Scottie, always appreciate your encouragement.
Steve, ever the ready anticipator...hope not to disappoint.
John B, glad you like whats been done to this kit. You're welcome to steal if there're any. :smiling6:

Cheers,
Richard
 
Thread owner
Above the interior of the canopy there is a console. The kit clear part just had a rectangular emboss with no detail. I scratched one out by making a thicker box with switches and dials...

View attachment 315254 View attachment 315255View attachment 315256 View attachment 315257

Then added wire which I twisted around a dowel and pull away. This would look like intercom wires hanging from the console just for visual sake.

View attachment 315258 View attachment 315259

The after it was soaked in Future and left on a piece of tissue to soak up excess...

View attachment 315260 View attachment 315261

I painted the console in situ and also touched up the frames with interior grey after shaving off the back flush which would free the sliding motion for the side windows.

View attachment 315262 View attachment 315263

More later...

Cheers,
Richard
 

Attachments

  • h0051.jpg
    h0051.jpg
    2.6 KB · Views: 0
  • h0052.jpg
    h0052.jpg
    2.8 KB · Views: 0
  • h0053.jpg
    h0053.jpg
    2.2 KB · Views: 0
  • h0054.jpg
    h0054.jpg
    2.5 KB · Views: 0
  • h0055.jpg
    h0055.jpg
    2 KB · Views: 0
  • h0056.jpg
    h0056.jpg
    2.4 KB · Views: 0
  • h0058.jpg
    h0058.jpg
    2.2 KB · Views: 0
  • h0062.jpg
    h0062.jpg
    2.6 KB · Views: 0
  • h0063.jpg
    h0063.jpg
    2 KB · Views: 0
  • h0064.jpg
    h0064.jpg
    2.2 KB · Views: 0
Thread owner
I don't know if anyone had noticed but the Italeri kits cyclic rear rotor blades are in the wrong direction. I don't know if they are supposed to be this way or are reversible in flight I just don't know but looking at all references they face the other way.
View attachment 315440 View attachment 315441

At first I thought it was going to be a major job and after studying the assembly I came up with a solution with a simple remedy to slice of the attachement pin and relocate it to the other side.

View attachment 315442 View attachment 315443

Then just glue the stabilisers onto the other side....solved.

View attachment 315444 View attachment 315445

Cheers,
Richard
 

Attachments

  • h0057.jpg
    h0057.jpg
    2.5 KB · Views: 0
  • h0065.jpg
    h0065.jpg
    2 KB · Views: 0
  • h0066.jpg
    h0066.jpg
    2.3 KB · Views: 0
  • h0067.jpg
    h0067.jpg
    2.3 KB · Views: 0
  • h0068.jpg
    h0068.jpg
    2.3 KB · Views: 0
  • h0071.jpg
    h0071.jpg
    2.4 KB · Views: 0
Really liking the updates Richard, your putting some great work into this.
 
Hi Richard
Always interesting and informative reading through your builds. I love the little control box in the canopy.
Jim
 
Thread owner
Thanks Ian and Jim, always looking for interesting detail to improve the kit. It's even better when the kit is so easy to build and fits like a glove.

Cheers,
Richard
 
Wonderful work Richard the scene is fantastic love the way the wind blows the plants away! Hats off to you sir! Best regards Danny
 
Thread owner
Hey Daniel, there are paddy fields not far away from my house in Sekincan, about an hour and a half drive so reference for it was real. Except it's grown in industrial size fields. Here's a video of the fields...


Cheers,
Richard
 
Thread owner
Thank you Steve...I hope you like the following...

Firstly strips were added as bracings for the top portion of the mesh. I did it this way rather than trying to leaving the original strips on and to sand and thin them to accept the mesh. Gluing and final puttying tiny gaps to the canopy with Gunze liquid putty aided with a brush.

View attachment 315904 View attachment 315905

The hoisting winch just looked naked and uninteresting without some straps and cable wires. Reference helped with the attachment points

View attachment 315906 View attachment 315907

The picture on the right shows how effective the dangling wire is in the cockpit.

View attachment 315908 View attachment 315909View attachment 315910 View attachment 315911

Again the picture on the right shows why all the effort was put into getting the window to slide open. It makes the kit scale larger than it actually is.

View attachment 315912 View attachment 315913

There will be more...

Cheers,
Richard
 

Attachments

  • h0075.jpg
    h0075.jpg
    2.9 KB · Views: 0
  • h0076.jpg
    h0076.jpg
    2.8 KB · Views: 0
  • h0077.jpg
    h0077.jpg
    2.4 KB · Views: 0
  • h0078.jpg
    h0078.jpg
    2.8 KB · Views: 0
  • h0079.jpg
    h0079.jpg
    2.9 KB · Views: 0
  • h0074.jpg
    h0074.jpg
    2.8 KB · Views: 0
  • h0073.jpg
    h0073.jpg
    2.8 KB · Views: 0
  • h0072.jpg
    h0072.jpg
    2.9 KB · Views: 0
  • h0069.jpg
    h0069.jpg
    2.9 KB · Views: 0
  • h0070.jpg
    h0070.jpg
    2.9 KB · Views: 0
Thread owner

Attachments

  • h0080.jpg
    h0080.jpg
    3.2 KB · Views: 0
  • h0081.jpg
    h0081.jpg
    1.7 KB · Views: 0
  • h0082.jpg
    h0082.jpg
    2.6 KB · Views: 0
  • h0083.jpg
    h0083.jpg
    2.8 KB · Views: 0
  • h0084.jpg
    h0084.jpg
    2.8 KB · Views: 0
  • h0085.jpg
    h0085.jpg
    1.5 KB · Views: 0
Hi Richard
Superb attention to detail. Not only do you do the research to see what detail is missing but you have the modelling skills to scratch what is needed.
Jim
 
Thread owner
Hi Scottie and Jim, thanks for the kind comments. The UH-34 was central to the diorama I was doing and upfront that any details added would help it along. I was going to spend time doing the paddy that somehow triggered my mojo to go all the way. Normally I would have just concentrated on surface detail.

Masking of canopy and mesh, priming and pre-shading gets underway...

View attachment 316151 View attachment 316152View attachment 316153 View attachment 316154View attachment 316155 View attachment 316156View attachment 316157

Cheers,
Richard
 

Attachments

  • h0086.jpg
    h0086.jpg
    2.7 KB · Views: 0
  • h0087.jpg
    h0087.jpg
    2.4 KB · Views: 0
  • h0088.jpg
    h0088.jpg
    2.9 KB · Views: 0
  • h0089.jpg
    h0089.jpg
    2.5 KB · Views: 0
  • h0090.jpg
    h0090.jpg
    3.1 KB · Views: 0
  • h0091.jpg
    h0091.jpg
    2.1 KB · Views: 0
  • h0092.jpg
    h0092.jpg
    2.8 KB · Views: 0
Another catch up and well worth it, some great work on this one Richard.
 
Hey Daniel, there are paddy fields not far away from my house in Sekincan, about an hour and a half drive so reference for it was real. Except it's grown in industrial size fields. Here's a video of the fields...


Cheers,
Richard
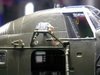
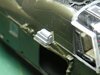
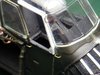
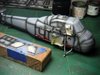
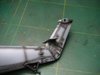
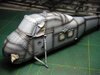
Thanks for that video Richard, never realised it was harvested in that manor, and not a tree in sight ! Always assumed you had thick luxurious woodland.
The bird looks fantastic, fancy the manufactures getting the blades wrong. Great detail as we have come to expect.
John.
 
Status
Not open for further replies.
Back
Top