Theme editor

Scale Model Shop

Valeron's 1/35 ICM KHD S3000/SS M Maultier

Thread owner
I'm back on this now that my Mossie is complete.

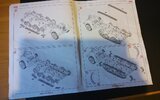
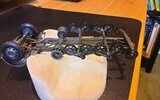
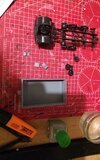
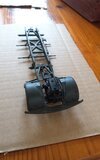
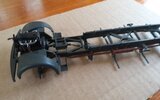
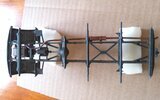
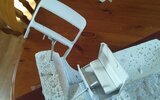
I've made some progress on the chassis. I'll come back to weather this later but am now moving onto the cabin and wheels.

View attachment 464558

View attachment 464559

View attachment 464560


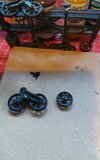
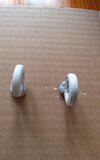
On the topic of wheels, does anyone have tips on removing the seamlines on the rubber tyres? If it just a matter of slowly and patiently fine sanding them? As you can see on the picture below, the seamlines are quite obvious after priming.

View attachment 464557
 

Attachments

  • 20221007_142219.jpg
    20221007_142219.jpg
    3.1 KB · Views: 0
  • 20221007_142037.jpg
    20221007_142037.jpg
    4.5 KB · Views: 0
  • 20221007_142049.jpg
    20221007_142049.jpg
    4.6 KB · Views: 0
  • 20221007_142111.jpg
    20221007_142111.jpg
    4.9 KB · Views: 0
I’ve only made a few models with them, and found the only reliable way is to slice them off. A fresh number 11 scalpel blade took them off best.
I did get one set where I could sand them off using 800 grit wet and dry used dry, but another set just tore when I tried that approach. A pity really because sanding gives a great in use worn effect.
 
Sorry I can't help you there Mike. I really hate the rubber tires that come in most kits too. I usually end up getting a set of resin tires to replace them. Chassis looking great too Sir...

Prost
Allen
 
Thread owner
Another possibly dumb question on the tyres if I may. If the tyres are already rubber colour, it is common to not actually paint them and just weather them, or always paint them? Looking at my Vallejo dark rubber model colour paint, it looks identical to the colour already on them.
 
Looks as if you have built up the chassis all nice and square. That will pay dividends later in the build. As to whether to paint the tyres - I think I would try just weathering them. If you don't like the result you can always remove it and paint.
 
Not a dumb question at all Mike. I brush painted the rubber tires on my Takom Vidalwagen trailer 6 weeks ago and they are still tacky and sticky. First and last time I ever do that again...Pigments work decent on the plain rubber tires too. You just can't handle them a lot afterwards...

Prost
Allen
 
I’ve used water based acrylics to paint them, but I wouldn’t use volatile based acrylics such as Tamiya, or lacquers or enamels. The paint film can be quite fragile after painting though, so minimise handling afterwards.
What I would do is make sure there is a film of paint on the wheel rim so the rubber isn’t in direct contact with the plastic. Some rubber tyre material can react with the plastic and break down over time. The paint film stops that happening.
 
Thread owner

Attachments

  • 20221011_120938.jpg
    20221011_120938.jpg
    4.8 KB · Views: 0
  • 20221011_121005.jpg
    20221011_121005.jpg
    5.4 KB · Views: 0
  • 20221011_121009.jpg
    20221011_121009.jpg
    4.9 KB · Views: 0
Steady progress Mike. From my limited experience I think half-tracks are difficult to build. They are quite complex and the best order of construction and painting takes some figuring out. Look good.
 
From my limited experience I think half-tracks are difficult to build. They are quite complex
With soft-skin ones, you get all the complexity of a truck kit and most of the complex parts of a tracked AFV kit — so yes, there are definitely simpler models out there :)
 
welcome to the world of 1/35 models all i work in..gone through your thread great start to this build never in all my years built a icm kit so will be following this with interest
 
I know that the mould seams can be tricky on rubber wheels, but when was the last time you saw a tyre with no wear or marks on the tread? Unless it's still in the showroom, all tyres will have a coating of road dust at the very least. As this is military, it won't have come from a showroom so some wear and tear on the road surface of the tyres is almost obligatory. A gentle sanding around the circumference (I use 240 grit sanders from Ultimate) will get rid of the seam and, as a bonus, leave you some marks of wear and tear.
 
Thread owner
A bit more progress. I've painted and attached all the wheelie bits.

View attachment 465279

I'm going to move onto the cabin now as I need to look into building, painting, washing etc tracks. I've never done this before and it's looks a little daunting, especially planning the order etc. I know I want to finish with some dust pigments I have after the model is nearly finished but not really sure on the next steps. I need to research this a bit.

View attachment 465280
 

Attachments

  • 20221017_174031.jpg
    20221017_174031.jpg
    4.8 KB · Views: 0
  • 20221017_174024.jpg
    20221017_174024.jpg
    5.4 KB · Views: 0
Thread owner
Looking for a bit of advice if I may.

I've now build the storage container to go on the back. I'm currently painting this.

View attachment 466273

BUT, dry fitting it to the Chassis proved difficult and I've snapped a few wheely parts off. Both Dave and Jakko did advice me that on ICM softskins it's important to get the chassis square to prevent later problems. I thought I did have it square but I guess not enough. Anyway I am where I am.

The damage inflicted is shown below.

I know I can use superglue to reattach them but that might not be strong enough and they may break again when I add the tracks.

Any advice would be appreciated.

View attachment 466275

View attachment 466274

Mike
 

Attachments

  • 20221031_100206.jpg
    20221031_100206.jpg
    5.9 KB · Views: 0
  • 20221031_100221.jpg
    20221031_100221.jpg
    4.8 KB · Views: 0
  • 20221030_194509.jpg
    20221030_194509.jpg
    5.9 KB · Views: 0
Hi Mike,
For a REALLY strong bond I use a two part mitre glue kit,"Everbuild" do a reasonably priced set.
You dab a bit ot glue on one surface and spray the accelerant on the other,hold together for a few seconds and "Bingo" a VERY strong join indeed :)
HTHs
Andy
 
Back
Top