
You are using an out of date browser. It may not display this or other websites correctly.
You should upgrade or use an alternative browser.
You should upgrade or use an alternative browser.
Valerons Airfix 1/72 Mosquito B.XVI
- Thread starter Valeron
- Start date
One step forward and one step backwards.
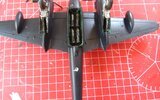
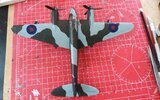
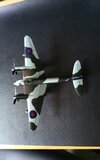
I started on the decals and so far so good but a long way to go.
It then dawned on me that I'd failed to mask a clear part on the underside. It's only small and I must have missed it.
It tried to carefully clean of the layers of prime, paint and clear coats so in the end removed the part. I'll now need to do clean up and redo paint work and I'll use Krystal clear instead of the clear part which is not usable.
Annoying but not the end of the world.
View attachment 463822
View attachment 463821
Attachments
That is looking very good Mike. Glad you're happy with your progress and still enjoying it :thumb2:
To help minimise paint seepage under the masking tape try not to direct the AB spray into the masked edge. Also I burnish the edge of the tape with one of THESE. It is only the edges that need to be well stuck down and then there is less chance of pulling off paint.
To help minimise paint seepage under the masking tape try not to direct the AB spray into the masked edge. Also I burnish the edge of the tape with one of THESE. It is only the edges that need to be well stuck down and then there is less chance of pulling off paint.
That is looking very good Mike. Glad you're happy with your progress and still enjoying it :thumb2:
To help minimise paint seepage under the masking tape try not to direct the AB spray into the masked edge. Also I burnish the edge of the tape with one of THESE. It is only the edges that need to be well stuck down and then there is less chance of pulling off paint.
Thanks Jim.
I like the look of those shaped cotton buds.
Unfortunately I don't use an Airbrush and brush paint, so have to paint over the masking.
I might consider investing in an airbrush when I've conquered a few more models.
Mike
- Joined
- Jan 26, 2017
- Messages
- 2,593
1/3
Looks good Mike :thumb2:
I think the Krystal clear will be a good replacement. I often have those “doh” moments when I realise I’ve forgotten something at the end of a build too :flushed:
Geoff.
I think the Krystal clear will be a good replacement. I often have those “doh” moments when I realise I’ve forgotten something at the end of a build too :flushed:
Geoff.
Allen Dewire
New member
1/3
Yes Mike, she is looking mighty fine Sir!!! Getting real close to the build finish. Good fix idea for the window. I don't think I masked mine up enough when I painted. Was the window only round or square with a round center piece in it???
Prost
Allen
Prost
Allen
It was a tiny round circular clear pieceYes Mike, she is looking mighty fine Sir!!! Getting real close to the build finish. Good fix idea for the window. I don't think I masked mine up enough when I painted. Was the window only round or square with a round center piece in it???
Prost
Allen
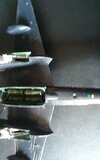
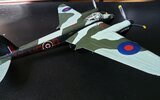
Decals added, followed by another clear coat.
Some of the decals were tiny and awkward as expected but seemed very good quality.
I'll now apply some washes and reduce the shine with a final coat of Matt or Satin varnish.
The next photos will be I'm the completed section.
View attachment 463949
View attachment 463950
View attachment 463948
Some of the decals were tiny and awkward as expected but seemed very good quality.
I'll now apply some washes and reduce the shine with a final coat of Matt or Satin varnish.
The next photos will be I'm the completed section.
View attachment 463949
View attachment 463950
View attachment 463948
Attachments
DefinitelyVery nice Mike. Don't decals make a plane model come to life :thumb2:
1/3
Looking good Mike. Home straight now then!
Legal Notice
scalemodelling.co.uk is a privately operated online discussion forum. All content posted by members reflects their own views and opinions and does not necessarily represent those of the forum owners or administrators. While reasonable efforts are made to moderate content, no responsibility is accepted for user-generated material. By using this site, you agree to comply with UK law and the forum rules.
Currently on our website
Threads
37,636
Messages
710,294
Members
2,679
Latest member
Professor Challenger