
You are using an out of date browser. It may not display this or other websites correctly.
You should upgrade or use an alternative browser.
You should upgrade or use an alternative browser.
What's on the Bench 2023
- Thread starter Graeme C.
- Start date
1/3
?


.... Some progress,for a rather maligned kit, it's not that bad!
Those decals went down well,(there's half a dozen just there!),the fit of the fuselage halves doesn't appear great, after a dry fit,so I'm doing it in stages")
.... Some progress,for a rather maligned kit, it's not that bad!
Those decals went down well,(there's half a dozen just there!),the fit of the fuselage halves doesn't appear great, after a dry fit,so I'm doing it in stages
Wow that ejection seat looks the biz Andy !?
.... Some progress,for a rather maligned kit, it's not that bad!
Those decals went down well,(there's half a dozen just there!),the fit of the fuselage halves doesn't appear great, after a dry fit,so I'm doing it in stages
1/3
Thanks very much Ron,Wow that ejection seat looks the biz Andy !
")
Must admit the pics aren't kind to it, but, I'm happy with it so far... Just trying to decide wether to pop a pilot in or not
1/3
A brief update,got the cockpit in and joined the two halves,and wings....


Yes,it needs a lot of clean up seam wise,and some teasing into position of some parts, but not a hill of beans. Don't forget also,that it's an old,and relatively,cheap kit... all I wanted was an half decent model of one of my favourite Jets,so I'm hoping anyway :smiling3:.... and I must admit, it's a real fun build, despite the extra lengths you have to go to :thumb2:.
Yes,it needs a lot of clean up seam wise,and some teasing into position of some parts, but not a hill of beans. Don't forget also,that it's an old,and relatively,cheap kit... all I wanted was an half decent model of one of my favourite Jets,so I'm hoping anyway :smiling3:.... and I must admit, it's a real fun build, despite the extra lengths you have to go to :thumb2:.
Don't do that Ron look at mine a bit close its quite shabby but I enjoy using it ,wouldn't say the more you do the better you become ,my thinking being the more you use it the more confident you become with confidence comes improvement a bit like the airbrush . DaveHm. Maybe I should just send my photoetch stuff for you to tackle Dave
Hm. Maybe I should just send my photoetch stuff for y
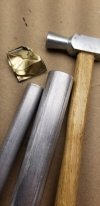
Think its good for primer so will start a proper build bloggy/ thing once that happens ,till then all good fun worst thing being each bolt head was made up of three pieces 


Oh and I scratched the cranking handel totally bogus but hey looks the part. Dave
Oh and I scratched the cranking handel totally bogus but hey looks the part. Dave
1/3
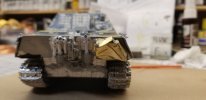
A bit more done... It's certainly not the kind of kit we're all used to,however, it's definitely one that can turn out to be quite satisfying... I hope!!:tears-of-joy:
LOTS of clean up necessary,and some persuasion,but here....

Some bits going to gether also,and then.....


Job done... Not my best effort ever,but it's almost like when I did a kit as a boy... completely stress free!!
LOTS of clean up necessary,and some persuasion,but here....
Some bits going to gether also,and then.....
Job done... Not my best effort ever,but it's almost like when I did a kit as a boy... completely stress free!!
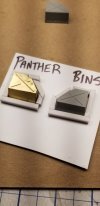
Solid advice Dave, thanks Buddy. Right after I finished my demolished storage bins I felt spent. Yet, at the same time wished I'd another set to do just to apply the lessons learnt from the first ones....Don't do that Ron look at mine a bit close its quite shabby but I enjoy using it ,wouldn't say the more you do the better you become ,my thinking being the more you use it the more confident you become with confidence comes improvement a bit like the airbrush . Dave
Well done Andy stress free is how it should be why fill your leisure time(or should that be pleasure time)doing something that's not giving anything back hence that Polish thing although not trashed was put too the shelf of doom. I went back to my loved 72nd scale and although the thing is covered in etch whilst not my favourite I throughly enjoyed the whole thing its not the best but hey I could say it was fun doing it. DaveA bit more done... It's certainly not the kind of kit we're all used to,however, it's definitely one that can turn out to be quite satisfying... I hope!!:tears-of-joy:
LOTS of clean up necessary,and some persuasion,but here....
Some bits going to gether also,and then.....
Job done... Not my best effort ever,but it's almost like when I did a kit as a boy... completely stress free!! :smiling3:
Ditto Ron with mine there should have been a strip of etch along the face of the track guards to form a raised lip totally botched my first attempt mullerd the thing only afterwards did a sensible plan of action spring to mind but too late by then but as mentioned next time out confidence won't let the same happen. DaveSolid advice Dave, thanks Buddy. Right after I finished my demolished storage bins I felt spent. Yet, at the same time wished I'd another set to do just to apply the lessons learnt from the first ones....
Revell 1:32 Spitfire mk2a
I think I started this in September.
No rush !


It was a second hand kit, £18.00 I think, but it’s only about £30.00 new. I think Revell done ok with this kit.
I think I started this in September.
No rush !
It was a second hand kit, £18.00 I think, but it’s only about £30.00 new. I think Revell done ok with this kit.
G
Guest
Guest
I've always loved dioromas, even as a child in the 70s. I'm also vary impressed with the ones developed by people on this forum.
Anyway I thought I'd give it a go myself. I'll be starting simple and using this Master Box kit. I'm not up to scratch building yet. I have though bought some foamboard and will extend this slightly beyond the sandbags.
I've no idea where this will go and it could be an absolute disaster but I'm going to take my time, do some research, learn some new skills and have fun.
1/3
Definitely the way to go mate - look forward to the end result!
Steve
Steve
If you havent already, add a post in the Figure Building section of the Forum.I've always loved dioromas, even as a child in the 70s. I'm also vary impressed with the ones developed by people on this forum.
Anyway I thought I'd give it a go myself. I'll be starting simple and using this Master Box kit. I'm not up to scratch building yet. I have though bought some foamboard and will extend this slightly beyond the sandbags.
I've no idea where this will go and it could be an absolute disaster but I'm going to take my time, do some research, learn some new skills and have fun.


It's been a great kit so far Mark (just not the best looking subject :tears-of-joy . Clever engineering and a great fit.
From what I've seen the biggest issue is packing enough weight into the front. Airfix recommends a minimum of 67 grams, so like others I'm stuffing it wherever I can.
. Clever engineering and a great fit.From what I've seen the biggest issue is packing enough weight into the front. Airfix recommends a minimum of 67 grams, so like others I'm stuffing it wherever I can.
I'll tag along Andy. Have a link, (or two), to the Gannet.I've made a start on the Airfix 1/48 Gannet. I figured I might get the interior done before putting it aside when the biplane GB starts. I'll do a proper blog when I resume, but it's a big box and it's going together really well so far
First, it was the very first aircraft I ever worked upon. Training at HMS Condor in Arbroath. I had to initially check the oleo pressures then change one of the oleo's!! A very memorable activity for a wee 16 year old!!!
Second. I served at HMS Gannet at Prestwick, Ayrshire twice. During that time we had a Gannet as gate guardian.
So I will follow your build with interest.
The progress so far is excellent.
Legal Notice
scalemodelling.co.uk is a privately operated online discussion forum. All content posted by members reflects their own views and opinions and does not necessarily represent those of the forum owners or administrators. While reasonable efforts are made to moderate content, no responsibility is accepted for user-generated material. By using this site, you agree to comply with UK law and the forum rules.
Currently on our website
Threads
37,649
Messages
710,335
Members
2,679
Latest member
Professor Challenger