Theme editor

Scale Model Shop

Yaks century series in 1/48 part 6 - the F106 Delta Dart

yak face

Moderator
Staff member
Joined
Jun 13, 2009
Messages
14,395
Reaction score
936
Points
113
Age
60
1/3
Thread owner
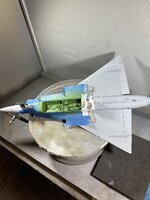
Heres the final part of my century series build , the Convair F106 Delta Dart. Its been a few years since I started this project with the F100 , then F101 , F102 , F104 and F105 ( all the previous builds are still on the forum but since the server change the pics cant be expanded , so once ive finished this one I’ll take some more of them all together ) .
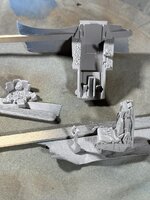
The kit is the superb Monogram tooling dating from 1983 , re issued here in a Revell boxing ( which means the decals will be good ) . The detail on this is stunning for the time with beautifully done wheel wells ,cockpit and missile bay . No PE is available for this but none is really needed as the cockpit and seat with harness are fully detailed, just needing careful painting . First up was assembling the three part seat and priming the cockpit parts .
066C2D7D-E01B-4C35-AB50-BAE7EE70C3A8.jpg 08024A6F-FE46-4C14-B7EF-2622CBE26105.jpg 3FA324AC-5977-4E25-A89C-256C86A62438.jpg 180DB12B-5402-465D-8A65-681542F52D57.jpg 9D00AB06-500E-45FA-A73B-3FF98234B7CA.jpg F0C81524-E0D8-4089-B9B7-5734B8E0C960.jpg A6516607-5162-4705-B868-D1E7A27A4ED3.jpg 91C46F6C-92FB-4D54-9DD0-C1D977069F74.jpg
 

Attachments

  • CA0B9110-DE55-49F3-AFCB-ACBF981327B4.jpg
    CA0B9110-DE55-49F3-AFCB-ACBF981327B4.jpg
    382.5 KB · Views: 0
  • 3799C136-FEE4-41AE-B9AF-E43CF1643E73.jpg
    3799C136-FEE4-41AE-B9AF-E43CF1643E73.jpg
    207.4 KB · Views: 0
Very nice, I’m going to pull up a chair to watch Tony.

The detail is amazing, even more so when you consider when it was tooled 🤩

Geoff
 
Thread owner
Made a start on the cockpit . Thankfully there are plenty of good colour pictures online of the pit and seat so its just a case of very fiddly , careful painting now . Ive done the seat and cockpit tub and sidewalls , they will now be getting a wash and some careful shading on the seat belts. Ive yet to start the instrument panel but this will be the same procedure - very careful painting.
IMG_5586.jpg
 
Thread owner
Back from a little holiday now so got a little more done today. The ejector seat and cockpit tub parts have all had a wash to bring out the detail and the instrument panel has had some very careful painting . As I mentioned before there is loads of excellent reference on the net especially the aircraft specific www. f-106deltadart . com .
IMG_5595.jpg IMG_5594.jpg
 
Thread owner
Well this has been taking a bit of a back seat as ive bern busy in the house but heres a little bit of progress . Ive painted up the extremely detailed wheel wells and painted and assembled the three part nosewheel bay . This has been fitted to the bottom section of the fuselage and the underneath of the cockpit tub forms the roof when the two halves of the fuselage go together. Ive also fitted the engine inlets to the top half of the fuselage , the resulting recessed joint being sorted by gluing pieces of fishing line over the joint so it matches the raised detail on the rest of the airframe . IMG_5665.jpg IMG_5668.jpg IMG_5612.jpg
 
Brilliant progress

Lovely classic kit of an early cold war icon!

Miko (sadly no longer conforms to 'aera rule')
 
Thread owner
Ive now got the top and bottom fuselage halves together , the resulting seam on the forward and rear fuselage has been sanded and filled and the lost raised panel lines reinstated by scoring with the scalpel - this leaves a raised line which is virtually the same size as the kit ones , once under a few coats of paint theyll be fine. The nose cone has been fitted but the joint is yet to be sorted .
I’m still not sure if I want to have the missile bay closed or open . Its not something I usually go for and the rest of the builds in this series with internal bays ( f101 voodoo , f102 delta dagger) were built closed -BUT , the detail on this kit is beautiful and it would be a shame not to see it . I just cant decide . Ive put a 1/72 hurricane im doing at the side to show how big a model this is in 1/48 , it was a surprisingly large aircraft .
IMG_5680.jpg IMG_5681.jpg IMG_5682.jpg IMG_5684.jpg
 
Thread owner
This has now had the canopies fitted ( rear section only temporarily) and given a coat of grey primer . A few areas needed tidying up with a little acrylic filler but its almost ready for the colour . One thing I have decided on is the weapons bay , I’m going to have it open - it would be a crime to hide all the exquisite detail with a closed bay .
With this in mind I've given the weapons bay a coat of green.
 

Attachments

  • IMG_5776.jpg
    IMG_5776.jpg
    416.8 KB · Views: 0
Back
Top