
Heres my entry for the modern jets GB. its the Bronco 1/48 Chengdu J10S Vigorous Dragon or 'Firebird' to give it its NATO ascc name. This chinese aircraft had a long development ,but the J10 A was intoduced into service in about 2003 (a little later for the two seater 'S' I'm modelling here). The aircraft is chinese in design and manufacture (apart from the russian lyulka al31fn engine) but was helped along with the transfer of data from the Israeli IAI Lavi project which never made production .
The kit is by Bronco , a chinese company mainly known for armour and is beautifully moulded and presented. All the sprues come wrapped in their own plastic bag as does the two decal sheets (all those tiny stencils !!oh no!) and the small photo etch sheet and the turned brass pitot tube (or as it says on the box 'pilot pipe'!!) There are two markings options and a clear sprue which includes both open and closed canopy options.
Anyway , I thought Ian was getting a bit lonely in this GB so I had to join in ! heres some pics ,hopefully Ill get this one done in time !(but dont hold your breath )
View attachment 242855
View attachment 242856
View attachment 242857
View attachment 242858
View attachment 242859
View attachment 242860
View attachment 242861
View attachment 242862
View attachment 242863
View attachment 242864
Attachments
-
![DSCN1531 [Desktop Resolution].JPG](/data/attachments/71/71563-85a74a0fbe827d7dc5034a3d7ab53841.jpg?hash=t58Y4kZFNy) DSCN1531 [Desktop Resolution].JPG2.2 KB · Views: 0
DSCN1531 [Desktop Resolution].JPG2.2 KB · Views: 0 -
![DSCN1532 [Desktop Resolution].JPG](/data/attachments/71/71571-d98db5b95ef25663b42f5276534cbb29.jpg?hash=1tUv-wRGvm) DSCN1532 [Desktop Resolution].JPG1.6 KB · Views: 0
DSCN1532 [Desktop Resolution].JPG1.6 KB · Views: 0 -
![DSCN1533 [Desktop Resolution].JPG](/data/attachments/71/71579-b4dbaa817ed05740cabfc7439ff0fc9a.jpg?hash=jygyqnn5Vl) DSCN1533 [Desktop Resolution].JPG2 KB · Views: 0
DSCN1533 [Desktop Resolution].JPG2 KB · Views: 0 -
![DSCN1534 [Desktop Resolution].JPG](/data/attachments/71/71587-dbd0c87d70e178b39a1b059027c6dcb0.jpg?hash=5nK9cR5RnI) DSCN1534 [Desktop Resolution].JPG2 KB · Views: 0
DSCN1534 [Desktop Resolution].JPG2 KB · Views: 0 -
![DSCN1535 [Desktop Resolution].JPG](/data/attachments/71/71595-5302bc6549b8288222c6ef5bad2228c4.jpg?hash=sBRTFAy8bS) DSCN1535 [Desktop Resolution].JPG1.4 KB · Views: 0
DSCN1535 [Desktop Resolution].JPG1.4 KB · Views: 0 -
![DSCN1536 [Desktop Resolution].JPG](/data/attachments/71/71603-dfcaf6281316e9680757aaa8eba4529b.jpg?hash=8fb_nqbsZl) DSCN1536 [Desktop Resolution].JPG1.6 KB · Views: 0
DSCN1536 [Desktop Resolution].JPG1.6 KB · Views: 0 -
![DSCN1537 [Desktop Resolution].JPG](/data/attachments/71/71611-9ad42a052d878b8e14bb86f2b9ce2b67.jpg?hash=Ek_f-vS69X) DSCN1537 [Desktop Resolution].JPG2.5 KB · Views: 0
DSCN1537 [Desktop Resolution].JPG2.5 KB · Views: 0 -
![DSCN1538 [Desktop Resolution].JPG](/data/attachments/71/71619-2af965594afbacb722802baceb389078.jpg?hash=0pLt5W2T7s) DSCN1538 [Desktop Resolution].JPG2.2 KB · Views: 0
DSCN1538 [Desktop Resolution].JPG2.2 KB · Views: 0 -
![DSCN1539 [Desktop Resolution].JPG](/data/attachments/71/71627-73c41fd363ccd51f2cb4bcf33b4b970d.jpg?hash=fkJzo1SNY6) DSCN1539 [Desktop Resolution].JPG2.4 KB · Views: 0
DSCN1539 [Desktop Resolution].JPG2.4 KB · Views: 0 -
![DSCN1540 [Desktop Resolution].JPG](/data/attachments/71/71634-e4c442f3fa242c0e4ea30447df04ffd4.jpg?hash=NdwzZfgjfs) DSCN1540 [Desktop Resolution].JPG2.5 KB · Views: 0
DSCN1540 [Desktop Resolution].JPG2.5 KB · Views: 0
") . Well it looks like one anyway.
. Well it looks like one anyway.")

![DSCN1565 [Desktop Resolution].JPG](/data/attachments/55/55065-974f5404dc17634608578886502df287.jpg?hash=CK5psQgaIb)
![DSCN1566 [Desktop Resolution].JPG](/data/attachments/55/55070-7eb839a3c6804e24a55634a653def816.jpg?hash=iP33AXfL2Z)
![DSCN1564 [Desktop Resolution].JPG](/data/attachments/55/55057-73d6eb8d61e75f20812c32a71af48895.jpg?hash=A6bBcQ0H8z)
![DSCN1563 [Desktop Resolution].JPG](/data/attachments/55/55049-9ebd6a8b46eae6d2c09346f335692bb3.jpg?hash=K6TNX5DffQ)
![DSCN1548 [Desktop Resolution].JPG](/data/attachments/54/54998-cd33f1b0f3f7cabde97fdf45615e1bf4.jpg?hash=rQBO8c_i-k)
![DSCN1549 [Desktop Resolution].JPG](/data/attachments/55/55006-1197d006dc30d352a591c4b771de8f1f.jpg?hash=BIZdESkjSv)
![DSCN1551 [Desktop Resolution].JPG](/data/attachments/55/55014-b61ba8ab85610d7070d2bf19f8493dea.jpg?hash=cyd3_qKhZw)
![DSCN1552 [Desktop Resolution].JPG](/data/attachments/55/55020-45d4807a756bf4d066910b5fa55f2337.jpg?hash=FrArlMmFJ7)
![DSCN1553 [Desktop Resolution].JPG](/data/attachments/55/55026-8f4ece49b132dc8ca45f9b9b5738e396.jpg?hash=yQNX-YgyR1)
![DSCN1554 [Desktop Resolution].JPG](/data/attachments/55/55033-3434a3befb1b7e74c9e8d519d231ce74.jpg?hash=IjwSQETjeA)
![DSCN1562 [Desktop Resolution].JPG](/data/attachments/55/55041-70462b0946e59a5c5b863cda3c5e0ca8.jpg?hash=9QGyCMmzxG)
 well,now pops ready, cheers
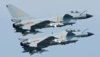
![DSCN1626 [Desktop Resolution].JPG](/data/attachments/58/58285-bf20e224a40dbed8609f9e1512a14d66.jpg?hash=mhrMPc5AnB)
![DSCN1627 [Desktop Resolution].JPG](/data/attachments/58/58293-a49d3cc9aebe2f7fea799166340a6d91.jpg?hash=tUH4Z2iJvi)
![DSCN1628 [Desktop Resolution].JPG](/data/attachments/58/58298-3d919a5416e0629ca68ad6897cf39eb1.jpg?hash=4xVChunfPW)
![DSCN1629 [Desktop Resolution].JPG](/data/attachments/58/58305-d38a5be3a92639155acd30ddc8a5da3c.jpg?hash=aEEthtS2FE)
![DSCN1630 [Desktop Resolution].JPG](/data/attachments/58/58311-cb5e25f6a412de48ed1a8749ba3ed1a1.jpg?hash=DNNz3q0uLd)
![DSCN1631 [Desktop Resolution].JPG](/data/attachments/58/58316-9b18cefd03c87499148713f3814c0d77.jpg?hash=j1_Vt5G_26)
![DSCN1632 [Desktop Resolution].JPG](/data/attachments/58/58322-b028c59c0be1ceffda841640e4a05b1b.jpg?hash=fpVtfq7mTp)
![DSCN1640 [Desktop Resolution].JPG](/data/attachments/58/58327-077c0e77034c996582932d21f5059512.jpg?hash=qZoocXJYnc)
![DSCN1641 [Desktop Resolution].JPG](/data/attachments/58/58334-4a09b95ff42ea972584b652d609a255e.jpg?hash=ybsakWey0u)
![DSCN1642 [Desktop Resolution].JPG](/data/attachments/58/58341-6eb66e989a153439ab72b8b8d51daa03.jpg?hash=BdHlA8QoIW)
![DSCN1645 [Desktop Resolution].JPG](/data/attachments/58/58348-464c263d459615e3134eec10c4c988b5.jpg?hash=BeqB2EUxXV)
![DSCN1646 [Desktop Resolution].JPG](/data/attachments/58/58355-28d2f703aafa8e73f1d46454457ebef5.jpg?hash=Phvoap39bN)
![DSCN1647 [Desktop Resolution].JPG](/data/attachments/58/58363-6d401275cda683121f9dc2a7b0c118d1.jpg?hash=0rRZp6m13j)
![DSCN1648 [Desktop Resolution].JPG](/data/attachments/58/58370-2c3f3b23404459b3cc9af624bc4aab52.jpg?hash=BMoYwcTQtd)