
You are using an out of date browser. It may not display this or other websites correctly.
You should upgrade or use an alternative browser.
You should upgrade or use an alternative browser.
Zoukei Mura Hs129B-2/ RIII, 1/32 scale.
- Thread starter BarryW
- Start date
1/3
Hi Barry. I can see them in the painted pic (above) as well, especially the one on the back and the right hand one on the seat. Not criticising by the way, just thought you might be really unhappy if you didn’t spot them until after you had closed the fuselage.
1/3
Weird…..still, your call to sort them out if you think it necessary….
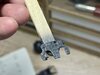
Tim. I have had another look. Still no sign of the two in the seat pan, those are just not visible under paint. On the back of the seat there is an oval, very feint, but I am sure it’s detail because of the shape. It does not look like a ejector pin mark. Regardless once weathered and seatbelts are added any trace will be lost anyway.
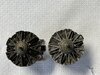
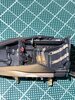
Very little of the engines will be seen, only the front, so I have focussed on that.
Having used the MRP black primer I need to bring out the detail. I also want a greasy metallic look and there is nothing better than using these for this.
View attachment 435230
I am using two types, the ‘Chrome Effect’ is the best one for highlighting detail and making painted plastic look like metal. Ignore the ‘chrome’ bit, if you want a chromed look you will not want to use this.
Here is a before and after just the use of the chrome effect to bring out detail.
View attachment 435231
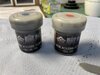
Next it is the steel effect. This gives you a nice bluish tint and I think it’s ideal for the central hub, providing as it does a nice contrast to the chrome effect. I apply the powder with a cotton bud, burnishing it down onto the surface where I want it. Here is the result.
View attachment 435232
I absolutely love these Uschi Metal Powders, they are just so effective and versatile. Some people say that you can do the same with pencils and while you can do something similar it just is not as good.
I have also worked on some more cockpit subs and sprayed the RLM66.
View attachment 435233
A close up of the I.p..
View attachment 435234
I have a lot more work on the cockpit to do, detail painting and weathering.
Having used the MRP black primer I need to bring out the detail. I also want a greasy metallic look and there is nothing better than using these for this.
View attachment 435230
I am using two types, the ‘Chrome Effect’ is the best one for highlighting detail and making painted plastic look like metal. Ignore the ‘chrome’ bit, if you want a chromed look you will not want to use this.
Here is a before and after just the use of the chrome effect to bring out detail.
View attachment 435231
Next it is the steel effect. This gives you a nice bluish tint and I think it’s ideal for the central hub, providing as it does a nice contrast to the chrome effect. I apply the powder with a cotton bud, burnishing it down onto the surface where I want it. Here is the result.
View attachment 435232
I absolutely love these Uschi Metal Powders, they are just so effective and versatile. Some people say that you can do the same with pencils and while you can do something similar it just is not as good.
I have also worked on some more cockpit subs and sprayed the RLM66.
View attachment 435233
A close up of the I.p..
View attachment 435234
I have a lot more work on the cockpit to do, detail painting and weathering.
Attachments
Coming on very nicely Barry.
I've just had a quick look at a video on how these metal powders work because, although you've mentioned them previously, I've not actually seen them demonstrated real-time before.
I have to say they look very simple to use, produce great results and I would imagine the pots last a very long time given what they're used for, making them very good value for money.
I see from the demo I've found in their website (here) that for larger surface areas it can/should be sealed. Obviously for your engine that may not be necessary as it will be hidden away.....I just wondered how durable it is before being sealed..... Just curious.....
Thanks and ATB.
Andrew
1/3
Looks very good Barry. You can get a metallic effect with pencil graphite as you say. It’s very good on smaller areas, but is a little two dimensional compared to those powders. Might keep those in mind if I ever start doing things with engines again…l
Coming on very nicely Barry.
I've just had a quick look at a video on how these metal powders work because, although you've mentioned them previously, I've not actually seen them demonstrated real-time before.
I have to say they look very simple to use, produce great results and I would imagine the pots last a very long time given what they're used for, making them very good value for money.
I see from the demo I've found in their website (here) that for larger surface areas it can/should be sealed. Obviously for your engine that may not be necessary as it will be hidden away.....I just wondered how durable it is before being sealed..... Just curious.....
Thanks and ATB.
Andrew
Personally Andrew I would not use them on larger surfaces simply because of the need to seal them and, if you do, you lose some of the metallic effect. You cannot beat spraying a good metaliser for larger surfaces that does not need sealing. So my advice would be to use them in places such as the engine boss over a painted surface,. The underlying paint does affect the finish, not just the colour but the sheen also.
For me the best use is for dry brushing over a painted surface as part of the weathering process. It brings out your highlights while giving the impression of painted metal that has suffered wear and tear (as distinct from chipping). On smaller scale subjects you could do this instead of chipping or, on larger scale subjects, alongside chipping. And,, yes, these are good for chipping too, for that I use a cocktail stick dipped in the powder.
Thanks Barry for that. Confirmed what I was thinking. Interesting to hear they can be dry brushed too and also used for chipping.Personally Andrew I would not use them on larger surfaces simply because of the need to seal them and, if you do, you lose some of the metallic effect. You cannot beat spraying a good metaliser for larger surfaces that does not need sealing. So my advice would be to use them in places such as the engine boss over a painted surface,. The underlying paint does affect the finish, not just the colour but the sheen also.
For me the best use is for dry brushing over a painted surface as part of the weathering process. It brings out your highlights while giving the impression of painted metal that has suffered wear and tear (as distinct from chipping). On smaller scale subjects you could do this instead of chipping or, on larger scale subjects, alongside chipping. And,, yes, these are good for chipping too, for that I use a cocktail stick dipped in the powder.
Keep up the good work.....I get the impression you're spending a lot of time in the new modelling room!!
ATB.
Andrew
I see the three faint ejector pin marks on the unpainted assembly including the oval shaped one which is not a design(or could be but references show it flat) but an angled ejector pin mark. As Tim mentioned only two of the pin marks is visible after painting on the slightly blurred image. Won't be seen much with seat belts on and the cockpit is so cramped you can hardly see it from any angle that the cramped space offers. Nothing serious to worry about.
The engine is beautifully painted, Barry.
Cheers,
Richard
The engine is beautifully painted, Barry.
Cheers,
Richard
- Joined
- Apr 27, 2018
- Messages
- 15,043
1/3
Barry,
The engines look spot on.
The engines look spot on.
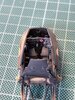
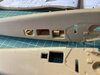
I have been working, quite slowly, on the cockpit grabbing the odd 10 minutes here and there. Still very tied up getting settled into the flat but I am getting there!
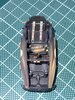
Here are some progress pics of the pit. I am using the Finemold Luftwaffe harness set. These are my ‘second favourite’ seat harnesses behind the 3D printed type. Far more effective than p.e. and less problematical than the fabric type
First two pics of the pit
I used the kit decals for the dials and, combined with some painting and dry brushing are very effective. ZM themselves provide three options for completing the instrument panel.
View attachment 435895
I used Micro Crystal Clear for the dials.
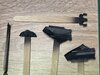
I still need to attach the shoulder seat belts but before I do I need to add some wear to the rear of the seat. I had to split this due to the excellent engineering.
View attachment 435893
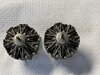
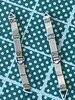
Here are the shoulder seat belts. They are magnified 11 times so any painting faults really show up though they are not visible with the naked eye.
View attachment 435894
Here are some progress pics of the pit. I am using the Finemold Luftwaffe harness set. These are my ‘second favourite’ seat harnesses behind the 3D printed type. Far more effective than p.e. and less problematical than the fabric type
First two pics of the pit
I used the kit decals for the dials and, combined with some painting and dry brushing are very effective. ZM themselves provide three options for completing the instrument panel.
View attachment 435895
I used Micro Crystal Clear for the dials.
I still need to attach the shoulder seat belts but before I do I need to add some wear to the rear of the seat. I had to split this due to the excellent engineering.
View attachment 435893
Here are the shoulder seat belts. They are magnified 11 times so any painting faults really show up though they are not visible with the naked eye.
View attachment 435894
Attachments
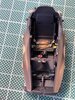
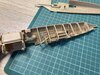
I found ten minutes to do some more work on the pit and have the rear seatbelts in position.
View attachment 435897
View attachment 435898
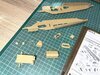
Yesterday I had also prepped some more interior parts. While I will be building the kit largely ‘buttoned up’ I am building, if not painting, the interior detail.
View attachment 435899
View attachment 435897
View attachment 435898
Yesterday I had also prepped some more interior parts. While I will be building the kit largely ‘buttoned up’ I am building, if not painting, the interior detail.
View attachment 435899
Attachments
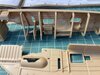
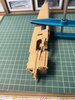
I have decided to depart from the instructions and not attach the cockpit at this stage as otherwise there could be alignment issues and it could be vulnerable to breakage. I have test fitted and I am happy that it won’t give me issues.
So I have started the rest of the fuselage interior. In cementing the bulkheads into position I am temporarily attaching the opposite fuselage side to make sure they are in the correct position.
View attachment 435996
View attachment 435997
Some would suggest that all the level of internal detail is ‘over engineering’. I don’t agree simply because, as you can see, if so minded there are plenty of fuselage panels that could be left off to display it.
View attachment 435998
View attachment 435999
I am really enjoying how this kit is coming together. Perfect fit so far and the instructions give you all the info you need to correctly position everything. Brilliant.
Attachments
Legal Notice
scalemodelling.co.uk is a privately operated online discussion forum. All content posted by members reflects their own views and opinions and does not necessarily represent those of the forum owners or administrators. While reasonable efforts are made to moderate content, no responsibility is accepted for user-generated material. By using this site, you agree to comply with UK law and the forum rules.