Theme editor

Scale Model Shop

Revell 1:32 He 111 P-1

Status
Not open for further replies.
Thread owner
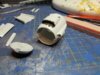
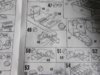
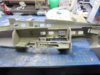
Thanks for the comments Gentlemen. So, a little update. I'm skipping around the build order a bit, so am building various sub - assemblies, starting with the engines. Now then, the instructions would have you insert the exhaust manifolds at this stage.


View attachment 265207


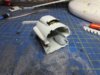
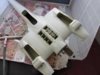
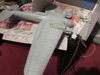
But then how can the be painted later ? So, a little experiment, can I build the engines leaving the front spinner assembly off, allowing the manifolds to be inserted later ?


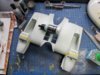
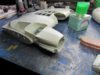
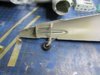
Well, with the help of lots of blu-tak, yes.


View attachment 265208


View attachment 265209


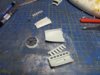
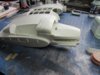
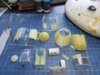
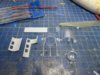
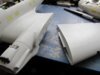
The engines are made of 4 parts (plus the front) and a bit of an unusual shape.


View attachment 265210


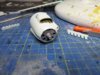
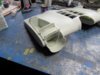
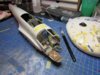
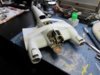
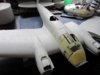
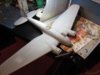
And when you're done, the front pops off allowing plenty of access for the exhaust manifolds to be fitted later.


View attachment 265211


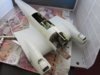
The fit of the parts is really good, so painting shouldn't be a problem, I think. The front may get stuck back on with blu-tak again.
 

Attachments

  • IMG_0590.JPG
    IMG_0590.JPG
    2.5 KB · Views: 0
  • IMG_0591.JPG
    IMG_0591.JPG
    2.7 KB · Views: 0
  • IMG_0592.JPG
    IMG_0592.JPG
    2.8 KB · Views: 0
  • IMG_0593.JPG
    IMG_0593.JPG
    2.9 KB · Views: 0
  • IMG_0594.JPG
    IMG_0594.JPG
    2.9 KB · Views: 0
Thread owner
Finally I'm getting to stick some big bits together, but there could be trouble ahead. Part 28, doesn't have any locating tabs as shown. OK, that might seem to  be no big issue, but a trial fitting of the engine and other bits shows it does have quite a big role in playing where everything sits.


View attachment 265255


First guess is it will have to sit somewhere here. There is actually a really small notch in the lower wing, not mentioned in the instructions which might be a big clue.


View attachment 265256


The next strange thing is theses parts, 32 and 33. The instructions suggest they are fitted after the engine. I can't see how that might be possible. They have locating pins and tabs all over and will not slide after fitting the engine.


View attachment 265257


So, fit them first. Then slide the engine up to them. Can you see part 28, now painted blue, sitting there minding it own business, well.


View attachment 265258


The radiator housing complete with radiator sits right on top of part 28, if that's in the wrong place, the rad' housing can't be seated correctly.


View attachment 265259


Some of these panel lines look a little prominent, but actually they are ok, a bit of sanding and maybe a tiny bit of filler and they will be fine. If you build one of these, please do take your time at this place and trial fit everything, and take revel's instructions as a very rough guide only.


View attachment 265260


But look at the flippin' size of this thing. The wheel wells are huge. The above assembly needs to be left to harden before I tackle any sanding. But not too worry, there's always more to do.
 

Attachments

  • IMG_0602.JPG
    IMG_0602.JPG
    3.2 KB · Views: 0
  • IMG_0597.JPG
    IMG_0597.JPG
    2.4 KB · Views: 0
  • IMG_0595.JPG
    IMG_0595.JPG
    2.8 KB · Views: 0
  • IMG_0598.JPG
    IMG_0598.JPG
    2.6 KB · Views: 0
  • IMG_0596.JPG
    IMG_0596.JPG
    2.9 KB · Views: 0
  • IMG_0600.JPG
    IMG_0600.JPG
    2.7 KB · Views: 0
Wading through vague instructions can be frustrating, but looks like you're nailing this one Colin. Lots of scope for detail and weathering in that scale. Hope you've got somewhere to display it at the end!
 
Thread owner
. Lots of scope for detail and weathering in that scale

Hello Joe, and yes the possibilities are endless. But, I'll just stick to a bit of photo etch. Although, the standard Revell product is quite good without any extras.


So, nearly ready to make a fuselage, but Revell need you to fit the tail wheel first. I would sooner leave it off until the end, but because of how it locates, you have to do it now.


View attachment 265341


Luckily, I remembered to unmask the windows on the inside, before masking on the outside.


View attachment 265342


Then it was time to slap the two halves together. After adding the cockpit, which I nearly forgot about, having made it so long ago.


View attachment 265343


The fit has been very tight. Having said that, at this stage you are lining up four bulkheads at the same time. I started from the back and worked forward. No gaps, but I missed the fuselage creating a bit of a step just behind the large opening you can see. This might just sand out, we'll see.
 

Attachments

  • IMG_0605.JPG
    IMG_0605.JPG
    3.2 KB · Views: 0
  • IMG_0604.JPG
    IMG_0604.JPG
    3 KB · Views: 0
  • IMG_0603.JPG
    IMG_0603.JPG
    2.8 KB · Views: 0
Thread owner
At last, it's starting to look like an aircraft. This was quite a tight fit, but looking good. I've only glued the top wing root joins at the moment. I'll give it an hour and tackle the bottom then.


View attachment 265373
 

Attachments

  • IMG_0606.JPG
    IMG_0606.JPG
    3 KB · Views: 0
Thread owner
Awesome work so far Colin it's looking very good.

Cheers old boy. It's going together rather well, Revell have done a nice job here. Gluing such a big fuselage was always going to be tricky, but it was fine with just a tiny bit of filler here and there, nearly all of the seams just sanded out.


Wing roots, turned out nice, a very good fit. It was difficult to get the fuselage in there, all sorts of horrible noises were made, but no damage.


View attachment 265442


The under side needed a bit more work to make it fit, but nothing difficult at all.


View attachment 265443


Finally, I think I've masked all the glazing, well I really hope so.


View attachment 265444


If you build this model, get yourself a mask set. Well worth the money. This little lot took a few hours and that was using a mask set, without a set I would probably have missed Christmas.


Right, time to stick some more bits together, this little lot make up the bit people like to call the 'gondola' ! Which of course has already been masked and painted, ready for fitting.


View attachment 265446
 

Attachments

  • IMG_0609.JPG
    IMG_0609.JPG
    2.7 KB · Views: 0
  • IMG_0610.JPG
    IMG_0610.JPG
    2.7 KB · Views: 0
  • IMG_0608.JPG
    IMG_0608.JPG
    3.1 KB · Views: 0
  • IMG_0607.JPG
    IMG_0607.JPG
    2.8 KB · Views: 0
Coming along nicely mate. Sure is big and a lot of masking. Good thing it fits well.
 
Very well done on the Masking there Colin, It takes me ages to do a canopy, so good job there mate. 
 
Thread owner
The masking yes, well the mask set was a great help here and highly recommended.


So, the monster has wings.


View attachment 265487


Although, surprisingly for such big wings, the locating of them might be a bit stronger. Time will tell.


View attachment 265488


Anyway, once attached, the fit is really good. Well done Revell.
 

Attachments

  • IMG_0612.JPG
    IMG_0612.JPG
    2.5 KB · Views: 0
  • IMG_0611.JPG
    IMG_0611.JPG
    2.4 KB · Views: 0
Plus one for using the mask set - cutting your own for this amount of glazing is just masochistic. Interesting what you say about the fit - I'm making the Revell 1/72 Halifax at the moment, and the fit is excellent so far. It's the pity the accuracy isn't quite what it might be!
 
Great work Colin, how are you fitting this huge thing on your table.
 
Looking very nice so far. Big bugger as well. Are those wires I saw in one of the photos....Are you putting lights in her. That would be brilliant!


Buy the way. I had to smile at your choice of covering paper in the spray both..... 
 
Thread owner
I had to smile at your choice of covering paper in the spray both

Well the way the pound is going, what else can I do with them ?  And yes, I've abandoned the bombs in favour of a few batteries.

Interesting what you say about the fit

Nice to hear the Halifax is a good fit. One of Revell's latest, the Shackleton was ok, but not as good as this, and this is from 2011.

how are you fitting this huge thing on your table.

Now the fun starts, all wings are attached nearly ready for primer and I'm already knocking things over with the model as it turn it around etc. I've had to stop the build and tidy up, unheard of !
 
Thread owner
Ok, the primer was delayed as I waited for a nice day to take the monster outside. This was sprayed with cheap Wilkinsons' grey primer. It's nice stuff, dries quickly nice and smooth, but easy to sand.


View attachment 266082


The primer highlighted a slightly dodgy seam, easily fixed. The panel on top which looks badly fitted, well it's not actually fitted, just blu tacked in place for now.


Tonight, the underside paint was applied (RLM65 I think) and then post shaded. I used to pre-shade all the time, but these days, not so much, post shading seems to work for me.


View attachment 266083


The contrast might be a bit too much at the moment, but a filter (blue or grey) applied later should sort that out.
 

Attachments

  • Primer.JPG
    Primer.JPG
    2.6 KB · Views: 0
  • Post shaded paint.JPG
    Post shaded paint.JPG
    2.7 KB · Views: 0
Excellent work Colin.


looking forward to seeing this. Do you have a scheme in mind yet?


Cheers


P
 
Thread owner
Excellent work Colin.


looking forward to seeing this. Do you have a scheme in mind yet?


Cheers


P

Thanks Paul. It will just be the typical splinter scheme, followed by kit decals.
 
Thread owner
Coming along nicely Colin, I can see the effectiveness of your post-shading.

On such a large area, skipping pre-shading saved a lot of time. and the post shading, it worked great. I'm not sure I do pre-shading again.
 
Status
Not open for further replies.
Back
Top