Beautiful work barry , ive only just caught up with this one having been away for a week. Really love your build log , its something i usually try and do , i think the step by step style is great for showing other members how easily ( or otherwise!) the kit goes together and shows how you solved any problems or potential pitfalls along the way. Keep the updates coming cheers tony

You are using an out of date browser. It may not display this or other websites correctly.
You should upgrade or use an alternative browser.
You should upgrade or use an alternative browser.
Tamiya 1/32 Spitfire Mk XVIe
- Thread starter BarryW
- Start date
- Status
- Not open for further replies.
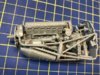
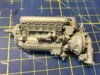
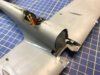
I have been making a fair amoiunt of progress cleaning up join seams on the fuselage and wings and re-scribing where necessary. I have also been making up sub-assemblies, including the superb Merlin engine. This really is a kit in its own right and goes together perfectly. Some of the pipework was a bit complex but a bit of patience was all it needed. There are more parts to the engine and its mount alone than there are in most of the Spitfire kits out there!!!
it does seem a pity not to paint and weather it but I do have 7 more Merlins in my stash to build and I will want some variation in a future build to do a fully painted, weathered and displayed Merlin, so this one will be sealed into the aircraft as previously explained. For that reason I have left off the p.e. and magnets that enable the panels to be removed, something else for a future build.
Some pics.
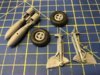
First some of the main sub-assemblies that I have finished ready to paint. I could have left the tyres off to paint the centres first but decided that they will be easy enough to do in-situ after a test fit. Pity they use rubber tyres, one of the less impressive elements of this superb kit. I have aftermarket for one of my later Spitty builds.
View attachment 265028
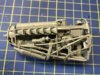
The engine, lots of parts and not finished yet....
View attachment 265026
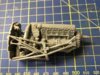
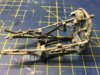
The cradle. It should be easy to paint the cradle and engine seperately in a future build.
View attachment 265027
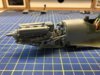
The engine fits snugly in the cradle and all the pipework falls exactly into the right position. The engine is fixed with a screw which pulls it into just the right position as it is tightened.
View attachment 265030
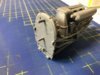
A view of the rear of the firewall and the screw..
View attachment 265029
The firewall dry fitted to the fuselage. Perfect!
View attachment 265031
A few more parts added....
View attachment 265032
All very nicely fitted....
There are still some more parts for the engine build to get on with.... I will finish this off and then pull together some of the sub-assemblies and small parts ready for painting.
it does seem a pity not to paint and weather it but I do have 7 more Merlins in my stash to build and I will want some variation in a future build to do a fully painted, weathered and displayed Merlin, so this one will be sealed into the aircraft as previously explained. For that reason I have left off the p.e. and magnets that enable the panels to be removed, something else for a future build.
Some pics.
First some of the main sub-assemblies that I have finished ready to paint. I could have left the tyres off to paint the centres first but decided that they will be easy enough to do in-situ after a test fit. Pity they use rubber tyres, one of the less impressive elements of this superb kit. I have aftermarket for one of my later Spitty builds.
View attachment 265028
The engine, lots of parts and not finished yet....
View attachment 265026
The cradle. It should be easy to paint the cradle and engine seperately in a future build.
View attachment 265027
The engine fits snugly in the cradle and all the pipework falls exactly into the right position. The engine is fixed with a screw which pulls it into just the right position as it is tightened.
View attachment 265030
A view of the rear of the firewall and the screw..
View attachment 265029
The firewall dry fitted to the fuselage. Perfect!
View attachment 265031
A few more parts added....
View attachment 265032
All very nicely fitted....
There are still some more parts for the engine build to get on with.... I will finish this off and then pull together some of the sub-assemblies and small parts ready for painting.
Attachments
When I built the Mk 9, I thought then that the engine could be a kit by itself. It will be nice to see what you do with this. Opps, I didn't read that bit. Yes cover it up, it will only spoil the flowing lines of the Spitfire with engine panels off.
The engine block construction is now finished.
View attachment 265086
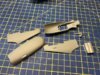
I have also removed and cleaned up the panels (not that there was much clean up...) I did need a spot of Mr Surfacer 500 on the oil cooler join and I will sand that down tonight.
View attachment 265087
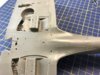
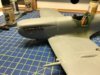
I have attached the wings to fuselage and, what can I say, there is just one word to describe the fit, perfect.... They slotted into place and I just ran a brush of Mr S Cement along the join. The shiny bit on the join is the cement, not filler - no filler at all was needed for this.
View attachment 265088
View attachment 265089
The Mr S Cement is better than Tamiya Extra Thin, works the same but it grips quicker and penetrates further into the joins by capillary action. Having used both I now stick to Mr Cement S and the thicker Mr Cement De Lux. The latter has its uses when you need a longer drying time or cannot use capillary action for some reason.
I have now complete the main construction stage and have just a few parts to remove from the sprues to clean up and then prepare for painting. I will next be bringing smaller parts together onto the airframe while painting where I need to at this stage such as inside the radiators etc.
View attachment 265086
I have also removed and cleaned up the panels (not that there was much clean up...) I did need a spot of Mr Surfacer 500 on the oil cooler join and I will sand that down tonight.
View attachment 265087
I have attached the wings to fuselage and, what can I say, there is just one word to describe the fit, perfect.... They slotted into place and I just ran a brush of Mr S Cement along the join. The shiny bit on the join is the cement, not filler - no filler at all was needed for this.
View attachment 265088
View attachment 265089
The Mr S Cement is better than Tamiya Extra Thin, works the same but it grips quicker and penetrates further into the joins by capillary action. Having used both I now stick to Mr Cement S and the thicker Mr Cement De Lux. The latter has its uses when you need a longer drying time or cannot use capillary action for some reason.
I have now complete the main construction stage and have just a few parts to remove from the sprues to clean up and then prepare for painting. I will next be bringing smaller parts together onto the airframe while painting where I need to at this stage such as inside the radiators etc.
Attachments
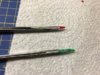
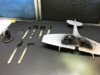
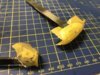
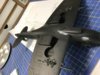
Got on with the last of the sub-assemblies:
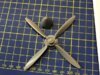
The prop..
View attachment 265118
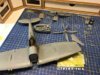
Some fillets added to the fuse/wing join
View attachment 265119
Those need a bit of a clean up - well more of a wipe with a sanding stick really.
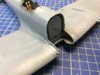
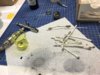
the main and trickiest job tonight will be this:
View attachment 265117
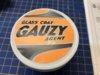
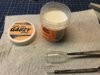
You might be able to see a fine seam running down the top of the transparency. I need to lightly scrape that off and then sand it with various grades of sanding and polishing sponges. I will finish it off with a dip in this (first use of this product)
View attachment 265120
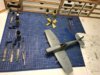
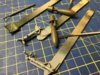
Here is a shot of all the various small parts and sub-assemblies.
View attachment 265121
i will next be gradually pulling all these together painting where needed as I go. Some dangly bits will be left until all the paintwork and weathering is finished of course.
The prop..
View attachment 265118
Some fillets added to the fuse/wing join
View attachment 265119
Those need a bit of a clean up - well more of a wipe with a sanding stick really.
the main and trickiest job tonight will be this:
View attachment 265117
You might be able to see a fine seam running down the top of the transparency. I need to lightly scrape that off and then sand it with various grades of sanding and polishing sponges. I will finish it off with a dip in this (first use of this product)
View attachment 265120
Here is a shot of all the various small parts and sub-assemblies.
View attachment 265121
i will next be gradually pulling all these together painting where needed as I go. Some dangly bits will be left until all the paintwork and weathering is finished of course.
Attachments
G
Guest
Guest
Looking great so far Barry, keep up the great work!!
Those seams are on their Mustangs as well as this Spitty Vaughan.
Anyway, more progress last night.
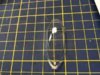
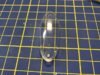
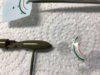
I painted the wing lights on the inside of the transparencies ready to cement to the wing.
View attachment 265171
No worries about the capillary action on the clear paint - that will end up painted over, its only a small area at the tip that will show and I will be masking that off before painting the airframe.
Speaking of the airframe...
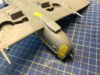
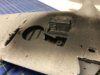
I did a test fit of the engine and panels. While the taped up panels look as if some filler might be needed in places, that is not the case. I will have no need to fill any of the joins as long as I take my time over getting them in position.
View attachment 265168
View attachment 265169
View attachment 265170
View attachment 265167
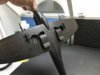
I did manage to get on with the canopy and first of all used some of the masking putty to give it some strength and avoid cracking it during the process:
View attachment 265160
I am not sure how well the pics will show what I did but I have a series of pictures starting with the scraped seams then running down various grades of sander through to polishing sponges to finish off...
View attachment 265161
View attachment 265162
View attachment 265163
View attachment 265164
I then got to this...
View attachment 265165
Not bad but not perfect.
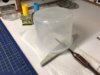
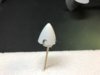
I have never dipped canopies before though I know that it is a standard practise for many to make the canopies look more glass like. Anyway I used this AKI material which is made specially for dipping and here is a pic of the canopy drying.
View attachment 265166
No final pictures yet as I dipped late at night and I had a 4.30am start to today.
I will check them over tonight and get some picture uploaded Monday. I do suspect that I might have to clean them off and re-dip as I think they were left uncovered too long allowing dust to lay....
This is how it was left.
View attachment 265172
I might get a chance to post over the weekend but more likely Monday. Have a great weekend everyone....
Anyway, more progress last night.
I painted the wing lights on the inside of the transparencies ready to cement to the wing.
View attachment 265171
No worries about the capillary action on the clear paint - that will end up painted over, its only a small area at the tip that will show and I will be masking that off before painting the airframe.
Speaking of the airframe...
I did a test fit of the engine and panels. While the taped up panels look as if some filler might be needed in places, that is not the case. I will have no need to fill any of the joins as long as I take my time over getting them in position.
View attachment 265168
View attachment 265169
View attachment 265170
View attachment 265167
I did manage to get on with the canopy and first of all used some of the masking putty to give it some strength and avoid cracking it during the process:
View attachment 265160
I am not sure how well the pics will show what I did but I have a series of pictures starting with the scraped seams then running down various grades of sander through to polishing sponges to finish off...
View attachment 265161
View attachment 265162
View attachment 265163
View attachment 265164
I then got to this...
View attachment 265165
Not bad but not perfect.
I have never dipped canopies before though I know that it is a standard practise for many to make the canopies look more glass like. Anyway I used this AKI material which is made specially for dipping and here is a pic of the canopy drying.
View attachment 265166
No final pictures yet as I dipped late at night and I had a 4.30am start to today.
I will check them over tonight and get some picture uploaded Monday. I do suspect that I might have to clean them off and re-dip as I think they were left uncovered too long allowing dust to lay....
This is how it was left.
View attachment 265172
I might get a chance to post over the weekend but more likely Monday. Have a great weekend everyone....
Attachments
-
 IMG_1621.JPG2.6 KB · Views: 0
 -
 IMG_1622.JPG2.6 KB · Views: 0
 -
 IMG_1620.JPG3.5 KB · Views: 0
 -
 IMG_1619.JPG2.8 KB · Views: 0
 -
 IMG_1618.JPG3.4 KB · Views: 0
 -
 IMG_1617.JPG2.8 KB · Views: 0
 -
 IMG_1615.JPG2.7 KB · Views: 0
 -
 IMG_1614.JPG3.4 KB · Views: 0
 -
 IMG_1611.JPG3.6 KB · Views: 0
 -
 IMG_1610.JPG3.1 KB · Views: 0
 -
 IMG_1608.JPG3.3 KB · Views: 0
 -
 IMG_1607.JPG3.5 KB · Views: 0
 -
 IMG_1606.JPG2.9 KB · Views: 0
A bit more progress this weekend.
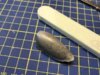
I had to dip the canopy three times in all before I got this result:
View attachment 265363
It does look pretty good. The messy looking bit at the end was where the tweezers held it and all of that is frame that will be painted.
I did my first batch of priming,
View attachment 265361
As you can see I am 'black basing' again.
I did the spinned in white primer. I covers much better than other white paint.
View attachment 265360
Stynylrez is a superb primer but it does take a lot of clean up!!!
View attachment 265362
Some areas needed dry brushing with metallic pigments to make the detail pop out though how much will be seen is a bit doubful.
View attachment 265365
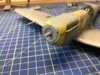
I laid down a base coat on the exhausts with this, AKI Burnt Metal, before attaching the engine panels. There will be other treatments to do after the main painting. The panels fitted well but, surprisingly seeing how well the dry fit went, there was some filler needed in places. While the panels can be made to be removable I really cannot see how that would give a satisfactory appearance given the issues around panel fitting. These really are a complex series of shapes to get right and you cannot see the knock-on effect of a minor misalignment until too late. I am sure the problem is not with the kit itself but I think it is best built either with or without the panels.
View attachment 265367
Finally I have been sorting colours and started masking ready for the next airbrush session. Tonight I will get on with more masking on the main airframe and canopies.
View attachment 265371
I had to dip the canopy three times in all before I got this result:
View attachment 265363
It does look pretty good. The messy looking bit at the end was where the tweezers held it and all of that is frame that will be painted.
I did my first batch of priming,
View attachment 265361
As you can see I am 'black basing' again.
I did the spinned in white primer. I covers much better than other white paint.
View attachment 265360
Stynylrez is a superb primer but it does take a lot of clean up!!!
View attachment 265362
Some areas needed dry brushing with metallic pigments to make the detail pop out though how much will be seen is a bit doubful.
View attachment 265365
I laid down a base coat on the exhausts with this, AKI Burnt Metal, before attaching the engine panels. There will be other treatments to do after the main painting. The panels fitted well but, surprisingly seeing how well the dry fit went, there was some filler needed in places. While the panels can be made to be removable I really cannot see how that would give a satisfactory appearance given the issues around panel fitting. These really are a complex series of shapes to get right and you cannot see the knock-on effect of a minor misalignment until too late. I am sure the problem is not with the kit itself but I think it is best built either with or without the panels.
View attachment 265367
Finally I have been sorting colours and started masking ready for the next airbrush session. Tonight I will get on with more masking on the main airframe and canopies.
View attachment 265371
Attachments
I have been getting on with masking, painting details and airframe preparation
Canopies masked
View attachment 265540
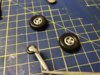
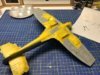
wheels and other bits painted
View attachment 265541
View attachment 265542
View attachment 265547
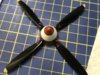
The prop still has a lot of work needed. The right red shade was a problem and I worked on the assumption that it would be the same red as on the roundels. Fortunately I found an exact match between the aftermarket decals I am using and Vallejo MA 71.129 Light Rust. I did not use the decals for the tips and painted these. Yellow is always a problem for coverage and the solution is the Stynylrez yellow primer as it covers beautifully in a couple of light coats and all you need is a coat of the actual yellow shade that you are using over the top.
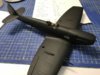
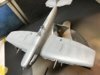
I primed the airframe and I am using black basing again.
View attachment 265545
View attachment 265546
I love this stage as once the primer has dried all the wonderful surface on the model detail is brought out. The qualities that enable this also helps show up the flaws in the build so they can be sorted.
View attachment 265548
View attachment 265549
As you can see there are not many flaws. I have sanded in various places and run a bead of Mr Dissolved Putty along a seam. Tomorrow I will do a little more sanding then another primer coat which hopefully will show the flaws sorted. With luck I will have the airframe ready for painting by Monday.
Canopies masked
View attachment 265540
wheels and other bits painted
View attachment 265541
View attachment 265542
View attachment 265547
The prop still has a lot of work needed. The right red shade was a problem and I worked on the assumption that it would be the same red as on the roundels. Fortunately I found an exact match between the aftermarket decals I am using and Vallejo MA 71.129 Light Rust. I did not use the decals for the tips and painted these. Yellow is always a problem for coverage and the solution is the Stynylrez yellow primer as it covers beautifully in a couple of light coats and all you need is a coat of the actual yellow shade that you are using over the top.
I primed the airframe and I am using black basing again.
View attachment 265545
View attachment 265546
I love this stage as once the primer has dried all the wonderful surface on the model detail is brought out. The qualities that enable this also helps show up the flaws in the build so they can be sorted.
View attachment 265548
View attachment 265549
As you can see there are not many flaws. I have sanded in various places and run a bead of Mr Dissolved Putty along a seam. Tomorrow I will do a little more sanding then another primer coat which hopefully will show the flaws sorted. With luck I will have the airframe ready for painting by Monday.
Attachments

G
Guest
Guest
Barry mate
Your work is of a very high standard. Super job on the cockpit and even better work on the canopy.
Your work is of a very high standard. Super job on the cockpit and even better work on the canopy.
Is that primer as smooth as it looks. It sure looks silky smooth to me.
The photo got me thinking.... Has anyone on here done one of the few night fighter Spitfires?
The photo got me thinking.... Has anyone on here done one of the few night fighter Spitfires?
Smooth as a baby's bottie Ian.......
got a bit more done. Finished dealing with the flaws and applied a final primer coat.
View attachment 265591
View attachment 265592
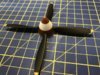
also applied some of the Tammy decals to the prop. They did splinter a bit but managed to piece the splintered ones together.
View attachment 265593
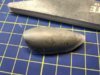
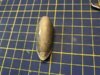
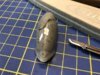
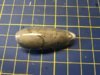
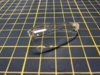
Tried applying decals to the bombs. Had a bit of a failure what with splintering Tammy decals and their inability to conform to the curves of the bombs.
View attachment 265589
I spent ages trying to work one into place with it eventually falling apart. Choice now is either to try masking to paint these coloured stripes, leave the bombs off and just have the bomb cradles empty as in a picture I have seen of the aircraft or fit them without the stripes. I am inclined to the latter but I will play around trying to get some masking laid down accurately.
got a bit more done. Finished dealing with the flaws and applied a final primer coat.
View attachment 265591
View attachment 265592
also applied some of the Tammy decals to the prop. They did splinter a bit but managed to piece the splintered ones together.
View attachment 265593
Tried applying decals to the bombs. Had a bit of a failure what with splintering Tammy decals and their inability to conform to the curves of the bombs.
View attachment 265589
I spent ages trying to work one into place with it eventually falling apart. Choice now is either to try masking to paint these coloured stripes, leave the bombs off and just have the bomb cradles empty as in a picture I have seen of the aircraft or fit them without the stripes. I am inclined to the latter but I will play around trying to get some masking laid down accurately.
Attachments
G
Guest
Guest
Certainly coming along nicely now mate. Looking forward too some camo on it.
I have been getting on with some painting:
First I went over the model with a sanding sponge, specifically a very fine polishing sponge more like. I do this between all coats of paint to smooth out any small irregularities. You can feel the difference with your finger before and after.
View attachment 265766
The model is wiped of dust with a damp piece of kitchel towl after. The pic above is before the wipe showing the dust.
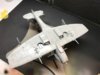
I sprayed the underside MSG with my usual method, buyilding up in light coats and then mixing a few drops of white into the cup, thinning it down and spraying the lightened, thinned mix into the centre of panels and on any areas that would catch the light when looking at the model. I finish with a mist spray of the base colour to bring it all together and reduce the contrast to how I want it to look. This gives a good modulated appearance.
View attachment 265765
I masked the underside where necessary.
View attachment 265767
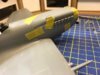
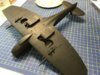
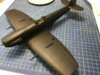
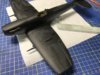
And sprayed RAF Ocean Grey on top, applying my usual modulating method. The picture looks a bit bleached out under the light and lighter than the underside - it is not... It really is a bit darker...
View attachment 265768
I have also been applying some washes to the dangly bits. I will produce pictures of those when I have progressed them some more.
Hopefully tonight I will have a chance to apply the camo masking and paint the dark green.
First I went over the model with a sanding sponge, specifically a very fine polishing sponge more like. I do this between all coats of paint to smooth out any small irregularities. You can feel the difference with your finger before and after.
View attachment 265766
The model is wiped of dust with a damp piece of kitchel towl after. The pic above is before the wipe showing the dust.
I sprayed the underside MSG with my usual method, buyilding up in light coats and then mixing a few drops of white into the cup, thinning it down and spraying the lightened, thinned mix into the centre of panels and on any areas that would catch the light when looking at the model. I finish with a mist spray of the base colour to bring it all together and reduce the contrast to how I want it to look. This gives a good modulated appearance.
View attachment 265765
I masked the underside where necessary.
View attachment 265767
And sprayed RAF Ocean Grey on top, applying my usual modulating method. The picture looks a bit bleached out under the light and lighter than the underside - it is not... It really is a bit darker...
View attachment 265768
I have also been applying some washes to the dangly bits. I will produce pictures of those when I have progressed them some more.
Hopefully tonight I will have a chance to apply the camo masking and paint the dark green.
Attachments
G
Guest
Guest
Smooth as a baby's bottie Ian.......
I've just primed my second model with this stuff, it is staggeringly good, just waiting for Badger to release a whole range of colours like this - they'll kill off all the competition.
It seems also, to be unbelievably tolerant of conditions - I had a bit left in my cup, so played around with it on a bottle, doing all the things we shouldn't do, and it still ends up a perfect surface!!!
edied to add: Ah, it appears that they do, it's just impossible to find them without being sent around in circles...
John, - John at SMS has them all in stock in the 120ml bottles and most colours in the smaller bottles.
http://www.scalemodelshop.co.uk/badger-stynylrez-primers-38.html
The couple of the smaller bottles John does not have are available here:
http://www.scalemodelshop.co.uk/badger-stynylrez-primers-38.html
Stunning work Barry. Absolute text book example of how to paint and finish a model.
Have you thought about reverse masking the stripes on the bombs? I.e. Paint the stripe colour first then apply a thin stripe mask then paint the bomb colour. Might make masking a little easier?
Again, superb stuff.
Paul
Have you thought about reverse masking the stripes on the bombs? I.e. Paint the stripe colour first then apply a thin stripe mask then paint the bomb colour. Might make masking a little easier?
Again, superb stuff.
Paul
Stunning work Barry. Absolute text book example of how to paint and finish a model.
Have you thought about reverse masking the stripes on the bombs? I.e. Paint the stripe colour first then apply a thin stripe mask then paint the bomb colour. Might make masking a little easier?
Again, superb stuff.
Paul
Thanks Paul - no I had not. I will look at doing that. Thanks for the input.
- Status
- Not open for further replies.
Legal Notice
scalemodelling.co.uk is a privately operated online discussion forum. All content posted by members reflects their own views and opinions and does not necessarily represent those of the forum owners or administrators. While reasonable efforts are made to moderate content, no responsibility is accepted for user-generated material. By using this site, you agree to comply with UK law and the forum rules.