Theme editor

Scale Model Shop

Gern's 'Less than a fiver' Cosford build.

Status
Not open for further replies.

Gern

Well-known member
Joined
May 17, 2009
Messages
9,320
Reaction score
235
Points
63
1/3
Thread owner
As usual, I'm behind everyone else in this mini GB, but I have made some progress. I picked the old Airfix 1/72 Boulton Paul Defiant and I put up the box and sprue shots in the Cosford thread. Here's where I'm at:

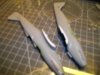
View attachment 279806

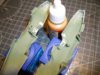
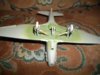
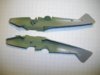
Interior parts fitted - both of them! I may add a seat cushion from milliput depending on how well the pilot figure fits.

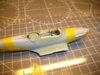
View attachment 279807

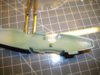
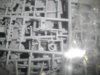
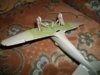
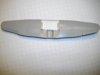
I blanked off the u/c bays as otherwise you'd be able to see right through into the cockpit. I put the ailerons at slight angles to help hide the fact they're too short by nearly 2mm. Lots of fettling on the wings as they were slightly different sizes - which is why the trailing edges have slight curves here and there.

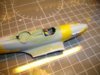
View attachment 279808 View attachment 279809

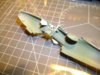
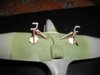
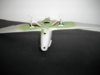
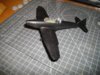
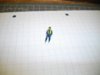
Pilot figure done. I'll have to include him to hide the lack of other details in the cockpit - and I'm not adding huge lots of 'scratch' on a cheap build.

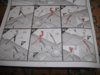
View attachment 279810
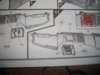
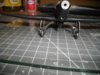
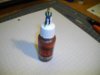
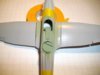
Ooops! Some plasticard inserts will fill those gaps at the wing roots, and some serious sanding to fair them in properly. At least the fuselage seam looks like it should clean up with minor filling and sanding.

I have vague memories of building this kit as a child and I don't remember having to think how to solve any of the problems shown. Were my standards that low I'd accept anything that I could get to glue together?

I know I only paid £4.00, but I'm thinking now I should have charged the dealer for taking it off his hands!

Anyway, it's all good practise and stress free as I'm not looking for any sort of special final result. Please folks, if we do this sort of thing again, give me a kick up the butt if you see me picking up an old Airfix kit!!!
 

Attachments

  • IMGP2198.JPG
    IMGP2198.JPG
    2 KB · Views: 0
  • IMGP2199.JPG
    IMGP2199.JPG
    1.6 KB · Views: 0
  • IMGP2200.JPG
    IMGP2200.JPG
    1.6 KB · Views: 0
  • IMGP2201.JPG
    IMGP2201.JPG
    2 KB · Views: 0
  • IMGP2202.JPG
    IMGP2202.JPG
    2.1 KB · Views: 0
Its certainly an old dog dave , i think this ones older than me ! Perhaps the one you built as a kid wasnt just rose coloured glasses , the mould being a lot newer and unworn it probably did fit better. Its a kit with well known outline inaccuracies and detail typical of the time its no wonder airfix decided to release a new version. Anyways great start , the pilot looks excellent and will do a sterling job of hiding the lack of any cockpit, cheers tony
 
Thread owner
Thanks guys.

Tony - You're probably right about the fit being better with a newer mould all those years ago. I do like the Defiant and had a look at the new Airfix (sucker for punishment or what?) 1/48 release. Looks impressive from the reviews so I've bought one.
 
I don't remember having to think how to solve any of the problems shown
Well, two things here. Firstly, we weren't bothered. It was all done in a weekend. Secondly, we expect so much more these days.
However, only true modellers battle with ancient kits (even though we like the new ones now)
 
Thread owner
Col - You got a point there. I used to buy kits as toys - not as faithful representations of the real thing - so the quicker they were built, the quicker I could put them into my war games.

Tony - Just checked. There is indeed a new tool Defiant in 1/72. Looks pretty good too - certainly a VAST improvement over the original!

Ron - My fault!!!???? 'twas you what suggested the 'Under a fiver' build! I can't hardly see 'ow you make it out to be my fault for buyin' a small box!

Next year I'm gonna suggest we all do an 'Over £50' build! THAT'LL sort the men from the boys - and the big box specialists from the amatchoors! Mind you, I 'spect I'll be the only one entering so I'll be able to cope with the competition.
 
Thread owner
OK. Thanks to the quality of work from the rest of the guys in this 'ere cheapo build, I've been forced to try and improve the kit offering. Thanks guys :confused:!

Here's what Airfix offer in their new tool 1/48 kit (which looks very, very nice in the box):

View attachment 279972

This is the best I can do. A quick respray of the interior green and pick out the extras with black and it should be OK:

View attachment 279970

View attachment 279971

Trying to give some idea of scale:

View attachment 279974

I've added some plasticard strips to fill the gaps at the wing roots. I thought this would be the easiest way (Bit blurry 'cos my nerves are shot having fiddled around with all those tiny bits! But you get the idea). I'll trim them to fit when I join the wings to the fuselage:

View attachment 279973


But that's it for the interior! I've still got my Shilka and King Tiger to finish so I don't want to be spending too long on this thing.
 

Attachments

  • IMGP2207.JPG
    IMGP2207.JPG
    3 KB · Views: 0
  • IMGP2203.JPG
    IMGP2203.JPG
    2.8 KB · Views: 0
  • IMGP2204.JPG
    IMGP2204.JPG
    3 KB · Views: 0
  • IMGP2205.JPG
    IMGP2205.JPG
    2.4 KB · Views: 0
  • IMGP2206.JPG
    IMGP2206.JPG
    2.8 KB · Views: 0
Good work Dave. I think it's often worth tarting up a blank cockpit a bit. Even if it wasn't accurate, it's better than nothing. I like to employ a lot of 'artistic license' at times.
 
Thread owner
Thanks guys.

Col - You're right, it is better to have something there. I've test fit the pilot and canopy, and I'm quite surprised that you can still see the additions. So my time wasn't completely wasted.

View attachment 280110 View attachment 280111
 

Attachments

  • IMGP2209.JPG
    IMGP2209.JPG
    2.8 KB · Views: 0
  • IMGP2208.JPG
    IMGP2208.JPG
    2.9 KB · Views: 0
Thread owner
Time for the undercarriage. Oh dear:(

This is all that you get in the box:

View attachment 280339

Using the 1/48 version as a reference, this is what should be there:

View attachment 280338

You can't see it too well I'm afraid, but part 33 (step 39) consists of two seperate struts linked by a triangular structure:

View attachment 280340

Looks like I gotta break out the plastic rods and card .....
 

Attachments

  • IMGP2222.JPG
    IMGP2222.JPG
    2.7 KB · Views: 0
  • IMGP2223.JPG
    IMGP2223.JPG
    2.9 KB · Views: 0
  • IMGP2224.JPG
    IMGP2224.JPG
    2.8 KB · Views: 0
Thread owner
OK, best I can do:

View attachment 280355 View attachment 280356

Hopefully they'll look OK under a coat of black (the white tack is just to help hold them in place while the glue sets up).

Can I remind you folks to give me a really good kick up the butt if you see me looking at an old Airfix kit at any of the shows please?

Bit of foam in the cockpit and off to the spray booth.
 

Attachments

  • IMGP2225.JPG
    IMGP2225.JPG
    2.1 KB · Views: 0
  • IMGP2231.JPG
    IMGP2231.JPG
    1.4 KB · Views: 0
OK, best I can do:

View attachment 280355 View attachment 280356

Hopefully they'll look OK under a coat of black (the white tack is just to help hold them in place while the glue sets up).

Can I remind you folks to give me a really good kick up the butt if you see me looking at an old Airfix kit at any of the shows please?

Bit of foam in the cockpit and off to the spray booth.
Keep going Dave your doing great. You'll get that nice warm feeling inside after the battle/fight is over.
 
Thread owner
Keep going Dave your doing great. You'll get that nice warm feeling inside after the battle/fight is over.

I do get some satisfaction from any little improvements I may make to a kit, but I still prefer to build 'shake and bake' kits and leave my few scratch talents to dios.
 
Thread owner
I decided I'd finish off the u/c before painting:

View attachment 280358
View attachment 280360

Not brilliant, but I think it looks better than it would if I hadn't bothered.

Off to bed methinks. It's back to the salt mines today .....
 

Attachments

  • IMGP2232.JPG
    IMGP2232.JPG
    2.7 KB · Views: 0
  • IMGP2234.JPG
    IMGP2234.JPG
    2.8 KB · Views: 0
Thread owner
A little more progress:

Canopy and pilot dry fit, but painted and Kleared ready for decals

View attachment 280931

My additions to the U/C don't look too bad, but the pic shows I've missed some clean-up on the front edges!

View attachment 280932
 

Attachments

  • IMGP2246.JPG
    IMGP2246.JPG
    2.8 KB · Views: 0
  • IMGP2247.JPG
    IMGP2247.JPG
    2.8 KB · Views: 0
Status
Not open for further replies.
Back
Top