Theme editor

Scale Model Shop

Colin M's Bristol F.2b Fighter. 1/32 wingnut wings

Status
Not open for further replies.
The black curvy bit ? I've also just noticed a few holes in the belt, filled with paint. Isn't macro photography brilliant !

Ya, sometimes it can be such a damper of a tool after all the work is done. It happens to me all the time...only thing is to bite the bullet and do the corrections. :tired:

Cheers,
Richard
 
My eyesight isn't 20:20 , all i see on the curved piece is a groove ? which , if following picture is correct , may be meant to be there

bristol_f.2b_026_of_106.jpg


( picture for discussion purposes only )
 
I would suggest It won't be a solid bar but a flat piece of metal bent to shape, thus leaving a seam.
If you look closely at the strengthening bars supporting that grey thingy just above, they too have a seam.

So don't you dare touch them - or it's no Tunnocks for you at Cosford next year matey!
 
Hi Colin,

I could be wrong and maybe a highlight but sure looks like a seam...anyway it's too fine and only be picked up if someone literally peers in and looks at it with a magnifier which I doubt it. Leave it if you're ok with it. Doesn't take away the fine painting of the cockpit.

View attachment 311557

Cheers,
Richard
 

Attachments

  • Pit 1.JPG
    Pit 1.JPG
    3.7 KB · Views: 0
:tears-of-joy: This brings to mind recently regarding seam lines. A group of us were invited to the Air Base in Butterworth and had a walk around an F-18 with an Anniversary livery. On close up at the pylons it was noted that there were seam lines with paint over duck tape to cover surface damage. So now if we see anyone building an F-18 decaled with the same Anniversary livery with smooth painted pylons, we'd tell them they got it all wrong and we have pictures to prove it that the manufacturer got it right with the seam line.

This goes to show that every individual plane will have its diferences in finishing, even more so if it were handmade. But as for tubing I recall seamless pipes were used for aircraft and bicycle frames as they were more lightweight with thinner walls.

Cheers,
Richard
 
Thread owner
That is stunning work Colin. Very impressive indeed. The engine and cockpit are gorgeous. More of the same please
 
Thread owner
A touch more work has been done. The instructions suggest various Humbrol and Tamiya paints as well as other manufacturers. Well as it happens, H121 is an old enamel paint I actually have, so out it came. The 40 year old paint needed a bit of a stir, but soon came back to life. I've had Vallejo paints die after 2 or 3 years !
So, H121 was sprayed on the underside surfaces (but not the fuselage, that's PC10) then the ribs were masked ready for a bit of highlighting and weathering.
View attachment 311937

Removing the tapes gave me this,

View attachment 311938

It doesn't look too bad, anyway, its not likely to be seen often !
 

Attachments

  • Ribs 2.JPG
    Ribs 2.JPG
    2.7 KB · Views: 0
  • Ribs 1.JPG
    Ribs 1.JPG
    2.9 KB · Views: 0
Beautiful work colin , the engine is superb , as is the cockpit , looking forward to the next update , cheers tony
 
Hi Colin
The engine is superb - looks so realistic. Cockpit is also a work of art. Wing painting with the ribs masked has worked a treat. A real top job :thumb2:
Jim
 
Superb looking engine and office Colin, turning into a real gem.:hungry:
Great paint job of the wings too.:thumb2:
 
Thread owner
Thanks for the interest gentlemen. I haven't posted in a while, but I have been busy doing the odd job on my build.
If you look carefully in this picture, you will find lots of little bits of Bristol F.2b, honestly, it's there somewhere.
View attachment 312606

Something more obvious, the PC10 has been painted along with my choice of Battleship grey. Now, whilst in this dismantled state, it's time for decals. Funny how these WW1 things go together. So, I've just slapped a couple of coats of 'Klear' on the wings ready for the decals. Whilst this is all drying, I've now reached that 'awful' stage of the F.2b build, and that is fitting the lower wing to, well nothing. The lower wing doesn't meet the fuselage, it just passes straight underneath attaching to the fuselage by some little tiny struts - an alignment nightmare. Wish me luck, I'm going in.
View attachment 312607
 

Attachments

  • Painted.JPG
    Painted.JPG
    2.9 KB · Views: 0
  • Mixed in.JPG
    Mixed in.JPG
    2.9 KB · Views: 0
Thread owner
Well that's a bit of a cock up. I've painted the ailerons of two wings up side down. Oh well, not difficult to fix. Although, many parts on these aircraft were interchangeable, that's got me thinking a bit. But look at that amazingly bright decal, not to worry, it's in for some 'treatment' to blend it in a little bit better later.
View attachment 312943

The fuselage is basically built. Not many decals to add, which is quite nice compared to modern aircraft. I'll probably go for a satin varnish before carrying on with the weathering, I'm not sure a mat varnish would be quite right for a WW1 RFC aircraft.
You can see here what I was on about earlier when I said the lower wing didn't actually meet the fuselage. To align this little lot up I resorted to good old liquid poly cement. A nice slow drying time to give me a chance to align it all up. More extra bright decals to 'deal' with...
View attachment 312944
 

Attachments

  • Fuse decals.JPG
    Fuse decals.JPG
    2.6 KB · Views: 0
  • Doh.JPG
    Doh.JPG
    2.5 KB · Views: 0
A real stunner Colin. You must be very pleased with the look. Keep up the great work sir:thumb2:
 
Thread owner
glad I’m not the only one that makes mistakes like that
Oh I make plenty. I just haven't worked out an excuse for this one yet.

Thanks for stopping by gentlemen, another small update.
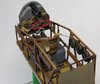
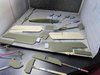
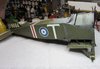
I'm slowly getting used to this oil weathering thing some people do. It's actually not too difficult, the only real downside is waiting a while for the oils to dry. So, slap some dots of oil on,
View attachment 313148

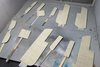
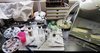
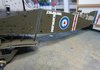
The brush them around a bit, and blend with some thinners, and you get a very subtle result. It's not easy to see in a photo, but look at the wing under the fuselage, that hasn't been oiled.
View attachment 313149

You can also see above my attempt at a bit of bungee cord around the landing gear struts - stop laughing at the back, I did say attempt. This detail is moulded, but bit soft. Unfortunately, some earphones paid the ultimate price to assist me here. Paint will be applied to make them a bit more bungee coloured and not Kevlar coloured - Kevlar in WW1...…...

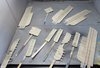
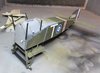
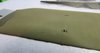
And finally, as all that oil is drying, I've started fitting the rigging eyes. I don't know how you spent your Sunday evening, but it WAS more interesting than fitting these little things. How many are there, I have no idea, it's just something I'll do, a few at a time, then I'll go and watch the grass grow, just for excitement.
View attachment 313156
One wing done, oh joy.
 

Attachments

  • Oil completed.JPG
    Oil completed.JPG
    2.6 KB · Views: 0
  • Oil dots.JPG
    Oil dots.JPG
    2.7 KB · Views: 0
  • Eyes.JPG
    Eyes.JPG
    1.5 KB · Views: 0
Status
Not open for further replies.
Back
Top