1/3
Just had a catch up John. Great building work, especially the cobbles. Love the colour variation. The water technique looks interesting so it will be good to see where it goes next!

Hi Tim, nice of you to look in. Thanks.Just had a catch up John. Great building work, especially the cobbles. Love the colour variation. The water technique looks interesting so it will be good to see where it goes next!
Thanks Andrew.John
Hats off to you. Looking very good indeed!
ATB
Andrew
Certainly hope it works Andy, thank you.You are doing a sterling job there John, this will be something really fabulous when it's done.
Andy.


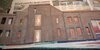
 By now I'd cut the balsa for the door frames, the foam board has dried and has the correct blend of mortar.
 Brick work has come out well, some areas had another very light wash applied to give the appearance of lighter and darker firings of the bricks.
Hi Joe, thanks for looking in, posts nearly crossed.Fantastic Progress John,,, really enjoying the colors Keep up the great work
No Joe, the first coat or two of the grey is just a cheap acrylic , used as a primer the just paint the rest with the washes etc as required. HTH.forgot to ask last time I posted..did you have to treat the foam board with anything before painting began?
")
Hi Jim, glad your enjoying it. No problem with being late ever .Thank you .Just went through the hole thread from start to finish, please excuse my lateness.
Wonderful work so far John, keep it up Buddy :thumb2:
Jim.
Thanks Andy.Stunning work John.
Think your right Si, it's the only time I really feel I know what I'm doing !Superb work John, your in your element when it comes to the building work:thumb2:
Thanks Neil. Yes it does try to curl, but I used to then stick another sheet to the paper side and counter it. This time I've found that placing heavy weights ( those steel bars about 150mm x 25 x 25. seem to cure it. Using another sheet of board seemed to be a rather expensive way,suppose I could have used a cheaper foam board and not Kappa for the back .Superb, John, just superb!
I was wondering, do you not have a problem with the foam board curling up after removing one layer of card?
Right it is Bob:smiling3: as I said to Si it's the only time I know what I'm doing :nerd:Right load of cobblers
You have got this building lack off to a big T, fantastic John
Thanks Andrew.Great work again John.
ATB
Andrew
John, you have found the right material to work your magic on and making inroads with leaps and bounds. Very much like your cobble stones and brick work.
Cheers,
Richard
Thanks Rick, perhaps I should just do buildings !There you go JR.........out of the mouth of babes......your bricks and cobbles are a wonder! Rick H.
Hi Jim.Hi John
Using pigments for the mortar and between the cobbles is a clever idea and has worked well. The balsa wood framing is good. Do you have problems with the wood splitting when pinned?
Jim

scalemodelling.co.uk is a privately operated online discussion forum. All content posted by members reflects their own views and opinions and does not necessarily represent those of the forum owners or administrators. While reasonable efforts are made to moderate content, no responsibility is accepted for user-generated material. By using this site, you agree to comply with UK law and the forum rules.